Create Flawless Cakes and Elegant Desserts with Professional Acetate Strips
A complete guide to using acetate cake collars for smooth finishes and beautiful layers
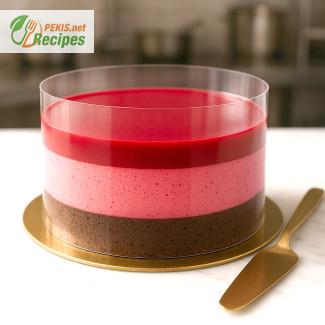
Acetate cake collars have become an indispensable tool for both professional pastry chefs and home bakers who aim to achieve clean finishes, precise layering, and elegant presentation. These transparent strips offer structure and support during assembly and help in the easy release of delicate desserts like mousse cakes, cheesecakes, and entremets. This comprehensive guide explores everything you need to know about choosing and using acetate collars effectively, so you can create visually stunning and professionally finished desserts every time.
What are acetate cake collars and their uses?
Acetate cake collars are transparent food-grade plastic strips that are flexible yet sturdy enough to hold layers of cake, mousse, or cream in place during assembly. Often referred to as cake film or mousse strips, these tools are typically made from polyethylene terephthalate (PET) and are completely safe for direct contact with food.
The primary purpose of acetate collars is to help build desserts in defined, uniform layers and to prevent smudging or sticking along the sides of the dessert. They’re widely used in:
- Layered mousse cakes
- No-bake cheesecakes
- Entremets and specialty pastries
- Chocolate decorations and tempered shapes
- Plated desserts assembled in molds
Whether you're constructing an elegant wedding cake or an individual dessert cup, acetate collars provide the support and clean edge you need for that perfect finish.
Top benefits of using acetate strips in cake decorating
Using acetate collars goes far beyond aesthetics. Their practical benefits can transform the way you approach pastry decoration and assembly.
- Smooth, professional finish: Acetate ensures the sides of your desserts remain pristine after de-molding.
- Clean layering: Each mousse or cream layer stays distinct without blending into the next.
- Structural support: Provides stability to delicate desserts as they set, especially those with airy textures like mousse.
- Easy unmolding: Desserts slide away from acetate smoothly without tearing or damaging the surface.
- Hygienic barrier: Acts as a protective layer during storage or display.
These benefits make acetate collars an essential tool for anyone aiming to elevate their dessert presentation.
How to choose the right size acetate collar for your cake
Selecting the correct height and thickness of acetate strips is essential for achieving your desired results. The size should correspond to both the height and diameter of your cake or mold.
Height:
- For mousse cakes: 5 cm to 8 cm (2 to 3 inches)
- For tall entremets or layered cakes: 10 cm to 12 cm (4 to 5 inches)
- For mini desserts or dessert cups: 4 cm (1.5 inches)
Length:
- Should wrap around the entire circumference of your mold or ring, usually between 60 cm to 90 cm (24 to 36 inches), depending on the size.
Thickness:
- Standard thickness ranges from 100 to 125 microns.
- For curved designs or chocolate work, a thinner strip (75 microns) may be more flexible and easier to shape.
Always measure your mold or baking ring before cutting the acetate to size. Most rolls can be easily trimmed with scissors.
Step-by-step guide: applying acetate collars to layered cakes
Working with acetate collars is simple once you understand the process. Follow these steps to ensure perfect layering and clean results every time.
- Measure and cut the acetate strip to fit around your cake ring or mold.
- Place the collar inside the mold, securing the ends with tape if necessary.
- Build your dessert in layers, starting with the base (sponge, biscuit, or crust), followed by mousse or filling layers.
- Smooth each layer carefully with a spatula to maintain a level surface.
- Chill the dessert until fully set—this is critical for structure and clean release.
- Peel off the collar gently once the cake is ready to be served or decorated.
Pro tip: Always apply the collar before pouring in any liquid or semi-liquid filling to avoid mess and ensure a snug fit.
Acetate vs. parchment paper: which is better for cake layers?
While parchment paper is widely used in baking for lining pans and preventing sticking, it doesn’t offer the same structural benefits as acetate. Here's a quick comparison:
| Feature | Acetate Collar | Parchment Paper |
|---|---|---|
| Transparency | Yes | No |
| Supports vertical layers | Yes | No |
| Clean finish | Excellent | Moderate |
| Reusability | Limited | Disposable |
| Mold compatibility | High (conforms to shapes) | Low |
For decorative or layered desserts, acetate is the superior option, particularly when presentation matters.
Where to buy high-quality acetate cake collars
Acetate collars are widely available both online and in specialty baking stores. Look for food-grade PET options from trusted baking supply brands. Consider purchasing:
- Pre-cut strips for convenience
- Rolls (typically 10 m to 50 m) for large-scale or repeated use
Recommended sources include:
- Professional kitchen supply stores
- Specialty pastry and chocolate suppliers
- E-commerce platforms like Amazon, Etsy, or niche baking websites like pekis.net
Always verify the thickness, length, and food-safe certification when purchasing online.
DIY acetate cake collars: making your own at home
If you’re in a pinch or prefer to customize your own size, you can make DIY acetate collars using materials available at craft or stationery stores. Here's what you need:
- Clear transparencies or report covers made from PET
- Scissors or rotary cutter
- Non-toxic tape for sealing ends
Important: Ensure the plastic is labeled as food-safe and free of BPA or other harmful chemicals. While DIY options are handy, they may lack the flexibility and smoothness of professional acetate, so use with care.
Cleaning and reusing acetate cake collars: tips and tricks
Though acetate collars are generally considered single-use, careful handling allows for limited reuse:
- Gently wipe the collar with a soft cloth and warm soapy water after use.
- Avoid harsh scrubbing that can scratch the surface.
- Let dry flat or vertically to maintain shape.
Reusing is more suitable for non-greasy desserts, such as tempered chocolate work or dry-set mousses. Over time, acetate may lose its clarity or develop bends, so it’s best to replace it regularly for consistent results.
Common mistakes to avoid when using acetate in baking
Avoiding these pitfalls can dramatically improve your results:
- Not securing the collar tightly around the mold, leading to leaks or uneven sides
- Overfilling the mold, which can cause mousse to spill over the collar
- Peeling off too early, which may damage unset layers
- Using the wrong thickness, causing buckling or difficulty in shaping
Take your time to set up the collar properly and follow each step with attention to detail.
Enhancing mousse dessert presentation with acetate collars
Acetate allows you to craft elegant desserts with polished edges and perfect symmetry. Try these techniques:
- Layer vibrant fruit mousses for a colorful visual effect
- Pipe contrasting lines of creams or purées between mousse layers
- Add decorative chocolate shards or mirror glaze for visual appeal
Whether it’s a raspberry mousse or a layered matcha entremet, the acetate collar acts like a canvas for your creativity.
Are acetate cake collars safe for food use?
Yes, food-grade acetate is non-toxic, BPA-free, and designed for direct food contact. When buying, look for materials labeled:
- PET (Polyethylene Terephthalate)
- FDA-approved or EU-compliant
Always avoid craft plastics or industrial-grade sheets not specifically made for culinary use. Trust in certified baking supplies to keep your desserts safe and hygienic.
Innovative decorating techniques using acetate strips
Beyond basic layering, acetate can be used for advanced pastry designs:
- Chocolate curls and spirals: Pour melted chocolate onto acetate, shape, and chill.
- Custom chocolate bands: Wrap around cakes for a luxury finish.
- Shaped mousse inserts: Pour fillings into acetate-lined molds for artistic effects.
Experiment with textured mats, colored chocolate, or edible glitter for impressive results.
Storing your acetate collars: best practices
To maintain acetate strips in optimal condition:
- Store flat or rolled loosely to avoid creasing.
- Keep in a cool, dry place, away from heat or sunlight.
- Avoid stacking heavy objects on top to prevent deformation.
If using pre-cut strips, keep them in airtight packaging to avoid dust or kitchen residue.
Acetate collars for cheesecakes: achieving smooth edges
Cheesecakes benefit from acetate just like mousse desserts. To use:
- Line the sides of a springform pan or ring with acetate before adding your filling.
- Chill until fully set before removing the collar.
The result is a cheesecake with flawless edges, ideal for adding ganache or fruit toppings without smudging the sides.
Troubleshooting: dealing with acetate collars sticking to cakes
If your collar sticks to the dessert:
- Let the dessert chill completely before removing the acetate.
- Warm the collar gently by rubbing your hands along the outside.
- Run a thin knife dipped in warm water between the collar and dessert, if needed.
Using high-fat content in mousse (such as heavy cream or mascarpone) usually helps reduce sticking, and a light spritz of neutral oil can assist as a barrier.
With the right techniques and a reliable set of acetate cake collars, your layered creations can reach new levels of elegance and precision. Whether you're crafting a birthday mousse cake or plating individual desserts for a wedding, acetate strips ensure your hard work looks as good as it tastes.