Discovering the Flavor and Tradition of Venezuelan Arepas
A timeless staple reinvented for modern kitchens
There are few dishes that embody the soul of a country as beautifully as arepas do for Venezuela. With their crisp golden exterior, soft interior, and versatility that bridges breakfast, lunch, or dinner, arepas have earned their place in kitchens around the globe. But what truly sets them apart is their authentic simplicity—made with just a few ingredients, yet capable of carrying the flavors of a nation. Whether filled with cheese, beans, shredded beef, or avocado, arepas are more than food—they're tradition on a plate.
As global interest in Latin American cuisine grows, arepas are emerging as a standout choice for those seeking dishes that are both nourishing and culturally rich. Their rise in popularity isn't just due to trend—it’s about returning to honest, home-style food that offers both comfort and depth. Rooted in indigenous culinary practices and embraced by generations of Venezuelan families, authentic arepas are a reminder that great cooking doesn’t need to be complicated.
What makes Venezuelan arepas unique?
Unlike other corn-based breads or patties, Venezuelan arepas are made from precooked white cornmeal, traditionally known as masarepa or harina PAN. This key ingredient gives them their signature texture—light yet satisfying, with a pleasant chewiness that makes them ideal for stuffing or topping. Unlike Colombian arepas, which are often thinner and served as a side, the Venezuelan version tends to be thicker, more pillowy, and typically split and filled with a variety of savory ingredients.
Their strength lies in versatility. From street vendors in Caracas to fine dining interpretations across New York and Madrid, arepas have found a home in diverse culinary scenes. They can be grilled, baked, or pan-fried, depending on the desired texture and flavor. This adaptability also makes them a favorite among vegetarians and meat-lovers alike, as they can be tailored with any filling imaginable.
Essential ingredients and cultural roots
At the heart of the arepa is a respect for traditional ingredients. Made with just precooked cornmeal, warm water, and a pinch of salt, the dough comes together quickly but requires a certain sensitivity to moisture and texture. Many recipes also include a drizzle of oil or butter for added richness and a smoother dough.
But beyond the ingredients lies a deeper story. Arepas are embedded in daily Venezuelan life—enjoyed at breakfast with cheese and coffee, packed in lunchboxes, or served at dinner alongside soups and salads. In many families, the process of shaping and cooking arepas is a shared ritual, passed down from parents to children. Every region of Venezuela has its own preferred method, from the crunchy arepa andina of the Andes to the moist and cheesy arepa de queso found in coastal towns.
Modern popularity and global appeal
Thanks to their gluten-free base and endless filling combinations, arepas are capturing the attention of modern home cooks and food enthusiasts alike. They’re not just for Latin American communities anymore—today, food bloggers, TikTok creators, and chefs are all bringing their personal spin to this beloved classic. What remains unchanged is the deep cultural authenticity that each arepa carries.
Particularly in urban centers with vibrant food scenes, arepas are celebrated for their balance of health, taste, and tradition. Their simplicity is their charm, and their ability to become whatever the cook imagines makes them a go-to recipe in both weekday meal plans and festive gatherings.
Arepas as an everyday experience
Preparing arepas at home offers a chance to reconnect with heritage, experiment with fillings, and create meals that satisfy everyone at the table. From simple cheese-stuffed versions to richly seasoned meats or even sweet plantain combinations, they encourage creativity while staying true to their roots.
Whether you’re discovering them for the first time or reintroducing a family classic, arepas deliver on comfort, texture, and flavor—making them one of the most approachable and rewarding recipes in any kitchen. Their growing popularity across cultures is no surprise; few dishes offer such a perfect mix of tradition, adaptability, and taste.
1. Prepare the dough
In a large bowl, pour the warm water and dissolve the salt. Slowly add the precooked white cornmeal while stirring with your hand to avoid lumps. Let the mixture sit for 2–3 minutes so the cornmeal can hydrate.
2. Knead the dough
Add the sunflower oil and knead gently for about 3–4 minutes until the dough is smooth and no longer sticks to your hands. If it feels dry, add a tablespoon of water. If too wet, add a bit more cornmeal.
3. Shape the arepas
Divide the dough into 4 equal parts. Roll each into a ball, then flatten into discs about 2 cm (¾ inch) thick and 8–10 cm (3–4 inches) in diameter.
4. Cook the arepas
Heat a nonstick skillet or griddle over medium heat and add vegetable oil. Place the arepas in the skillet and cook for about 5–6 minutes on each side, or until a golden-brown crust forms.
5. Finish in oven (optional for extra fluffiness)
For thicker arepas, preheat your oven to 180°C (350°F) and bake the cooked arepas for an additional 5–10 minutes. This ensures a fully cooked interior.
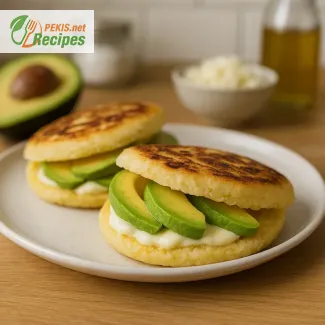
6. Fill and serve
Let the arepas cool slightly. Slice open halfway to create a pocket. Fill with sliced avocado, mozzarella, a pinch of salt, and a squeeze of lime juice—or use your favorite combination of cheese, beans, or meats.
Enhancing Classic Arepas for Today’s Taste
Creative ingredient swaps and expert tips for better texture and flavor
While traditional Venezuelan arepas are cherished for their simplicity and cultural heritage, modern kitchens offer countless opportunities to elevate the classic recipe without losing authenticity. With small adjustments and thoughtful additions, you can customize arepas to suit different dietary needs, enhance their nutritional profile, or simply bring out richer flavors and textures. Whether you're an experienced home cook or exploring arepas for the first time, these techniques will help you get the most out of every bite.
How to enrich the dough with flavor and nutrition
The original dough—made from precooked white cornmeal, water, and salt—is wonderfully neutral, making it a canvas for both sweet and savory creations. To improve the flavor complexity, try mixing in one or more of the following ingredients:
- Grated cheese such as mozzarella or queso blanco will add moisture, saltiness, and depth to the dough itself, making each bite more indulgent.
- Ground flaxseed or chia seeds can be added for a nutritional boost, contributing omega-3 fatty acids and fiber without significantly altering the texture.
- A small amount of mashed sweet potato or pumpkin puree lends a hint of natural sweetness, softens the interior, and introduces vitamin A and antioxidants.
- Replace part of the water with vegetable or chicken broth to introduce subtle savory undertones.
These variations subtly adjust the taste, color, and aroma of the finished arepas while preserving the traditional structure and cooking technique.
Home-cooked arepas vs. store-bought options
Cooking arepas at home ensures you have full control over the quality of ingredients and the cooking method, leading to a more personalized and wholesome result. Store-bought arepas or mixes often contain preservatives or added starches that can affect both taste and texture. When made from scratch, arepas tend to be lighter, fresher, and more flavorful, especially when using fresh cornmeal and clean, neutral oils like sunflower or avocado oil.
In addition, homemade fillings like avocado slices, sautéed vegetables, or seasoned shredded chicken offer a more vibrant taste than prepackaged spreads or canned fillings. The freedom to adjust seasoning, texture, and moisture in your fillings ensures a more satisfying and nutrient-dense meal.
Common mistakes to avoid when making arepas
Even though the recipe is relatively simple, certain missteps can compromise the final outcome. Avoid these typical mistakes to ensure consistently delicious results:
- Over-hydrating the dough can cause the arepas to become too soft and sticky, making it difficult to shape and resulting in soggy interiors. Always let the dough rest to absorb moisture before adjusting.
- Using the wrong cornmeal is a common issue. Only precooked cornmeal (masarepa) should be used, not corn flour or polenta.
- Cooking at too high a heat can burn the outside while leaving the inside raw. Moderate heat ensures even browning and proper cooking throughout.
- Skipping the resting phase after mixing the dough can lead to cracking or uneven texture during cooking.
Mastering these small but significant steps results in arepas with crisp exteriors and soft, tender interiors, just as they should be.
Healthier twists without sacrificing tradition
Arepas are naturally gluten-free and low in sugar, but there are ways to make them even healthier:
- Use whole-grain precooked cornmeal instead of white cornmeal to increase fiber and add a nuttier flavor.
- Opt for baking instead of frying to reduce the oil content while still achieving a satisfying texture. A light brush of oil before oven baking provides a crispy finish without the excess fat.
- Fillings like black beans, roasted vegetables, or grilled tofu can create balanced, plant-based meals high in protein and micronutrients.
- Swap out cheese for cashew cream or mashed avocado if reducing saturated fat is a priority.
These smart substitutions allow you to enjoy arepas more often, whether you're managing dietary goals or just looking to feel more energized after your meals.
Flavor layering through creative fillings
Traditional arepas are known for their versatility as a vessel for all kinds of fillings. You can elevate them further by exploring new combinations of textures and temperatures:
- Combine crispy elements like shredded cabbage or fried plantains with creamy fillings like hummus or refried beans.
- Add a touch of acidity using pickled onions or a splash of lime juice to balance rich ingredients like cheese or meats.
- Create layered fillings with multiple ingredients—try combining grilled chicken, caramelized onions, and fresh cilantro for a bold profile.
Pairing contrasts in flavor, texture, and temperature will take your arepas from simple to exceptional.
Texture control and advanced cooking techniques
If you’ve mastered the basic skillet method, you can experiment with alternative cooking styles to adjust the texture and flavor:
- Try grilling the arepas over open flame or on a grill pan for added smokiness and char marks.
- Bake them in the oven after pan-searing to create fluffier interiors with a firmer crust.
- Use a cast-iron skillet to retain even heat and produce a more consistent browning across batches.
Each of these methods gives a new dimension to the arepas, enhancing their visual appeal and mouthfeel without requiring new ingredients.
Through thoughtful experimentation and mindful preparation, arepas can evolve into a signature dish that reflects both culinary tradition and modern creativity—perfect for those who value both authenticity and innovation in their home cooking.
Allergens present in the recipe:
- Milk (mozzarella)
- Corn (cornmeal)
Contains gluten: No – recipe is naturally gluten-free.
Substitution tip: To make it dairy-free, replace mozzarella with plant-based cheese or mashed beans.
Vitamins and minerals per serving (approximate):
- Vitamin B3 (niacin): 2.1 mg – supports energy metabolism
- Vitamin E: 1.4 mg – antioxidant, protects cells from oxidative stress
- Folate: 45 µg – important for DNA synthesis and red blood cell formation
- Magnesium: 36 mg – supports nerve and muscle function
- Iron: 0.9 mg – essential for oxygen transport
- Potassium: 210 mg – regulates blood pressure and fluid balance
Antioxidants per serving (approximate):
- Lutein and Zeaxanthin: 270 µg – support eye health
- Vitamin E (alpha-tocopherol): 1.4 mg – combats oxidative damage
- Beta-sitosterol (from avocado): 12 mg – supports heart health and cholesterol balance
Recipes worth trying