The Secret to Perfectly Caramelized Cannelés
A Classic French Pastry with a Crisp Crust and Custardy Heart
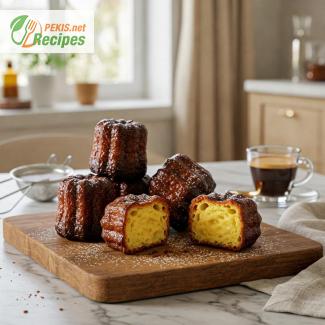
Among the many iconic treats of French pâtisserie, few evoke as much admiration as the cannelé de Bordeaux. These small, fluted pastries with a deeply caramelized crust and a soft, custard-like center are a true labor of love, requiring patience, precision, and the right techniques to achieve their signature contrast in texture. While they may seem elusive outside of France, mastering the art of making cannelés at home is not only possible but also an immensely rewarding experience.
With their origins tracing back to 18th-century Bordeaux, cannelés have stood the test of time, becoming a staple in French bakeries. Their distinctive shape, thanks to the traditional copper molds, and their rich flavor, enhanced by vanilla and rum, make them a coveted delicacy among pastry enthusiasts. However, making authentic cannelés requires a meticulous approach, from the batter preparation to the slow baking process that ensures their characteristic texture.
This guide takes you through a step-by-step journey to achieve perfect cannelés—from selecting the right ingredients to mastering the baking technique that gives them their famous crisp, caramelized shell and tender interior.
The Origins of Cannelés: A Pastry Rooted in History
The history of cannelés de Bordeaux is as rich as their flavor. While their exact origins remain somewhat mysterious, they are widely believed to have been created by nuns in Bordeaux who used leftover egg yolks from local winemakers. During the wine clarification process, egg whites were used to refine wines, leaving a surplus of yolks. Rather than letting them go to waste, the resourceful nuns incorporated them into a simple yet exquisite pastry, combining milk, flour, sugar, vanilla, and rum to create what we now know as the cannelé.
Over time, these pastries became synonymous with Bordeaux’s culinary identity, served in the city’s most prestigious pâtisseries and enjoyed alongside coffee or dessert wines. Their unique baking technique—using copper molds lined with beeswax—is what gives them their signature golden-brown exterior and contrastingly soft interior. Today, they are a symbol of French craftsmanship, beloved by pastry lovers worldwide.
What Makes Cannelés So Special?
Unlike many pastries that rely on intricate layering or elaborate fillings, cannelés are celebrated for their simplicity and technique. The magic of this French delicacy lies in its contrast of textures:
- A deeply caramelized crust that is crisp, slightly chewy, and rich in flavor.
- A soft, custard-like interior that melts in the mouth with notes of vanilla and dark rum.
- A perfect balance of sweetness, making them an elegant treat that pairs beautifully with coffee or tea.
Beyond their taste and texture, what sets cannelés apart is their slow and precise baking process. The batter, which is similar to a crêpe batter, is allowed to rest for at least 24 hours, allowing the flavors to develop and ensuring the perfect consistency. Baking at a high temperature initially, followed by a long, slow bake, gives them their characteristic crust while keeping the inside tender and airy.
The Key to Perfect Cannelés: Essential Techniques
Achieving the perfect cannelé requires precision, patience, and the right tools. Here are the most important factors that contribute to their authentic texture and flavor:
1. Using Traditional Copper Molds
While silicone molds are available, copper molds conduct heat more efficiently, ensuring even caramelization and the signature crispy exterior.
2. Resting the Batter for Maximum Flavor
Allowing the batter to rest for at least 24 hours (or even 48 hours) helps the flavors deepen and ensures a smooth texture. This process is essential to achieving the signature contrast between the crispy crust and soft center.
3. The Right Balance of Rum and Vanilla
The distinct aroma of cannelés comes from pure vanilla and dark rum. Using high-quality ingredients makes all the difference, enhancing the depth of flavor in each bite.
4. Precise Temperature Control
Starting with a high oven temperature, then reducing it gradually, ensures proper caramelization while keeping the inside light and creamy. This technique is what creates the iconic cannelé texture.
5. Proper Molding with Beeswax and Butter
Traditionally, copper molds are lined with a beeswax and butter mixture, giving the pastries their characteristic glossy crust and rich, nutty undertones. This method also helps prevent them from sticking to the mold.
Why You Should Try Making Cannelés at Home
While they are often seen as a specialty of French bakeries, homemade cannelés are well worth the effort. By following the correct techniques, you can achieve professional-level results in your own kitchen. Making them at home allows you to experiment with different flavors, adjust the sweetness and texture to your preference, and enjoy the authentic taste of Bordeaux’s most cherished pastry.
Whether you're a seasoned baker or someone looking to challenge yourself with a new recipe, cannelés offer an exciting and rewarding experience. With their delicate flavor, rich history, and unmistakable texture, they are a testament to the beauty of French pastry craftsmanship.
So, are you ready to embark on this sweet journey? Follow this step-by-step guide to create the perfect cannelés at home and bring a piece of Bordeaux’s rich culinary heritage to your kitchen.
- Infuse the milk: In a saucepan, heat the milk, butter, and split vanilla bean over medium heat until warm but not boiling. Remove from heat and let it cool to room temperature, allowing the vanilla to infuse.
- Prepare the batter: In a separate bowl, mix the sugar, flour, and salt. In another bowl, whisk together the eggs and egg yolks. Gradually add the egg mixture to the dry ingredients, stirring until smooth.
- Incorporate the milk: Strain the milk mixture to remove the vanilla pod, then slowly pour it into the batter while stirring continuously. Add the rum and mix well.
- Rest the batter: Cover the batter and let it rest in the refrigerator for at least 24 hours (up to 48 hours) to allow the flavors to develop.
- Prepare the molds: If using traditional copper molds, melt the beeswax and butter, then coat the molds to prevent sticking and ensure a crisp crust. Let them cool before use.
- Preheat and bake: Preheat the oven to 220°C (425°F). Fill the molds about ¾ full with chilled batter. Bake for 15 minutes, then reduce the temperature to 180°C (350°F) and bake for another 45-50 minutes until dark golden brown.
- Unmold and cool: Let the cannelés cool in the molds for 10 minutes, then remove them and let them cool completely on a wire rack before serving.
Elevating the Classic Cannelé: Tips for a Superior Texture and Flavor
Small Adjustments for Big Improvements
The cannelé de Bordeaux is a delicate yet complex pastry, requiring the right balance of ingredients, temperature, and technique. While the traditional recipe is already a masterpiece, there are ways to enhance its texture, flavor, and overall quality by making slight adjustments to the process. Whether you want a crispier crust, a creamier interior, or a more intense aroma, experimenting with certain elements can lead to even better results.
The Role of Ingredients in Perfecting Cannelés
Selecting the Right Milk and Fat Content
The quality of milk and butter directly impacts the creaminess of the custard inside. Using whole milk ensures a rich texture, but for an even more indulgent result, you can replace part of the milk with heavy cream. This increases the fat content, leading to a smoother, more luscious interior. However, using too much cream may result in a denser pastry, so maintaining a balance is key.
Enhancing Flavor with the Best Vanilla and Rum
The deep vanilla and rum aroma are at the heart of authentic cannelés. While many recipes use vanilla extract, the best results come from using a real vanilla bean. Scraping out the seeds and infusing them in warm milk allows for a stronger, more complex vanilla taste.
For the rum, opt for a high-quality dark rum rather than a cheaper variety. The aging process of premium rums adds deeper caramel and spice notes, complementing the caramelized crust beautifully. If you want a more intense flavor, try replacing a portion of the rum with Armagnac or Cognac, which brings additional warmth and depth.
Techniques That Make a Difference
The Importance of Resting the Batter
Resting the batter for at least 24 to 48 hours is non-negotiable when making cannelés. This step allows the gluten to relax, preventing a chewy texture, and lets the flavors develop fully. However, for those looking to enhance the caramelization, adding a small pinch of baking soda to the batter before baking can help achieve a richer golden-brown crust without overbaking the inside.
Perfecting the Beeswax Coating
Traditional copper molds are lined with a beeswax and butter mixture, ensuring a shiny, crisp crust. Many modern recipes omit beeswax, but including it can enhance the authentic texture of the pastry. If beeswax is unavailable, a high-quality clarified butter or even cocoa butter can serve as an alternative, though the results will be slightly different.
To avoid an uneven coating, heat the molds before brushing in the wax mixture. This allows for a thin, even layer, preventing excess wax from pooling and affecting the texture of the crust.
Common Mistakes and How to Avoid Them
Even experienced bakers can face challenges when making cannelés. Here are some of the most common issues and how to prevent them:
1. Cannelés That Are Too Soft or Pale
This is usually caused by insufficient baking time or low oven temperature. Always start at a higher temperature (220°C/425°F) for the first 15 minutes, then lower it to 180°C/350°F for even cooking. This creates the signature caramelized crust while keeping the inside tender.
2. Cannelés Sticking to the Mold
If cannelés refuse to release from the mold, the issue is likely insufficient greasing or the batter being too cold when poured. To fix this:
- Always coat the molds thoroughly with beeswax or butter.
- Let the batter come to cool room temperature before pouring it into the molds.
3. Hollow or Collapsed Cannelés
This happens if the batter is over-mixed, incorporating too much air, or if the baking temperature drops too quickly. A good rule is to stir the batter gently, not whisk it, to avoid excess air bubbles. Additionally, keeping the oven door closed during the first 20 minutes of baking ensures the structure sets properly.
Making Healthier Cannelés Without Losing Flavor
While traditional cannelés are an indulgence, small tweaks can make them a bit lighter without sacrificing their signature taste.
Reducing Sugar Without Compromising Caramelization
Sugar plays a crucial role in creating the crispy exterior, but if you want to reduce the overall sweetness, swap out part of the white sugar with coconut sugar or light brown sugar. These alternatives still provide caramelization but with a lower glycemic impact.
Dairy-Free Options
For a lactose-free version, replace milk with almond or oat milk. Since these alternatives are lower in fat, adding a small amount of coconut cream or vegan butter helps mimic the richness of whole milk and butter.
Gluten-Free Adaptation
To make gluten-free cannelés, use a 1:1 gluten-free flour blend that contains rice flour and tapioca starch. Avoid blends that rely heavily on almond flour, as they can alter the texture too much.
Why Homemade Cannelés Are Worth the Effort
Although cannelés are available in some French bakeries, making them at home elevates the experience. Store-bought versions often suffer from a lack of freshness, resulting in a less crisp crust and drier interior. When baked fresh, cannelés have an unbeatable contrast between their crunchy shell and custard-like center.
Additionally, homemade cannelés allow you to tailor the recipe to your preference—whether that means adjusting the sweetness, experimenting with different flavor infusions, or using healthier ingredients.
Creative Variations to Explore
While traditional cannelés are beloved for their vanilla-rum flavor, experimenting with new variations can add an exciting twist:
- Chocolate Cannelés – Replace 20 g (2 tbsp) of flour with cocoa powder and add chopped dark chocolate to the batter.
- Coffee-Infused Cannelés – Swap the rum for espresso and add a pinch of cardamom for depth.
- Orange Blossom & Honey Cannelés – Replace rum with orange blossom water and add a teaspoon of honey for a floral, delicate flavor.
Each of these variations maintains the classic texture while introducing unique flavor profiles that suit different tastes.
Perfecting cannelés is both an art and a science. By fine-tuning the ingredients, mastering the baking techniques, and avoiding common pitfalls, you can create exceptional homemade cannelés that rival those found in French pâtisseries. Whether sticking to tradition or experimenting with new flavors, the key to success lies in patience, precision, and passion for pastry-making.
- Contains gluten (wheat flour), dairy (milk, butter), eggs, and alcohol (rum).
- Not suitable for gluten-intolerant individuals unless a gluten-free flour alternative is used.
Substitution Tips for Allergen-Free Cannelés:
- Gluten-free: Use a 1:1 gluten-free flour blend for a similar texture.
- Dairy-free: Replace whole milk with almond or oat milk and butter with vegan butter or coconut oil.
- Egg-free: Substitute each egg with a flaxseed or chia egg (1 tbsp ground flaxseed mixed with 3 tbsp water per egg).
- Alcohol-free: Omit the rum or replace it with maple syrup or vanilla extract for flavor.
- Calcium: 50 mg – Supports bone health.
- Iron: 0.5 mg – Aids in oxygen transport in the blood.
- Potassium: 80 mg – Helps regulate muscle function.
- Magnesium: 5 mg – Supports nerve and muscle function.
- Vitamin B2 (Riboflavin): 0.1 mg – Essential for energy production.
- Vanilla extract: Contains vanillin, which has anti-inflammatory properties.
- Egg yolks: Provide lutein and zeaxanthin, beneficial for eye health.
- Dark rum: Contains trace antioxidants that may aid cardiovascular health.
Recipes worth trying