Master the Art of Flaky Perfection with This Traditional Delight
Discover the Secrets Behind Authentic Danish Pastry Layers
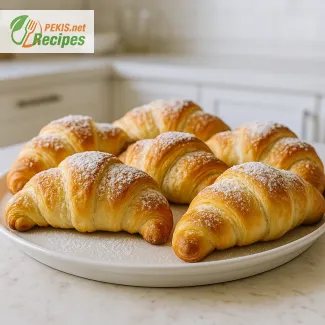
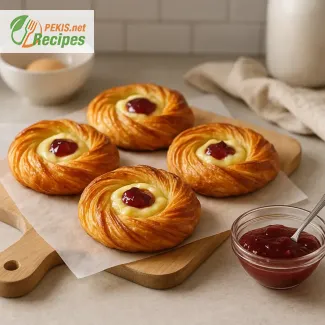
Few baked goods evoke the same sense of indulgence and craftsmanship as the Danish pastry. With its iconic flaky texture, buttery richness, and layers that melt in the mouth, this pastry has long held a beloved place in both artisan bakeries and home kitchens around the world. While many associate it with Sunday brunches or coffeehouse treats, the true beauty of the Danish pastry lies in its versatility and the deep tradition behind its preparation. Whether filled with vanilla custard, fruit preserves, marzipan, or simply dusted with powdered sugar, it brings a luxurious finish to any moment of the day.
At the heart of a perfect Danish pastry is the dough—a carefully laminated blend of yeast-leavened dough and rich butter, folded repeatedly to create dozens of delicate layers. This method, similar to puff pastry but with a yeasted base, gives Danish pastry its unique lightness and complexity. The rich buttery aroma, the delicate golden crust, and the melt-in-your-mouth center all come from mastering this technique.
Historically rooted in the Austrian tradition but developed into its current form by Danish bakers, this iconic pastry is more than a recipe—it’s a celebration of texture and taste. Over time, the Danish pastry has evolved beyond its Nordic roots, becoming a staple in patisseries and kitchens globally. Yet, despite its popularity, many still believe it to be too intricate for home baking. This couldn’t be further from the truth. With the right guidance and understanding of the process, anyone can bring the magic of a classic Danish pastry into their home oven.
The beauty of this pastry lies not only in its taste but in its artistic expression. Each shape—from spirals and pinwheels to enveloped pockets—serves as a canvas for your creativity. Whether you prefer classic raspberry Danish pastry, smooth cream cheese fillings, or indulgent almond frangipane, the possibilities are nearly endless. And while ready-made versions may be convenient, nothing compares to the fresh aroma and satisfying crispness of a homemade Danish pastry straight from the oven.
For the best results, attention to detail is key. From chilling your dough between folds to selecting high-quality butter and resting times for the yeast, every step contributes to the final texture. A well-executed Danish pastry offers the perfect contrast: a crisp, golden exterior that shatters delicately with each bite and a soft, airy interior that carries the flavor of its filling with elegance. Mastering this balance will elevate your baking repertoire to new heights.
In this guide, you'll uncover every stage of crafting authentic Danish pastry from scratch. We’ll walk through the essential techniques to develop those signature layers, highlight common pitfalls to avoid, and explain how different fillings and toppings can personalize your pastry for any occasion. Whether you're preparing a batch for a special gathering, a cozy weekend breakfast, or just to satisfy your own cravings, this recipe will bring out the artisan in you.
Before diving into the full recipe, let’s take a closer look at the process, tips, and components that define this elegant and rewarding baked treat. The journey to a perfect Danish pastry begins not just with flour and butter, but with understanding the alchemy that turns simple ingredients into something extraordinary.
- Activate the yeast: Warm the milk to 37–40°C (98–104°F). Mix in the sugar and yeast. Let it sit for 10 minutes until frothy.
- Make the dough base: In a large bowl, combine flour, salt, and softened butter (50 g). Add the yeast mixture and eggs. Mix until combined into a shaggy dough.
- Knead the dough: Transfer to a floured surface and knead for about 8–10 minutes until smooth. Shape into a rectangle, cover with plastic wrap, and refrigerate for 1 hour.
- Prepare butter block: Place cold butter (250 g) between two sheets of parchment paper. Pound and roll into a rectangle approximately 20 x 15 cm (8 x 6 inches). Chill until firm but pliable.
- Laminate the dough: Roll out chilled dough into a 40 x 20 cm (16 x 8 inches) rectangle. Place the butter block in the center and fold the dough over it from both sides, encasing the butter.
- First fold: Roll into a long rectangle and fold into thirds like a letter. Wrap and chill for 30 minutes.
- Second and third fold: Repeat rolling and folding process two more times, chilling between each for 30 minutes.
- Final roll-out: Roll dough to ½ cm (¼ inch) thickness. Cut into desired shapes: rectangles, pinwheels, spirals.
- Add filling (optional): Add jam, cream cheese, or almond paste in the center of each piece.
- Proof the pastry: Place on baking sheets, cover, and let rise at room temperature for 1–1.5 hours until puffed.
- Brush and bake: Preheat oven to 200°C (390°F). Mix egg yolk and water for egg wash. Brush pastries and bake for 15–18 minutes or until golden brown.
- Cool and serve: Let pastries cool on a rack. Optionally glaze with icing sugar and lemon juice or dust with powdered sugar.
Elevating the Classic Danish Pastry to Gourmet Standards
Tips and Ingredient Tweaks for a Refined Homemade Experience
While the traditional Danish pastry recipe already delights with its buttery layers and delicate structure, there are numerous ways to refine, customize, and enhance it further to better suit your personal taste, dietary preferences, or to simply impress guests with an artisan twist. Mastering the base recipe opens up a wide range of creative possibilities, and a few thoughtful adjustments can take this classic to a whole new level.
Enhancing flavor through ingredient modifications
One of the most direct ways to improve the depth of flavor in a Danish pastry is to choose ingredients of the highest quality and consider subtle upgrades.
Butter quality matters: Switching from regular store-bought butter to European-style butter (which has a higher fat content, around 82–85%) gives a richer flavor and better lamination. The higher fat content results in more defined layers and a more tender crumb.
Flavoring the dough: A touch of freshly ground cardamom or grated orange zest added to the dough can introduce subtle aromatic notes that pair wonderfully with both fruit and cream fillings. These additions don’t overpower the base but elevate the overall sensory experience.
Vanilla paste over extract: If you're using a custard or frangipane filling, consider replacing vanilla extract with vanilla bean paste. It delivers a stronger vanilla flavor and adds visual appeal with natural specks from the vanilla pod.
Infused fillings: While raspberry or apricot preserves are traditional, try experimenting with lemon curd, salted caramel, or pistachio cream. Each brings its own flavor dimension and creates a gourmet finish.
Why homemade always wins
The true superiority of a homemade Danish pastry lies in freshness, customization, and control. Store-bought options, even those from bakeries, often contain preservatives, artificial flavorings, and margarine instead of butter. At home, you know exactly what goes into your dough.
Moreover, preparing it yourself allows you to tailor the sweetness level, select organic ingredients, and reduce additives. The process, while intricate, also offers a rewarding baking experience that deepens your appreciation for the craftsmanship behind laminated doughs.
Avoiding common mistakes for perfect results
Even experienced bakers can stumble when preparing laminated pastries. Here are the most common pitfalls to avoid:
Overworking the dough: Excessive kneading develops too much gluten, making the dough difficult to roll and fold. This results in tough rather than tender layers.
Letting butter melt: During lamination, if the butter softens or melts into the dough, you’ll lose the distinct layers. Always chill the dough between folds and work quickly in a cool environment.
Too much flour while rolling: Dusting with too much flour dries out the dough. Instead, use just enough to prevent sticking, and brush off excess before folding.
Underproofing or overproofing: Underproofed pastries won’t rise properly and can be dense, while overproofed ones may collapse in the oven. Look for a noticeable puffiness and a slight jiggle when the pastries are ready for baking.
Improper shaping: Uneven shapes not only look less appealing but can bake unevenly. Precision ensures consistent results and enhances visual appeal.
Health-conscious adaptations without sacrificing flavor
If you're seeking healthier alternatives, several adjustments can be made to improve the nutritional profile of the Danish pastry without drastically altering its taste.
Whole grain flour blends: Substituting up to 30% of the white flour with whole wheat or spelt flour adds fiber and nutrients. Keep in mind that more than this can affect the dough's elasticity.
Reduced sugar fillings: Opt for low-sugar jams, unsweetened nut butters, or fruit compotes to decrease overall sugar content. This also makes room for more nuanced, natural fruit flavors to shine.
Plant-based ingredients: For a dairy-free version, use vegan butter blocks designed for baking, and substitute cow’s milk with unsweetened soy or oat milk. Egg substitutes like aquafaba or chia eggs can also be used for vegan adaptations.
Portion control: Making smaller, bite-sized pastries can help with moderation. This works especially well for brunch platters or as part of dessert assortments.
Advanced techniques for expert-level lamination
If you're comfortable with the traditional technique, consider exploring advanced lamination methods to increase layer count and flakiness:
- Double fold (book fold): Instead of a simple tri-fold, fold both ends to the center and then fold in half again, like closing a book. This increases layering and flakiness.
- Resting overnight: Allow the final shaped pastries to proof slowly in the refrigerator overnight. This deepens flavor and yields better structure.
Additionally, using steam during baking (by placing a pan of water in the oven) can create a glossier, crisper crust. Some bakers also apply a thin syrup glaze immediately after baking for a shiny finish and subtle sweetness.
Customizing for special occasions
The base Danish pastry is incredibly adaptable for themed or seasonal variations. Try adding cinnamon and raisins for a Scandinavian-style twist, or decorate with colored icing and candied citrus peel for holiday celebrations. For a spring brunch, lavender-infused cream or berry compote with edible flowers brings elegance and seasonal flair.
The aesthetic matters
Appearance plays a big role in how the pastry is received. Neat folds, even sizing, and balanced fillings show care and elevate the dish to professional presentation standards. Brushing with an egg yolk and cream mixture gives a deeper golden crust, while finishing with a dusting of powdered sugar or a vanilla glaze enhances visual appeal.
Ultimately, the best Danish pastry is one that balances flavor, texture, and artistry—all achievable with a little planning, attention to detail, and willingness to experiment. Whether you're baking for your family, hosting a gathering, or simply treating yourself, upgrading the traditional recipe ensures every bite is unforgettable.
Allergens present:
- Gluten (wheat flour)
- Eggs
- Milk (dairy)
Suggestions for allergen-free alternatives:
- Gluten-free: Replace all-purpose flour with certified gluten-free flour mix with xanthan gum.
- Dairy-free: Use plant-based butter (vegan block) and unsweetened soy or oat milk.
- Egg-free: Replace eggs with aquafaba (3 tbsp per egg) or a flaxseed meal mix (1 tbsp flax + 3 tbsp water per egg).
- Vitamin B1 (Thiamine): 0.35 mg – Supports nerve and energy metabolism
- Vitamin B2 (Riboflavin): 0.25 mg – Promotes healthy skin and vision
- Vitamin D: 1.5 µg – Supports calcium absorption and bone health
- Calcium: 85 mg – Maintains bone and dental health
- Iron: 2.1 mg – Supports oxygen transport in blood
- Magnesium: 25 mg – Aids in muscle function and relaxation
- Potassium: 140 mg – Regulates fluid balance and muscle contractions
- Zinc: 0.9 mg – Enhances immunity and wound healing
- Selenium: 11 µg – Protects cells from oxidative stress
- Vitamin E: 1.8 mg – Prevents cell membrane damage
- Lutein: 120 µg – Supports eye health
- Beta-carotene: 200 µg – Boosts immune response and skin health
Recipes worth trying