Creative Frozen Treats That Keep Kids Cool and Smiling
Discover the joy of homemade ice pops with these fun, fruity ideas
When summer heat kicks in, nothing delights children more than colorful, refreshing popsicles. These easy popsicle recipes are not only fun to eat but also fun to make—giving kids a hands-on way to explore the kitchen and enjoy nutritious treats without artificial additives. The magic of homemade popsicles lies in their simplicity, customization, and the ability to use real, wholesome ingredients like fresh fruits, yogurt, and natural juices.
Creating popsicles at home is more than just a cooking activity; it becomes a shared experience that connects families and fuels creativity. Whether it's a rainbow blend of berries or creamy banana swirls, the variety of options means there’s always a new flavor to try. Kids love choosing their own combinations and watching their creations freeze into colorful, icy masterpieces.
Why homemade popsicles are perfect for kids
Unlike store-bought versions, homemade popsicles can be tailored to children’s preferences and dietary needs. From dairy-free alternatives using coconut milk to sugar-free versions sweetened with ripe bananas or dates, these recipes give parents peace of mind while letting children enjoy a cooling treat.
Kids often gravitate toward familiar fruits like strawberries, blueberries, mango, and watermelon, all of which blend beautifully into vibrant popsicle mixtures. By including ingredients such as Greek yogurt, honey, or fresh citrus juice, these pops become both flavorful and naturally nourishing.
The process also encourages better eating habits. When children are involved in making their own snacks, they’re more likely to enjoy and appreciate real food, develop culinary curiosity, and understand how ingredients come together.
Tools you need to get started
To make popsicles at home, all you really need are a few basic tools:
- Blender or food processor for mixing ingredients
- Popsicle molds or reusable silicone holders
- Popsicle sticks, preferably wooden and food-safe
- A freezer and a little patience
You can even repurpose small yogurt cups or ice cube trays if you don’t have molds. Just cover the top with foil and poke a stick through the center before freezing. These simple hacks make the process accessible to any kitchen setup.
Flavor ideas kids will love
Here are some of the most popular and kid-approved combinations:
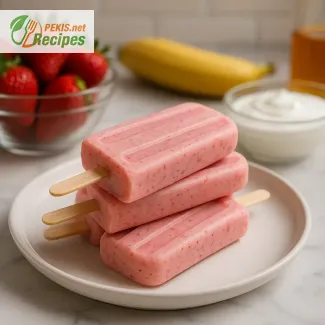
- Strawberry banana pops: A classic favorite that’s both creamy and sweet
- Blueberry yogurt swirl: Tangy and smooth, packed with antioxidants
- Orange creamsicle: A citrusy delight with a creamy twist
- Tropical mix: Mango, pineapple, and coconut milk bring summer to every bite
- Chocolate banana: For dessert lovers, with cocoa and mashed banana
Using seasonal fruits adds not only vibrant flavor but also color and freshness. You can also sneak in some hidden vegetables like spinach or carrots—paired with sweet fruit, they’ll go unnoticed but add extra nutrients.
Safe and fun preparation for all ages
Letting kids participate in the popsicle-making process is safe and entertaining. Younger children can help wash fruit, place ingredients in the blender, or pour mixtures into molds. Older kids may enjoy experimenting with layered popsicles, creating gradients by freezing one flavor at a time.
The tactile experience of making their own frozen treats builds confidence and joy. Plus, when they finally pull their finished popsicle from the mold, the sense of achievement is as satisfying as the first bite.
Storage tips and serving ideas
Once frozen, popsicles can be stored in their molds or wrapped in parchment paper and kept in freezer-safe bags. This keeps them fresh and ready whenever a craving strikes. For parties or hot afternoons, you can display them in bowls of crushed ice, making them visually appealing and easy to grab.
Serving ideas include:
- Adding popsicles to smoothies as decorative stirrers
- Serving mini-pops on toothpicks for toddlers
- Dipping tips in melted dark chocolate and refreezing for an added treat
These options keep things interesting and invite children to explore new tastes in playful ways.
Benefits of choosing natural ingredients
One of the key advantages of homemade popsicles is control over what goes in. Fresh ingredients not only taste better, they’re free from artificial colorings, flavorings, and excessive sugar. By using real fruit, natural yogurt, and wholesome add-ins, every popsicle becomes a better-for-you snack.
Parents can feel confident knowing exactly what their kids are eating, and kids develop positive habits by associating fun and flavor with real food. It’s a win-win that turns snack time into a moment of health, joy, and creativity.
- Wash the strawberries thoroughly, remove the stems, and slice them in halves.
- Peel the banana and cut it into chunks.
- In a blender, combine strawberries, banana, Greek yogurt, honey, lemon juice, and vanilla extract.
- Blend until smooth and creamy. Scrape down the sides to ensure all fruit is incorporated.
- Taste the mixture and adjust sweetness if needed by adding more honey.
- Pour the mixture evenly into 6 popsicle molds, leaving a little space at the top for expansion.
- Tap the molds gently on the counter to release air bubbles.
- Insert popsicle sticks into each mold.
- Place in the freezer for at least 5 hours or until fully frozen.
- To unmold, run warm water over the outside of the molds for a few seconds and gently pull out each popsicle.
Elevate Homemade Fruit Popsicles with Smart Ingredient Upgrades
Turn simple frozen snacks into flavor-packed, nutritious delights
Homemade strawberry banana yogurt popsicles are already a crowd-pleaser, but small ingredient upgrades and technique adjustments can make this classic even better. Whether you're looking to intensify flavor, improve texture, reduce sugar, or boost nutritional value, there are several easy and impactful ways to refine the traditional recipe while still keeping it kid-friendly and fun.
How ingredient swaps change the flavor and texture
Using Greek yogurt in the original recipe delivers a rich and creamy texture, but you can elevate the mouthfeel and nutritional profile even further by switching to strained skyr or adding a tablespoon of chia seeds. Skyr introduces a firmer consistency and a slightly tangier edge, while chia seeds help thicken the mixture naturally and introduce plant-based omega-3s and fiber.
If you're aiming for a sweeter profile without refined sugars, consider replacing honey with medjool dates. Blend them thoroughly with the fruit to create a smooth texture and a deep, caramel-like sweetness. This adds natural fiber and avoids blood sugar spikes often caused by processed sweeteners.
For children who love variety, swap strawberries for raspberries or add a handful of pineapple for a tropical twist. Blueberries can also bring a jam-like texture and more vibrant color. Each fruit changes not only the color and sweetness level but also introduces unique antioxidants and subtle acidity that keeps the flavor exciting.
Why homemade popsicles are better than store-bought
Creating popsicles from scratch means full control over ingredients—free from artificial flavorings, preservatives, and added colorants commonly found in commercial brands. This is particularly important when serving children, whose growing bodies benefit from natural sources of nutrition.
The experience of making the popsicles at home also builds anticipation and teaches kids the basics of choosing healthy ingredients. Parents can tailor the blend to avoid allergens, reduce sugar, or add protein, making each batch more purposeful than any off-the-shelf product.
Common mistakes and how to avoid them
One of the most frequent mistakes is using overripe fruit that’s too watery. This can result in ice crystal formation and a less creamy texture. To prevent this, make sure to balance water-heavy fruits like watermelon with creamy binders like yogurt or mashed banana.
Another issue is not blending thoroughly. If the mixture is too chunky, it may freeze unevenly, leading to separation or difficulty in unmolding. Always scrape down the sides of the blender to ensure uniform consistency before pouring into molds.
If popsicles stick to the mold or break apart during unmolding, it’s usually because they were removed too early or the mold wasn’t rinsed with warm water. Allow enough freezing time—at least 5 hours—and run the mold under water for a few seconds to release them smoothly.
Healthier alternatives for every dietary need
For dairy-free options, replace Greek yogurt with unsweetened coconut yogurt or oat-based yogurt. These options still yield a smooth, scoopable texture and pair beautifully with fruits like mango and peach. If you're avoiding animal products, choose maple syrup or agave nectar as a vegan sweetener substitute.
Want to boost protein? Blend in a spoonful of natural peanut butter, almond butter, or a scoop of plant-based protein powder. These additions enhance both the satiety and richness of the popsicle without overpowering the fruit flavors.
For children with gluten intolerance or sensitivity, confirm that all yogurt brands used are certified gluten-free—while yogurt typically doesn't contain gluten, some flavored versions may include thickeners derived from wheat.
Tips for visual appeal and layering
Kids are drawn to color, so try creating layered popsicles using two or three mixtures. Freeze one layer at a time before adding the next, letting each section set for about 30 minutes. Good combinations include banana with mango, or strawberry with kiwi.
To add a crunchy texture, fold in finely chopped nuts or sprinkle toasted coconut into the molds before pouring. This creates popsicles that are not only delicious but also visually fun and texturally complex—ideal for curious young eaters.
Storage tips and long-term freshness
Although homemade popsicles can last up to 3 weeks in the freezer, flavor and texture are best within the first 7–10 days. Wrap each individually in parchment paper before placing them in freezer bags to prevent freezer burn and flavor transfer from other foods.
Label each batch with a date and flavor mix so you can rotate them and always have a fresh variety on hand. This also helps parents manage what ingredients work best for different children’s taste preferences or dietary restrictions.
Adding extra nutrition without changing the taste
You can enrich the popsicle mixture without altering its flavor by adding ground flaxseed, a touch of turmeric, or even a splash of carrot juice. These elements are subtle in taste but offer a valuable nutritional lift.
Frozen spinach or zucchini puree can also be blended in small amounts with bright fruits like strawberries or pineapple. These additions are masked by the dominant fruit flavors but provide phytonutrients and support digestive health.
The beauty of this recipe lies in its versatility—small changes make big differences in both health value and enjoyment, especially when crafted with care and intention.
Allergens present in the recipe:
- Milk (Greek yogurt)
Contains gluten: No
Tips for replacing allergens and gluten:
- Replace Greek yogurt with coconut yogurt or almond milk yogurt for a dairy-free and vegan alternative.
- Ensure all replacement yogurts are unsweetened to control sugar content.
Vitamins and minerals per serving (approximate):
- Vitamin C: 42 mg – supports immune function and skin health
- Vitamin B6: 0.3 mg – aids brain development and immune regulation
- Potassium: 330 mg – helps regulate fluid balance and muscle contractions
- Calcium: 92 mg – essential for bone and teeth strength
- Magnesium: 25 mg – supports muscle and nerve function
Antioxidants per serving (approximate):
- Anthocyanins (from strawberries): 60 mg – may reduce inflammation and improve heart health
- Vitamin C: 42 mg – also acts as an antioxidant, neutralizing free radicals
- Phenolic compounds: 18 mg – help protect cells from oxidative damage
Recipes worth trying