The Art of Naturally Coloring Easter Eggs: A Traditional and Eco-Friendly Approach
Rediscovering the Beauty of Natural Egg Dyeing
Easter is a time of renewal, celebration, and vibrant traditions, and among the most cherished customs is the decoration of Easter eggs. While synthetic dyes have dominated modern egg coloring, a growing number of people are turning back to natural, chemical-free alternatives that not only produce stunning hues but also embrace the beauty of sustainability. Dyeing Easter eggs with onion skins, turmeric, and beets is a time-honored technique that has been passed down for generations, creating breathtaking colors with ingredients found in any kitchen.
This method not only allows for vivid, earthy tones, but it also brings an element of creativity and tradition into the process. By using onion skins for deep amber hues, turmeric for golden yellow tones, and beets for rich pinks and reds, you can achieve a stunning, rustic aesthetic without the need for artificial additives. Whether you're introducing children to the magic of Easter egg dyeing or simply looking for a more sustainable way to celebrate the season, this approach offers an engaging, rewarding experience.
Why Choose Natural Dyes for Easter Eggs?
Modern food dyes often contain synthetic chemicals, some of which may have undesirable health effects, especially when used on food-based items. Natural egg dyeing eliminates this concern, making it an ideal choice for families who prioritize organic and toxin-free living. Furthermore, using kitchen scraps and common spices as dyes is an excellent way to reduce waste while still creating beautifully decorated eggs.
Aside from being an eco-conscious choice, natural egg dyeing provides a unique, artistic quality that mass-produced synthetic colors often lack. Each naturally dyed egg features its own variations, marbled effects, and delicate textures, ensuring that no two eggs look exactly alike. This unpredictability adds a special charm to your Easter celebrations, making the tradition even more authentic and personal.
The Science Behind Natural Egg Dyeing
Natural dyes work through a process called absorption staining, where eggshells soak up the color from the dye bath. The intensity of the color depends on several factors, including the concentration of the dye, the length of time the eggs remain in the dye bath, and the type of vinegar used. Vinegar acts as a mordant, helping the eggshells absorb and retain the color more effectively.
Different natural ingredients produce a spectrum of colors:
- Onion skins create deep, warm orange and reddish-brown hues.
- Turmeric yields a bright golden yellow, perfect for a sunny, cheerful touch.
- Beets provide delicate pinks, deep reds, and even purples, depending on the soaking time.
By experimenting with various soaking durations and dyeing techniques, you can create an entire palette of natural shades that reflect the beauty of organic color.
A Tradition Rooted in History
Natural egg dyeing is more than just a creative activity—it is a time-honored tradition that dates back centuries. Many cultures have long relied on botanical ingredients to color eggs for religious and festive celebrations. Eastern European countries, Mediterranean regions, and even parts of Asia have historically used onion skins, berries, and plant-based dyes to decorate eggs for spring festivals, fertility rites, and Easter celebrations.
The act of dyeing eggs naturally connects us to the past, offering a glimpse into the heritage and customs of our ancestors. It is a way to preserve cultural identity, foster family traditions, and appreciate the artistry of natural materials.
An Engaging Activity for All Ages
One of the best aspects of natural egg dyeing is its accessibility. It requires simple ingredients, minimal effort, and plenty of room for creativity. This makes it a perfect activity for families, schools, and community gatherings. Children can learn about natural color extraction, while adults can appreciate the rustic charm and sustainability of the process.
Additionally, creating unique patterns is easy with simple techniques like:
- Wrapping eggs with herbs or flowers before placing them in the dye bath for a botanical imprint.
- Using rubber bands or wax to create stripes and resist patterns.
- Double-dyeing eggs by layering colors for added depth and complexity.
A Sustainable and Beautiful Easter Tradition
By choosing natural dyes, you are not only embracing an eco-friendly practice, but also reviving a rich, cultural tradition that celebrates nature’s gifts. The process of boiling onion skins, simmering turmeric, or steeping beets is a reminder of how simple, natural elements can create something truly beautiful.
This Easter, consider stepping away from store-bought synthetic dyes and immerse yourself in the art and science of natural egg dyeing. Whether you are drawn to this method for its historical roots, sustainability, or stunning aesthetic, you will find that it brings a deeper sense of connection and joy to your Easter celebrations.
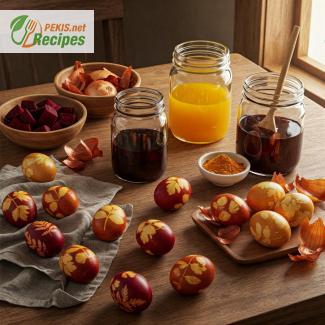
- Prepare the Ingredients
- Collect a generous amount of onion skins from yellow onions. The more skins, the deeper the color.
- Chop the beetroot into small pieces for better color extraction.
- Measure out ground turmeric for a bright golden hue.
- Boil the Natural Dyes
- In three separate pots, add 500 ml (2 cups) of water to each.
- Add one dye ingredient per pot: onion skins in the first, beetroot in the second, and turmeric in the third.
- Bring to a gentle boil, then reduce heat and let simmer for 30 minutes to extract the color.
- Strain and Add Vinegar
- After 30 minutes, strain the liquids into separate bowls and discard the solids.
- Add 20 ml (1 tbsp) of white vinegar to each dye bath to enhance color absorption.
- Dye the Eggs
- Gently place the eggs into the dye bath. Ensure they are fully submerged.
- Let them sit for at least 30 minutes for soft tones, or leave them in the dye overnight in the refrigerator for deeper colors.
- Remove and Dry
- Carefully remove the eggs and place them on a cooling rack or a paper towel-lined tray to dry.
- Avoid rubbing to prevent smudging.
- Polishing (Optional)
- For a natural shine, rub dry eggs with a few drops of vegetable oil using a soft cloth.
Elevating the Traditional Art of Natural Easter Egg Dyeing
Small Adjustments for More Vibrant and Long-Lasting Colors
One of the easiest ways to enhance the depth and vibrancy of naturally dyed Easter eggs is by tweaking the dyeing process. A common mistake many make is not simmering the natural dye ingredients long enough, which results in pale or uneven colors. For deeper, richer hues, let the onion skins, turmeric, or beets steep in hot water for at least one hour before straining. The longer the dye bath sits, the stronger the pigment becomes.
Additionally, increasing the vinegar concentration can make a noticeable difference. Vinegar helps the dye bond to the eggshell, ensuring a more saturated and lasting color. Instead of 1 tablespoon per cup of water, try adding 2 tablespoons for stronger results. However, avoid excessive amounts, as it can cause the shell to become brittle.
Experimenting with Additional Natural Ingredients
While onion skins, turmeric, and beets provide stunning colors, experimenting with other natural ingredients can introduce an entirely new spectrum of shades:
- Red cabbage creates beautiful blue and teal tones.
- Spinach leaves result in subtle green hues.
- Coffee or black tea produces rich brown shades, giving a more earthy aesthetic.
- Blueberries yield deep purples and blues, perfect for a soft pastel palette.
If you want to customize the color intensity, you can also layer the dyes. For example, dyeing an egg first in turmeric (yellow) and then submerging it in red cabbage (blue) creates a natural green shade without needing artificial dyes.
Why Homemade Natural Egg Dyeing is Superior
Choosing homemade natural dyes over commercial synthetic ones offers numerous advantages beyond aesthetics. Store-bought egg dyes often contain chemical additives and artificial colorants, some of which can be potential allergens or irritants. Natural dyes, on the other hand, use organic, food-based ingredients, making them safe for children and environmentally friendly.
Another major benefit of DIY egg dyeing is the unique artistic effect it provides. Unlike uniform, factory-processed synthetic dyes, natural dyes create organic patterns and marbled textures, giving each egg a one-of-a-kind appearance. This unpredictability is part of the beauty of handmade Easter eggs, making them more authentic and visually interesting.
Common Mistakes to Avoid
Even with the best intentions, several common mistakes can lead to disappointing results. Here’s what to watch out for:
- Not Cleaning the Eggs Properly
- Eggs should be washed with mild soap and water to remove natural oils that may prevent dye absorption.
- Skipping the Vinegar Step
- Vinegar is essential for helping the dye bond to the eggshell. Without it, colors may appear faint and uneven.
- Using Boiling Hot Dye on Eggs
- Let the dye cool slightly before adding the eggs, as extreme heat can cause cracking.
- Not Allowing Enough Time for Soaking
- For deep, rich colors, eggs should sit in the dye for several hours or overnight.
- Handling Wet Eggs Too Soon
- Allow eggs to air dry completely before touching them to avoid smudging the color.
Healthier Alternatives for a More Sustainable Approach
For those seeking a healthier, eco-friendly approach, small changes can make a big difference. Instead of using store-bought white vinegar, try apple cider vinegar, which provides the same effect while being less processed.
If concerned about food waste, you can repurpose vegetable scraps and peels for dyeing, such as:
- Carrot tops for a light green tint
- Avocado pits for soft pink hues
- Red onion skins for deeper burgundy shades
Additionally, choosing organic, free-range eggs enhances the natural beauty of the dyed eggs, as their higher-quality shells absorb pigments better and offer a smoother finish.
The Impact of Antioxidants in Natural Dyes
Beyond aesthetics, many of the ingredients used in natural egg dyeing are packed with antioxidants that can benefit overall health. Though not consumed directly through egg dyeing, their presence highlights the power of nature’s pigments:
- Beets contain betalains, which have anti-inflammatory and detoxifying properties.
- Turmeric is rich in curcumin, known for its anti-inflammatory and immune-boosting effects.
- Onion skins contain quercetin, an antioxidant linked to heart health and reduced allergy symptoms.
Elevating Traditional Egg Dyeing
By adjusting simple factors, such as steeping time, ingredient combinations, and dyeing techniques, you can transform a traditional method into a modern and sustainable art form. Whether you seek richer colors, more creative designs, or an eco-conscious approach, these improvements will enhance the process and make naturally dyed Easter eggs even more special.
- Contains: Eggs
- Gluten-Free: Yes
- Substitutions for Allergies:
- For egg allergies, use ceramic or wooden eggs for decorative purposes.
- Vitamin B12: 0.6 mcg (25% DV) - Essential for red blood cell formation.
- Vitamin D: 1.1 mcg (15% DV) - Supports bone health and immunity.
- Iron: 0.9 mg (10% DV) - Aids in oxygen transport in the blood.
- Choline: 147 mg (27% DV) - Supports brain function and liver health.
- Onion skins: Rich in quercetin, known for its anti-inflammatory and cardiovascular benefits.
- Turmeric: Contains curcumin, a powerful antioxidant that supports joint health.
- Beets: Provide betalains, which have detoxifying properties and aid in liver function.
Recipes worth trying