Tangy brined eggs you’ll love: A timeless preservation classic
A traditional method rediscovered for modern kitchens
The pickled egg has long been a staple of homesteads, pubs, and farmhouse kitchens—an enduring symbol of simple preservation and bold flavor. Today, this rustic delicacy is making a powerful comeback as more home cooks rediscover the satisfying process of brining eggs and infusing them with spice, tang, and creativity. Whether served on a charcuterie board, added to salads, or eaten straight from the jar, pickled eggs are versatile, protein-packed, and full of character.
In this guide, we delve into the origins, appeal, and preparation techniques behind the homemade pickled egg recipe that balances zesty vinegar tang with aromatic spices for a bold yet balanced taste. Crafted for the modern kitchen yet rooted in traditional methods, this version is quick, customizable, and suited to all skill levels.
What makes pickled eggs so popular again?
Pickled eggs are enjoying a resurgence for several compelling reasons. First, they offer an easy way to preserve eggs without refrigeration, making them ideal for meal prepping or emergency storage. Secondly, they provide a satisfying blend of acidity and flavor that's missing from many modern snacks. With just a few basic ingredients—hard-boiled eggs, vinegar, spices, and salt—you can create a snack that's both timeless and trendy.
The tangy flavor profile of pickled eggs pairs beautifully with smoked meats, crusty bread, cheese platters, and fermented vegetables. They also add a distinctive twist to deviled eggs, potato salads, or grain bowls. From Appalachian farmhouses to European taverns, the tradition of pickling eggs spans cultures and centuries—and today, it's being reimagined in vibrant kitchens around the world.
Choosing the right vinegar and spices
The secret to exceptional pickled eggs lies in the brine. White distilled vinegar is the go-to choice for a clean, bright flavor and clear brine. Apple cider vinegar, on the other hand, offers a deeper, fruitier tang, while red or malt vinegars bring in maltiness and visual character.
Spices make each batch unique. Common choices include mustard seeds, peppercorns, garlic, dill, and bay leaves, but bolder variations might include chili flakes, smoked paprika, or even turmeric for color. The beauty of homemade pickled eggs is how easily they adapt to different palates and cuisines—from classic English pub styles to smoky Cajun or Asian-inspired blends.
How long do pickled eggs last?
When properly stored in sterilized jars and kept refrigerated, pickled eggs can last several weeks, often improving in flavor over time. The eggs should be submerged completely in brine and sealed tight. While some traditional recipes call for room temperature storage, modern food safety guidelines recommend keeping them chilled to reduce the risk of contamination.
Letting the eggs pickle for at least 5–7 days allows the flavors to penetrate deeply, resulting in a more intense and enjoyable bite. The longer the eggs sit, the firmer and tangier they become, making them ideal for pairing with rich or fatty foods.
Creative ways to serve pickled eggs
There’s no wrong way to enjoy pickled eggs. Here are some of the most popular ideas:
- Sliced over avocado toast for a protein-rich breakfast
- Chopped into potato salad or egg salad for added zing
- Quartered in a noodle bowl or alongside ramen
- Served whole with coarse salt and mustard for a rustic snack
- Topped with chili oil or kimchi for a bold fusion twist
Because of their striking appearance and vibrant color, pickled eggs also make beautiful garnishes for canapés, Bloody Mary cocktails, or festive platters. Beet-infused versions with their rich pink hue are especially eye-catching and ideal for special occasions.
The best eggs to use and tips for perfect peeling
Not all eggs are equal when it comes to pickling. Older eggs tend to peel more easily after boiling, which results in a smoother appearance and better brine penetration. To ensure success:
- Use eggs that are at least 7–10 days old
- Boil and cool them thoroughly before peeling
- Avoid cracked eggs, as they absorb too much brine too quickly
Letting the eggs sit in a cold water bath right after boiling also helps loosen the shell. The goal is a perfectly smooth, firm surface that can absorb flavor evenly while looking visually appealing in a clear glass jar.
Making your own homemade pickled eggs is more than just preserving food—it’s about embracing flavor, texture, and tradition. This recipe is a delicious starting point for your pickling journey and a satisfying project that offers bold taste with minimal effort. Whether you’re a culinary explorer or simply craving a new snack, pickled eggs offer a unique blend of practicality and punch.
- Boil the eggs: Place the eggs in a large saucepan and cover them with water. Bring to a boil over medium heat, then let them cook for 10 minutes.
- Cool and peel: Transfer the eggs to a bowl of ice water immediately after boiling to stop the cooking process. Let them sit for 5 minutes, then gently peel.
- Prepare the brine: In a medium saucepan, combine the vinegar, water, salt, sugar, garlic, mustard seeds, peppercorns, bay leaves, and chili flakes. Bring the mixture to a boil, then reduce heat and simmer for 3 minutes. Remove from heat and let cool slightly.
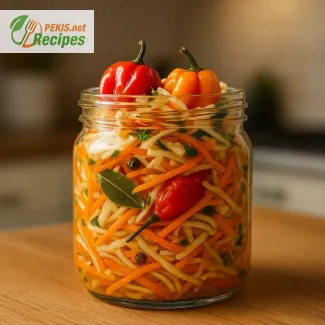
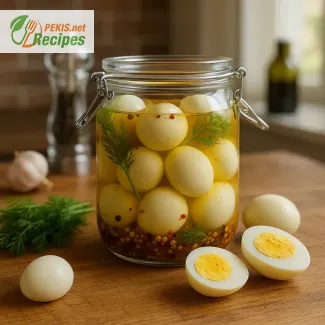
- Pack the jars: Place the peeled eggs in a sterilized glass jar. Add dill and pour the warm (not hot) brine over the eggs until they are fully submerged.
- Seal and store: Seal the jar tightly and refrigerate. Let the eggs pickle for at least 7 days before eating for optimal flavor and texture. For a pink hue, add beet juice to the brine before pouring.
- Serve: Slice in half or serve whole. They are delicious as a snack, with salads, on sandwiches, or as part of a charcuterie board.
Customize Your Brine: Transforming Pickled Eggs into Gourmet Snacks
Creative flavor upgrades and common-sense improvements to enhance a classic
Pickled eggs are beloved for their sharp tang, firm texture, and long shelf life, but that doesn't mean they must remain a static, unchanging staple. In fact, this humble recipe provides an ideal foundation for experimentation and personal flair. By adjusting a few elements—such as the vinegar base, spice blend, or coloring agents—you can transform the flavor profile, visual appeal, and even the nutritional content of your eggs. Whether you’re preparing them for guests or refining your family’s favorite snack, understanding the flexibility of this recipe allows for deeper culinary creativity.
How changing the vinegar changes the flavor
Vinegar is the cornerstone of the pickling process, and your choice dramatically affects the taste. White distilled vinegar offers a clean, bright acidity, ideal for letting the egg’s flavor and brine spices shine. However, swapping in apple cider vinegar adds a sweet, fruity depth, which balances stronger spices like chili flakes or black pepper. For a more rustic or savory touch, malt vinegar brings a nutty complexity, pairing beautifully with mustard seeds and garlic.
A mixture of different vinegars—such as combining white vinegar with rice vinegar—can soften the acidity while maintaining enough preservation power. This hybrid approach is excellent for those seeking a milder taste that still retains character.
Experimenting with spices and aromatics
A classic brine typically includes mustard seeds, peppercorns, garlic, and bay leaves, but the recipe is infinitely adaptable. To create a bolder flavor, try adding sliced jalapeños or smoked paprika for heat and depth. For Mediterranean flair, introduce rosemary, thyme, and lemon zest. Indian-inspired versions benefit from turmeric, coriander seeds, and a touch of cumin, which also add vibrant color.
Each new spice brings its own aroma and function: cinnamon sticks can provide warmth, cloves a bit of sweetness, and star anise a licorice note. Choose herbs and spices that align with your intended use—lighter flavors work best for salads, while more robust ones suit charcuterie boards and savory snacks.
Natural coloring for visual appeal
Although flavor is key, appearance matters—especially if you’re serving guests or sharing the eggs as part of a visual spread. One of the easiest ways to enhance pickled eggs is by adding natural dyes like beet juice, which turns the eggs a stunning magenta. You can also try purple cabbage, which gives a bluish tint, or turmeric for a warm golden hue.
These colorful variations not only enhance the presentation but can subtly affect the flavor as well. Beets introduce an earthy sweetness, while turmeric contributes a slightly peppery bite. These additions are ideal for festive occasions, themed platters, or gourmet gift jars.
Why homemade is always better
Store-bought pickled eggs may be convenient, but they rarely compare to homemade versions in terms of freshness, customization, and transparency. When you make your own, you control salt levels, ingredient quality, and preservation hygiene. You can avoid preservatives and tailor the brine to dietary needs, making it healthier and more natural.
Homemade pickled eggs also allow you to use farm-fresh eggs, which offer a richer taste and better nutritional profile. And because you prepare them in small batches, you can adjust the flavor to your liking over time—something mass-produced products can't offer.
Mistakes to avoid when pickling eggs
Even though pickling is straightforward, a few common mistakes can ruin the results. The most frequent issue is using eggs that are too fresh, which makes them difficult to peel. Older eggs—ideally at least a week old—are best for a smooth finish.
Another common error is pouring hot brine over hot eggs, which can result in rubbery whites or uneven pickling. Always allow the eggs and brine to cool slightly before combining them. And be sure your jars are sterilized and sealed properly to prevent contamination and maintain freshness.
Finally, don’t rush the pickling period. While the eggs may appear ready after 2–3 days, they need at least a full week to fully absorb flavor throughout. Impatience often leads to bland or unevenly pickled eggs.
Healthier alternatives and dietary adjustments
For those watching their sodium intake, you can reduce the salt content slightly without compromising preservation—especially if you include acidic elements like lemon juice or rice vinegar. Using natural sweeteners like honey or maple syrup instead of refined sugar adds depth and mild sweetness.
You can also experiment with organic apple cider vinegar, which is often unfiltered and contains probiotics known as "the mother." While these are destroyed in boiling, some people like to stir in a small amount of raw vinegar at the end of the brine-cooling process to preserve live cultures—though this should be done with food safety in mind.
Adding fresh herbs, citrus slices, or ginger also introduces subtle antioxidant properties and elevates the overall flavor, making your pickled eggs not only tastier but potentially more nourishing.
Storing and layering flavors for complexity
Storage plays a role in taste development. Keep the pickled eggs refrigerated at all times in tightly sealed jars, and consider rotating them gently every few days to distribute the brine. For more depth, create layered jars by alternating eggs with onion slices, chili rings, or vegetable peels. This technique allows brine flavors to evolve and meld beautifully over time.
The longer the eggs stay in the brine (up to four weeks), the more intense and integrated the flavors become. This is especially true with smoked or spicy profiles, which need time to mellow and round out.
The beauty of pickled eggs lies in their simplicity and adaptability. With just a few tweaks, you can create countless variations to suit your mood, meal, or occasion. Focus on balance—between sharp and sweet, soft and crunchy, mild and bold. And always prioritize quality ingredients, cleanliness, and patience. These small details make the difference between an average snack and a truly memorable bite.
Allergens present in the recipe:
- Eggs
- Mustard seeds (may trigger mustard allergy)
Gluten status:
- Gluten-free
Substitution tips to avoid allergens and gluten:
- Replace mustard seeds with coriander seeds if allergic to mustard
- No gluten-containing ingredients are used; ensure vinegar is gluten-free certified
Vitamins and minerals per serving (approximate):
- Vitamin A – 270 µg: supports vision and immune system
- Vitamin B12 – 1.1 µg: essential for red blood cells and nervous system
- Vitamin D – 1.0 µg: supports bone health and immune function
- Iron – 1.2 mg: helps oxygen transport in blood
- Selenium – 15 µg: antioxidant defense and thyroid function
- Zinc – 1.0 mg: aids in immune response and wound healing
Antioxidants per serving (approximate):
- Selenium – 15 µg: protects against oxidative stress
- Lutein and Zeaxanthin – 250 µg: support eye health
- Choline – 250 mg: involved in brain development and liver function
Recipes worth trying