Mastering Sous Vide at Home: A Complete Beginner’s Guide to Perfectly Cooked Meals
Discover how to bring restaurant-level precision to your home kitchen with these expert sous vide tips
Sous vide has transitioned from being a niche technique used by professional chefs into a popular and accessible cooking method for home cooks around the world. By using precise temperature control and slow cooking, sous vide ensures that your meals are cooked perfectly every single time—with minimal effort and maximum flavor.
Whether you’re aiming to impress guests with the most tender steak they’ve ever had, or you’re simply looking to elevate your weekly meal prep, learning how to cook sous vide at home opens up a new world of culinary possibilities. In this guide, we’ll cover all the essential beginner tips, walk through common questions, and share key techniques to help you achieve consistently delicious results.
What Is Sous Vide Cooking and How Does It Work?
The term sous vide (pronounced “soo veed”) is French for "under vacuum." It refers to a method of cooking food in a vacuum-sealed bag placed in a precisely controlled water bath. The food is cooked at a low, consistent temperature for a longer period than traditional methods, resulting in unmatched tenderness, flavor retention, and consistency.
The process revolves around precision temperature control. Unlike pan frying or baking, where temperatures fluctuate, sous vide keeps the food at the exact temperature you set—typically within 0.1 °C / °F. This allows meat to be cooked evenly throughout without overcooking the outside.
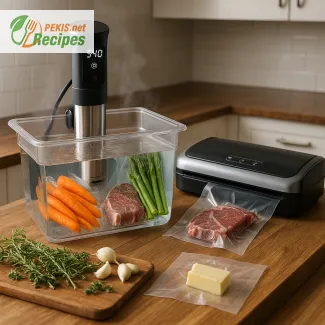
Essential Equipment Needed for Sous Vide Cooking at Home
Getting started with sous vide doesn’t require a professional kitchen. Here's what you need:
- Sous vide immersion circulator: This is the heart of your setup. It heats the water and maintains your desired temperature. Popular models include Anova, Joule, and Inkbird.
- Vacuum sealer or resealable freezer bags: You’ll need to seal the food properly to ensure even cooking. Vacuum sealers provide the best results, but the water displacement method with zipper-lock bags is a solid alternative for beginners.
- Container or pot: A large pot or dedicated sous vide container holds the water. Consider using a lid or cover to prevent water evaporation during longer cooks.
- Optional accessories: Bag clips, weights, and racks can help keep your food submerged and stable during cooking.
Step-by-Step Guide: Getting Started with Sous Vide for Beginners
- Prepare your ingredients: Season or marinate your protein or vegetables. Add herbs, spices, citrus slices, or butter for extra flavor.
- Seal the food: Place the ingredients in a bag and remove the air using a vacuum sealer or water displacement.
- Set the temperature and time: Plug in your immersion circulator and set the recommended temperature for your food (e.g., 54 °C / 129 °F for medium-rare steak).
- Cook the food: Place the sealed bag in the water bath and let it cook. This could range from 1 hour to 48 hours depending on the recipe.
- Finish with a sear (optional): After cooking, many foods benefit from a quick sear in a hot pan or on a grill to develop flavor and texture.
Best Meats to Cook Sous Vide for Perfect Results
Sous vide shines particularly when it comes to meat, as it can turn tough cuts into tender masterpieces while also preserving moisture in delicate proteins. Here are some ideal options:
- Steak: Achieve the perfect medium-rare edge-to-edge every time.
- Chicken breast: Juicy and never dry, with no guesswork.
- Pork chops: Incredibly tender and flavorful when slow-cooked.
- Lamb: Keep it tender and pink from edge to edge without overcooking.
- Ribs: Sous vide for 24–36 hours results in fall-off-the-bone texture.
You can even try sous vide burgers for ultra-juicy patties or experiment with wild game meats like venison.
Sous Vide Cooking Times and Temperatures Chart for Beginners
One of the most frequently asked questions from beginners is about correct cooking times and temperatures. While detailed charts are widely available, here are some general guidelines:
- Medium-rare steak: 54 °C / 129 °F for 1.5 to 3 hours
- Chicken breast: 60 °C / 140 °F for 1.5 hours
- Pork tenderloin: 59 °C / 138 °F for 2 hours
- Salmon: 52 °C / 125 °F for 30–45 minutes
- Vegetables: 85 °C / 185 °F for 1 to 2 hours
Consistency is key, and with sous vide, these temperatures deliver reliable and repeatable results.
Common Mistakes to Avoid When Cooking Sous Vide
Even with its forgiving nature, sous vide cooking has pitfalls. Here are some common errors to watch out for:
- Incorrect sealing: Air pockets can cause uneven cooking or floating bags. Always remove as much air as possible.
- Water level too low: Water evaporates during long cooks. Use a lid or cover to maintain levels.
- Overcooking via searing: After sous vide, a quick sear is great—but too long on high heat can undo your hard work.
- Using the wrong temperature: Double-check the ideal temp for your protein to avoid under- or overcooking.
- Lack of seasoning: Sous vide enhances natural flavors, but under-seasoned food may taste bland.
Is Sous Vide Cooking Safe? Understanding the Risks and Precautions
Sous vide cooking is very safe when basic food safety guidelines are followed. Always cook at recommended minimum temperatures and avoid holding food in the "danger zone" (5–60 °C / 41–140 °F) for extended periods.
Vacuum sealing creates an anaerobic environment, so cleanliness is vital. Use fresh ingredients and don’t store cooked food for too long unless refrigerated or frozen immediately. If unsure, pasteurization charts are available for added safety.
How to Achieve the Perfect Sear After Sous Vide Cooking
Searing adds texture, color, and flavor. For the best results:
- Pat the food dry before searing to prevent steaming.
- Use a cast iron skillet or grill on high heat.
- Sear for 30–60 seconds per side to create a golden-brown crust.
- You can also use a torch, especially for smaller items like scallops or burgers.
Avoid long sears, which can overcook the outer layer and defeat the purpose of precise sous vide temperatures.
Sous Vide vs. Traditional Cooking Methods: Pros and Cons
Sous vide offers several unique advantages:
Pros:
- Precise doneness
- Juicier, more tender results
- Less active cooking time
- Excellent for meal prep
- Reduced risk of overcooking
Cons:
- Requires special equipment
- Longer cooking times
- Lacks instant gratification of high-heat methods
- Final texture often needs post-sear
Still, many home cooks find that the ease and consistency of sous vide outweigh any drawbacks.
Can You Sous Vide Frozen Meat? Tips and Techniques
Yes, frozen meat can go straight into the sous vide bath. Simply:
- Add an extra 30–60 minutes to the normal cooking time.
- Ensure the meat is vacuum sealed or use the water displacement method carefully.
- Don’t defrost first—it’s unnecessary and may even compromise texture.
Sous vide is an ideal way to cook from frozen without compromising quality.
Sous Vide Vegetables: Techniques and Recipes for Beginners
Vegetables can be tricky with traditional cooking—often overcooked or uneven. Sous vide allows for perfectly cooked vegetables every time. Try:
- Carrots at 85 °C / 185 °F for 1.5 hours
- Asparagus at 85 °C / 185 °F for 10–15 minutes
- Potatoes at 90 °C / 194 °F for 1.5–2 hours
They retain more nutrients, texture, and color than boiling or steaming. A touch of butter and herbs in the bag can enhance flavor beautifully.
How to Properly Season and Marinate Food for Sous Vide
Because sous vide cooking is gentle and doesn’t evaporate liquids, strong marinades can become overpowering. Instead:
- Use light seasoning: salt, pepper, garlic, fresh herbs.
- Avoid too much acid (lemon juice, vinegar), as it can alter texture over time.
- For meats, season before sealing. For fish, consider post-cook seasoning to avoid a mushy texture.
Some marinades with oils, soy sauce, and aromatics like rosemary or thyme work exceptionally well with sous vide.
Sous Vide Meal Prep: Tips for Cooking in Advance
Sous vide is excellent for batch cooking and meal prep. Here’s how:
- Cook proteins in bulk and refrigerate in sealed bags.
- Reheat using sous vide at a slightly lower temperature to maintain doneness.
- Label bags with date and content for easy tracking.
- Freeze for long-term storage and reheat as needed.
This makes weekday dinners faster and ensures consistent quality even when time is short.
Choosing the Right Vacuum Sealer and Bags for Sous Vide
A reliable vacuum sealer is a worthwhile investment. Look for:
- External vacuum sealers: affordable and suitable for most home use.
- Chamber vacuum sealers: more expensive but ideal for liquids and long-term storage.
- Sous vide-specific bags: BPA-free and heat safe up to 100 °C / 212 °F.
Reusable silicone bags are an eco-friendly alternative, but make sure they’re rated for sous vide cooking.
Sous Vide Cooking on a Budget: Affordable Equipment and Tips
Sous vide doesn’t have to break the bank. Budget-friendly tips:
- Choose a basic circulator with solid reviews—some models start around $50.
- Use large stockpots instead of specialty containers.
- Skip the vacuum sealer and use zip-top freezer bags with the water displacement method.
- Look for deals on bulk proteins to make the most of your new method.
With a bit of creativity, you can enjoy professional-quality meals at home without a premium price tag.
Cooking sous vide at home unlocks a new level of control and confidence in your kitchen. With the right equipment, practical techniques, and attention to detail, even beginners can produce restaurant-quality dishes effortlessly. Whether you're cooking meats, fish, vegetables, or prepping meals for the week, sous vide delivers results that are hard to beat.