Irresistibly Creamy Chocolate and Peanut Butter Delight
A melt-in-your-mouth homemade treat with timeless flavor
Few dessert combinations are as beloved and universally satisfying as chocolate and peanut butter. This classic pairing has stood the test of time, cherished by generations for its perfect balance of sweet and salty, smooth and rich. The Chocolate Peanut Butter Ball captures everything people adore about this flavor duo in one indulgent, bite-sized creation. Whether you're preparing a batch for a festive celebration, a cozy evening treat, or simply to satisfy an afternoon craving, these homemade confections are sure to become a favorite in your kitchen.
Handcrafted with a silky-smooth peanut butter filling wrapped in a luscious coat of melted chocolate, each ball is a delightful fusion of taste and texture. Their size makes them perfect for sharing, gifting, or serving on a dessert platter, yet they’re just as satisfying when enjoyed all on your own. What truly sets these treats apart is their versatility—they can be decorated with sprinkles, drizzled with white chocolate, or even made with crunchy peanut butter for a twist in texture.
The process of making chocolate peanut butter balls is surprisingly simple and rewarding, requiring just a few basic pantry ingredients and no baking. In a world where elaborate desserts can sometimes feel overwhelming, this no-fuss recipe offers a comforting return to basics—yet with a result that tastes anything but ordinary. It’s this combination of simplicity and decadence that makes the chocolate peanut butter ball such an enduring favorite.
Imagine sinking your teeth into a soft, creamy center that melts effortlessly in your mouth, only to be followed by the snap of a perfectly tempered chocolate shell. The contrast is what makes each bite memorable. The richness of the peanut butter balances beautifully with the subtle bitterness and sweetness of the chocolate, creating a harmonious experience that’s deeply satisfying.
These balls aren’t just treats—they’re moments of joy. They're perfect for holidays like Christmas or Valentine’s Day, yet their appeal is timeless and fitting year-round. Children adore them for their sweetness, adults love them for their nostalgic flair, and everyone appreciates the effort and care that goes into something homemade.
Crafting these little spheres of happiness is also a wonderful opportunity to get creative. From using dark or milk chocolate to rolling them in coconut flakes, crushed nuts, or sea salt, there are endless ways to put a personal spin on each batch. They can be stored in the refrigerator for days, making them a convenient option for those who like to plan ahead or need a go-to dessert for unexpected guests.
If you’re looking for a dessert that delivers both comfort and elegance, look no further than the chocolate peanut butter ball. It’s a recipe that speaks the language of warmth, indulgence, and tradition—all wrapped in a shiny chocolate shell. And the best part? Every bite tells a story of love, care, and culinary simplicity.
In the following sections, you’ll discover exactly how to make your own batch of these irresistible chocolate peanut butter treats, with step-by-step instructions that guide you through each part of the process. Whether you’re a seasoned baker or a kitchen novice, this is one recipe that promises delicious results every time.
- In a large mixing bowl, combine room temperature unsalted butter, creamy peanut butter, vanilla extract, and salt. Mix with a wooden spoon or electric mixer until smooth and well combined.
- Gradually sift in the powdered sugar, mixing continuously until a soft but moldable dough forms. The texture should not be too sticky – if needed, add a little more sugar.
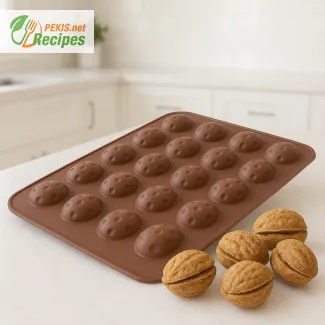
- Using your hands or a small scoop, shape the mixture into small balls, each about 2.5 cm (1 inch) in diameter. Place them on a baking tray lined with parchment paper.
- Once all balls are formed, place the tray in the refrigerator for at least 30 minutes, or until they are firm to the touch.
- In the meantime, melt the chocolate chips together with coconut oil in a heatproof bowl over a pot of simmering water (double boiler method), stirring gently until smooth and glossy. Alternatively, microwave in short bursts of 30 seconds, stirring in between.
- Remove the chilled peanut butter balls from the refrigerator. Using a fork or a toothpick, dip each ball into the melted chocolate, coating it completely. Let the excess chocolate drip off.
- Place the coated balls back on the parchment-lined tray. If desired, drizzle with additional chocolate or sprinkle with chopped nuts.
- Chill the balls again in the fridge for 15–20 minutes or until the chocolate shell has fully set.
- Store in an airtight container in the refrigerator for up to 10 days.
Creative Twists to Elevate the Classic Peanut Butter and Chocolate Combo
Simple upgrades that bring gourmet results
While the traditional chocolate peanut butter ball is already a beloved treat for its creamy center and rich chocolate shell, there’s always room for creativity and refinement. Whether you're looking to make this sweet more decadent, nutritious, or unique, small changes in ingredients or technique can make a noticeable difference in flavor, texture, and presentation. Below are tried-and-true suggestions that will help elevate your next batch of peanut butter balls from simple to sensational.
Enhancing flavor through ingredient substitutions
A well-crafted peanut butter ball relies on balance: the saltiness of peanut butter, the sweetness of powdered sugar, and the richness of chocolate. Each of these elements can be adjusted to better suit your preferences or dietary needs.
For example, replacing traditional peanut butter with almond butter will give the filling a deeper, nuttier profile. Almond butter is slightly less sweet, which means the overall flavor becomes more sophisticated and less cloying, especially when paired with dark chocolate.
If you enjoy bold flavors, try adding a touch of espresso powder to the chocolate coating. Just half a teaspoon can enhance the cocoa notes, creating a more intense and complex chocolate flavor. Similarly, a pinch of cinnamon or cardamom mixed into the filling adds a warm, unexpected spice that complements the peanut butter beautifully.
Another way to create a premium experience is by upgrading the chocolate itself. Use high-quality couverture chocolate with at least 60–70% cocoa solids for a smoother, more luxurious shell. The snap and shine of tempered couverture elevate both the texture and the visual appeal.
Why homemade always tastes better
Homemade versions of chocolate peanut butter balls surpass store-bought options not just in freshness but in customizability and ingredient control. When preparing the recipe yourself, you avoid preservatives, artificial flavorings, and low-grade chocolate that are often used in mass production.
Moreover, you can adjust the sugar level to your preference. Many people find that commercial peanut butter treats are overwhelmingly sweet. At home, you can reduce the powdered sugar and balance it with natural sweeteners like maple syrup or honey, which add depth and character.
Homemade preparation also allows you to control the consistency of the filling. If you prefer a firmer bite, you can chill the dough longer or add more dry ingredients. If you love a melt-in-your-mouth texture, use whipped peanut butter or fold in a spoon of cream cheese for a richer, tangier flavor.
Common mistakes to avoid
Even with a simple recipe, small mistakes can impact the final result. One of the most frequent issues is using peanut butter that is too oily or runny, which makes it difficult to shape the balls and leads to a greasy texture. Always choose a stabilized or well-mixed creamy peanut butter.
Another common mistake is melting chocolate too quickly or at too high a temperature, causing it to seize or burn. Use a double boiler or microwave in short bursts, stirring between each one, to ensure a smooth and glossy result. Tempering chocolate—if you’re confident—adds a professional finish and prevents the chocolate from becoming dull or sticky.
Be cautious with the amount of powdered sugar. While it helps firm the dough, too much sugar can lead to a dry or crumbly texture. It’s better to add it gradually, testing as you go for the desired consistency.
Healthier alternatives for guilt-free indulgence
To make this recipe more suitable for health-conscious eaters, several substitutions can reduce calories or improve nutritional value without sacrificing flavor.
Swap the powdered sugar for finely ground coconut sugar or a powdered erythritol-based sweetener to lower the glycemic index. Instead of conventional chocolate chips, opt for sugar-free or stevia-sweetened chocolate, which is readily available in specialty grocery stores.
Using natural peanut butter without added oils or sugars is another simple yet impactful change. While the texture might be slightly more fluid, you can compensate by adding a spoonful of oat flour or ground flaxseeds to firm it up while adding fiber and nutrients.
For an added protein boost, mix in a scoop of vanilla or chocolate protein powder to the peanut butter mixture. This makes the treat more satiating and suitable for post-workout snacking.
Fun variations and finishing touches
Once you’ve mastered the classic recipe, there’s no limit to how you can play with flavors and finishes. Consider rolling the peanut butter balls in crushed roasted peanuts, shredded coconut, or cocoa powder before dipping them in chocolate for added texture and visual contrast.
Another idea is to fill the center with a surprise ingredient, such as a whole roasted hazelnut or almond, to add crunch and complexity. You can also infuse the filling with flavors like orange zest or chili flakes for an adventurous twist.
White chocolate or ruby chocolate coatings can also be used to diversify the flavor palette and create a stunning presentation for special occasions. These alternatives not only change the taste but also allow for creative color combinations when paired with drizzles or decorative garnishes.
Storage tips for freshness and flavor
To keep your chocolate peanut butter balls fresh and delicious, store them in an airtight container in the refrigerator for up to 10 days. For longer storage, they can be frozen for up to two months. When freezing, layer the balls between sheets of parchment paper to prevent sticking and preserve their shape.
If serving them at a party or event, allow them to sit at room temperature for 10–15 minutes beforehand to soften slightly, which enhances their flavor and mouthfeel.
Improving a traditional recipe doesn’t always require a complete overhaul—sometimes, small refinements can lead to extraordinary results. Whether you choose to enhance the flavor, reduce sugar, or experiment with textures, every change brings a personal touch that reflects your taste and creativity. And in the world of chocolate and peanut butter, a little innovation goes a long way toward making a classic favorite even more unforgettable.
Allergens present in this recipe:
- Peanuts (peanut butter)
- Dairy (butter, chocolate)
Contains gluten: No
Allergen-free and gluten-free tips:
- Replace peanut butter with sunflower seed butter or almond butter for those allergic to peanuts.
- Use dairy-free butter and chocolate (such as coconut-based or vegan alternatives) for lactose intolerance.
- This recipe is naturally gluten-free, but always check labels on chocolate and other processed ingredients to confirm.
- Vitamin E: 2.7 mg – supports immune function and acts as an antioxidant
- Magnesium: 40 mg – essential for muscle function and nerve signaling
- Iron: 1.2 mg – important for oxygen transport in the blood
- Potassium: 150 mg – helps regulate blood pressure and fluid balance
- Phosphorus: 90 mg – important for healthy bones and energy production
- Flavonoids (from chocolate): 55 mg – improve heart health and reduce inflammation
- Resveratrol (trace): <1 mg – supports cellular health and may have anti-aging properties
- Phenolic acids (from cocoa): 30 mg – aid in reducing oxidative stress
Recipes worth trying