The Secret to Perfect Cloud Eggs Every Time
A modern twist on classic eggs for a stunning breakfast
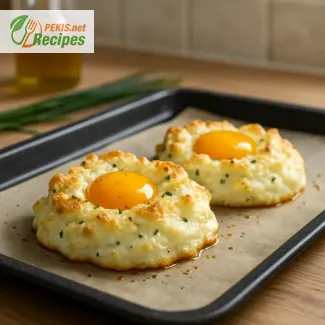
Cloud eggs have emerged as one of the most visually striking and surprisingly simple breakfast dishes in recent culinary trends. Their distinctive look—whipped egg whites baked into fluffy, golden clouds with a glowing yolk nestled at the center—has captivated home cooks and brunch enthusiasts alike. But beyond the aesthetic appeal, these airy creations offer a unique textural contrast that makes them more than just an Instagram-worthy novelty. Whether you're crafting a gourmet morning spread or simply elevating your usual egg routine, cloud eggs bring an exciting and satisfying twist to the breakfast table.
What sets this dish apart is its clever technique. Separating egg whites and whipping them into stiff peaks gives the dish its signature volume, while baking solidifies their structure and enhances their cloud-like appearance. Once the yolks are carefully returned to their pillowy nests, a brief final bake ensures a runny center or a set yolk, depending on personal preference. The result is a dish that's both light in texture and rich in flavor—perfect for anyone seeking a breakfast that's quick to make but delivers a high-impact presentation.
Why cloud eggs are worth the hype
Cloud eggs are more than just a fleeting trend—they're a testament to how a few basic ingredients can be transformed into a gourmet experience. At the heart of this recipe lies a deep respect for egg quality, technique, and timing. With just eggs, salt, pepper, and optional add-ins like cheese, herbs, or spices, the cloud egg becomes a canvas for both simplicity and creativity. In an era when breakfast often means grabbing something on-the-go, cloud eggs invite us to slow down and savor a dish that's equal parts art and nourishment.
Ideal for special mornings or everyday indulgence
This recipe is perfect for weekend brunches, Mother’s Day breakfasts, or any time you want to surprise someone with something unique yet approachable. Their lightness also makes them a great companion to whole grain toast, avocado, sautéed greens, or smoked salmon. The flavor profile of cloud eggs is subtle yet satisfying, with the crisped, golden-edged whites offering a gentle crunch, and the rich yolk adding depth.
Because they’re so quick to prepare—ready in under 15 minutes—they make a surprisingly practical option for weekday mornings as well. They don’t require special equipment (just a hand mixer or whisk), and you likely already have the ingredients on hand. For those following low-carb or gluten-free diets, cloud eggs naturally fit into a variety of nutritional lifestyles, making them a versatile choice for different dietary needs.
Technique-driven success for perfect results
The key to success lies in mastering the texture of the egg whites. They should be beaten until they form firm, glossy peaks, similar to a meringue. Any trace of yolk or fat in the whites can hinder whipping, so clean separation is essential. Using room temperature eggs and a grease-free bowl ensures optimal volume. Shaping the whites on parchment paper and creating a small well for the yolk helps maintain structure during baking.
Another benefit of this preparation method is how well it retains the nutritional integrity of the egg. Because it’s cooked gently in the oven, the texture remains soft without the rubberiness that sometimes comes from over-frying or boiling. The whites puff into a delicate shell, while the yolk can remain as soft or firm as you prefer. This balance of technique and customization makes cloud eggs a favorite among both culinary novices and seasoned cooks.
A canvas for flavor experimentation
Though the classic version of cloud eggs uses only salt and pepper, the structure of the dish makes it easy to adapt with flavorful additions. Mixing in grated cheese, finely chopped chives, parsley, smoked paprika, or even a touch of truffle oil adds depth without compromising the integrity of the cloud. You can also top the finished product with microgreens, chili flakes, or even a drizzle of olive oil for a Mediterranean touch.
If you're preparing brunch for a crowd, cloud eggs can be baked on a large sheet pan for multiple servings at once. Each portion can be seasoned individually, offering a fun, interactive way to customize flavors for each guest. From a culinary perspective, cloud eggs straddle the line between simplicity and refinement, making them ideal for casual family breakfasts and sophisticated plated meals alike.
Visual appeal that matches the flavor
Let’s not forget one of the biggest draws of this dish—presentation. Few breakfast foods offer such immediate visual satisfaction with so little effort. When served on toasted sourdough or a buttery English muffin, cloud eggs are almost too pretty to eat. The contrast between the snow-white whipped base, golden crisp edges, and glossy yolk center makes for a plate that looks straight out of a fine dining magazine.
Whether you're preparing them for a weekend treat or adding variety to your weekday routine, cloud eggs deliver elegance, flavor, and fun in every bite. With the right technique and a touch of creativity, they’ll quickly become a staple in your morning repertoire.
- Preheat the oven to 230°C (450°F). Line a baking tray with parchment paper and lightly grease it with olive oil.
- Separate the eggs: Carefully separate the egg whites and yolks. Place each yolk in its own small bowl to keep them intact.
- Whip the egg whites: Using a clean, dry mixing bowl and electric mixer, whip the egg whites until they form stiff, glossy peaks.
- Season the whites: Gently fold in salt, black pepper, and optionally grated Parmesan and chopped chives.
- Shape the clouds: Spoon the whipped egg whites onto the prepared baking tray into two equal mounds. Use the back of a spoon to create a deep well in the center of each.
- Bake the whites: Bake the egg white mounds for 3 minutes until slightly golden and set.
- Add the yolks: Carefully place one yolk into the center of each cloud. Return to the oven and bake for an additional 2 minutes for runny yolks, or 3–4 minutes for a firmer texture.
- Serve immediately: Carefully lift the cloud eggs off the tray using a spatula and serve warm on toast, greens, or as-is.
Elevating the Cloud Egg Experience
Expert tips for customizing texture, flavor, and presentation
Cloud eggs are already a stunning centerpiece for any breakfast table, but there’s plenty of room to refine and enhance this dish beyond its classic preparation. With just a few thoughtful adjustments, you can elevate the flavor, improve texture, and add visual sophistication. These upgrades don’t require expert culinary skills—just a deeper understanding of how each component interacts and a willingness to experiment within the framework of a beautifully simple dish.
Enhancing flavor with bold and subtle additions
While the basic cloud egg recipe relies on whipped egg whites and a delicately baked yolk, it becomes exponentially more flavorful with the addition of finely grated cheeses. Options like aged Parmesan, Gruyère, or even cheddar can be folded gently into the whipped whites before baking. These cheeses bring a layer of umami and saltiness that balances the egg's natural creaminess. For a more refined profile, try a dash of white pepper, a sprinkle of nutmeg, or a drizzle of truffle oil after baking—these accents enhance the flavor without overpowering it.
Fresh herbs also contribute freshness and complexity. Adding chopped chives, tarragon, dill, or parsley gives the whites subtle aromatics, while a few microgreens on top can complete the presentation with a crisp, peppery bite. For a Mediterranean twist, incorporate a pinch of smoked paprika or sumac into the whites.
Texture improvements and how to achieve them
Achieving the ideal texture begins with proper whipping technique. Use room temperature egg whites and ensure your mixing bowl is completely clean and dry. Any trace of yolk or fat can prevent the whites from reaching stiff peaks, which are essential for the cloud-like structure.
To make the clouds even lighter, some chefs add a pinch of cream of tartar (about 0.5 g or ⅛ tsp), which stabilizes the foam and helps maintain volume during baking. Another technique is to fold in a small amount of cornstarch (around 2 g or ½ tsp), which gives the cooked whites a silkier finish and prevents collapse.
If you prefer a richer bite, you can gently fold in a spoonful of ricotta or crème fraîche just before shaping the clouds. This will result in a creamier texture, but be careful not to overmix, as the structure must remain aerated to bake properly.
Why homemade cloud eggs are superior
Preparing cloud eggs at home offers control over every element, from ingredient quality to seasoning and cooking time. Store-bought or mass-prepared versions (such as those served at buffets or cafés) often compromise on texture or temperature. Home-cooked cloud eggs can be tailored to your preferences—whether you prefer a runny yolk, a more custard-like center, or extra herbs and spices.
Using organic eggs or pasture-raised varieties not only improves flavor and color (the yolk will be a deeper golden hue), but also increases the nutrient density of the final dish. Furthermore, homemade cloud eggs are free from unnecessary preservatives or artificial flavorings often found in pre-made versions.
Common mistakes and how to avoid them
One of the most frequent mistakes is under-whipping the egg whites, leading to deflated or soggy clouds. Conversely, over-whipping can cause them to separate and bake unevenly. Aim for peaks that are firm and glossy, not dry or clumpy.
Another pitfall is failing to properly form the wells for the yolks. If the center is too shallow or wide, the yolk can run over the edges and cook unevenly. Use a spoon to gently carve out a central dip with high walls before baking the whites for the first time.
Timing is another critical factor. Overbaking the yolk in the second stage can result in a dry or chalky texture. If you want a molten center, monitor closely and bake for no more than 2 minutes after adding the yolk.
Healthier alternatives for special diets
While cloud eggs are naturally low in carbs and gluten-free, there are still ways to make them healthier. If you’re watching sodium intake, skip the added cheese or use a low-sodium variety. For dairy-free diets, omit cheese and replace it with finely chopped vegetables like zucchini, spinach, or bell pepper, which add bulk and micronutrients without altering the structure.
For additional fiber and antioxidants, serve the cloud eggs on top of whole grain toast, sautéed kale, or a bed of quinoa. Those avoiding eggs altogether due to allergies can explore aquafaba (chickpea water) as a vegan alternative for whipping into meringue-like foam, though replicating the yolk texture remains challenging in vegan adaptations.
Creative serving ideas to match any occasion
To impress guests or elevate a holiday brunch, consider plating cloud eggs on toasted brioche or atop a small nest of roasted vegetables. Add a smear of avocado, a spoonful of hummus, or even a dash of hot sauce for extra personality.
For an elegant appetizer, serve mini cloud eggs on crostini, topped with caviar or a sliver of smoked salmon. You can even go sweet—by omitting savory additions and lightly sugaring the whites, then placing a custard yolk or fruit purée in the center for a creative breakfast-dessert hybrid.
The cloud egg is more than a recipe—it’s a platform for creativity, precision, and personalization. With each enhancement, it becomes a signature dish uniquely your own.
Allergens present in the recipe:
- Eggs
- Milk (if using Parmesan)
Gluten:
- This recipe is naturally gluten-free if served without bread or with gluten-free toast.
Allergen replacement suggestions:
- Eggs: No substitute available for this specific recipe.
- Parmesan (milk allergen): Replace with a dairy-free cheese alternative or omit entirely.
Vitamins and minerals per serving (approximate):
- Vitamin A: 540 IU – supports vision and immune health
- Vitamin B12: 1.2 µg – essential for nerve function and red blood cell production
- Vitamin D: 41 IU – important for bone health and calcium absorption
- Iron: 1.3 mg – supports oxygen transport in blood
- Phosphorus: 100 mg – contributes to healthy bones and teeth
- Selenium: 17 µg – supports antioxidant defense and thyroid function
Antioxidants per serving (approximate):
- Lutein and Zeaxanthin: 250 µg – promote eye health and protect against oxidative stress
- Vitamin E: 0.5 mg – protects cell membranes from free radicals
- Glutathione (from egg whites): 10 mg – supports cellular detoxification and immunity
Recipes worth trying