A hauntingly delicious Halloween treat with chocolate, cookies, and fun
Create the ultimate graveyard dirt cake with rich layers and spooky toppings
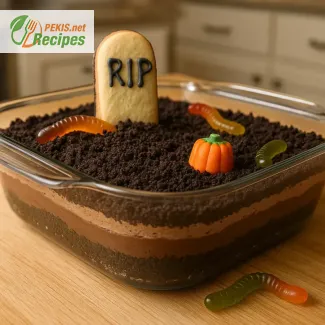
Every October, the kitchen transforms into a playground of spooky imagination, and few desserts capture the eerie essence of Halloween as perfectly as the Halloween Dirt Cake with Oreo Crust. This visually creepy yet irresistibly delicious dessert has become a beloved classic across generations, blending creamy chocolate pudding, crushed Oreo cookies, and playful decorations to evoke a miniature edible graveyard. It’s not just a treat—it’s an experience, designed to surprise, entertain, and indulge.
The base of this graveyard cake is what gives it its rich depth and crunch: a buttery, dark Oreo cookie crust, pressed into a pan and chilled to form the perfect foundation. Over this crisp layer sits a luscious mixture of chocolate pudding, cream cheese, and whipped topping, delivering a smooth, mousse-like texture that contrasts beautifully with the crunchy topping. The star element—crushed Oreo “dirt”—crowns the dessert and sets the stage for the decorative graveyard scene, complete with cookie tombstones, gummy worms, and Halloween candies.
This dessert is more than just aesthetically themed. Its flavor profile is deeply satisfying, especially for chocolate lovers. The balance of sweetness, creaminess, and texture ensures each bite is both nostalgic and decadent. What makes this cake particularly appealing is how customizable it is. Whether you want to craft realistic edible tombstones, add skeleton bones, or insert marshmallow ghosts, the visual impact is limited only by your creativity.
Why this dessert is a Halloween favorite
Halloween dirt cake has become a staple at October parties, school events, and haunted house gatherings. Its ease of preparation, make-ahead convenience, and kid-friendly design contribute to its lasting popularity. Unlike traditional baked cakes, this no-bake dessert keeps things cool and effortless, making it ideal for busy hosts or last-minute party planners.
Another reason for its widespread love is its interactive element. Decorating the cake becomes a fun group activity for children and adults alike. From planting candy pumpkins to arranging cookie headstones, the dessert evolves into a canvas for edible art. Its spooky presentation and over-the-top decorations make it Instagram-worthy and memorable, earning it a place at the center of any Halloween dessert table.
Key elements that make a perfect Halloween dirt cake
Oreo cookie crust
The crust acts as the structural base of the dessert. Made from finely crushed Oreo cookies mixed with melted butter, it’s chilled to create a firm, chocolatey foundation. This layer is essential for the satisfying crunch beneath the creamy layers and echoes the deep, rich flavors associated with fall desserts.
Chocolate pudding and cream cheese filling
What elevates this dessert from a simple cookie crumble is the smooth, rich middle. The combination of instant chocolate pudding and softened cream cheese whipped with whipped topping results in a decadent filling that’s airy yet satisfying. This component offers a creamy counterpoint to the cookie layers and serves as the “mud” in the graveyard scene.
Crushed Oreos for the “dirt”
A second layer of crushed Oreos is sprinkled generously over the top to mimic freshly dug earth. This topping adds texture, depth, and visual cohesion to the graveyard theme. For the best effect, the cookies should be pulsed to a fine consistency, resembling soil while retaining that unmistakable Oreo flavor.
Spooky decorations
The crowning touch of the graveyard dirt cake is its edible decorations. Popular choices include Milano cookies inscribed with “RIP” using black icing, gummy worms crawling out of the dirt, candy pumpkins, marshmallow ghosts, and even edible bones. These elements can be arranged to tell a mini Halloween story, adding character and creativity to the dessert.
Tips for an impressive presentation
To make your Halloween dirt cake stand out, consider assembling it in a glass trifle bowl or individual clear cups. This showcases the layered effect of crust, filling, and topping, and enhances the visual appeal. Use themed tableware, serve with black or orange spoons, and light the setting with flickering candles or string lights to elevate the spooky ambiance.
Add food coloring to the filling for an extra eerie effect—green, purple, or blood red hues can intensify the Halloween theme. Edible glitter or crushed dark chocolate can be sprinkled for a mystical touch. Don’t forget the names on your tombstones; using edible markers or icing pens adds a personalized element that guests will remember.
Make-ahead and storage advice
This dessert is ideal for preparation in advance. In fact, chilling the layers overnight allows the flavors to meld together more fully and helps the crust firm up. Store the cake in the refrigerator in an airtight container to maintain its freshness. Decorations like cookies or candy should be added just before serving to preserve texture and prevent sogginess.
Halloween dirt cake travels well too, making it perfect for potlucks, classroom celebrations, or spooky office parties. It holds its shape and can be easily portioned, either scooped or sliced depending on the presentation method.
A fun, nostalgic, and delicious Halloween tradition
There’s a reason why Halloween dirt cake keeps making its way back to dessert tables every year. It’s easy to make, crowd-pleasing, and delightfully thematic. With endless ways to customize and decorate, it invites creativity and play, making it perfect for all ages. From the deep, chocolatey flavor to the playful graveyard decor, this cake captures the very spirit of Halloween in every bite.
1. Prepare the crust:
Place 300 g (10.5 oz) of crushed Oreo cookies in a food processor and pulse until finely ground. Transfer to a mixing bowl and stir in melted butter until evenly combined. Press the mixture firmly into the bottom of a 9-inch (23 cm) rectangular or round pan. Chill in the refrigerator for at least 15 minutes to firm up the base.
2. Make the creamy filling:
In a large mixing bowl, combine softened cream cheese and powdered sugar. Beat with a hand mixer until smooth and creamy. Add vanilla extract and mix again. Gently fold in the whipped topping using a spatula until fully incorporated.
3. Prepare the pudding layer:
In another bowl, whisk instant chocolate pudding mix with cold milk for about 2 minutes until thickened. Let it sit for another 2 minutes to firm up.
4. Assemble the layers:
Spread the cream cheese mixture evenly over the chilled crust. Follow with a layer of the chocolate pudding. Smooth the surface using a spatula. Chill in the refrigerator for 30 minutes.
5. Add the dirt topping:
Sprinkle the remaining 100 g (3.5 oz) of crushed Oreo cookies over the top to resemble fresh “graveyard dirt”.
6. Decorate your graveyard:
Insert cookie tombstones, position candy pumpkins, arrange gummy worms peeking out of the dirt, and get creative with Halloween candy to complete the graveyard look.
7. Chill before serving:
Refrigerate for at least 1 hour before serving to allow the dessert to set completely. Serve chilled with a spooky smile.
Reinventing a Halloween Classic with Flavor and Texture in Mind
Expert tips to elevate your homemade dirt cake experience
The Halloween Dirt Cake is already a crowd-pleaser, but like many beloved desserts, there’s always room for refinement. While the original recipe delivers on nostalgia and visual appeal, there are ways to enhance both flavor and texture without sacrificing the spooky fun. From upgrading ingredients to adding complexity, these tips will help you create a more memorable and satisfying dessert that stands out at any Halloween gathering.
Upgrade the base: using flavored or homemade cookies
Most versions of this dessert rely on classic Oreo cookies as the base and topping. While this provides a reliable crunch and chocolatey taste, experimenting with different cookie flavors can bring unexpected depth. For example, using double chocolate or espresso-flavored cookies can add richness and intensity, complementing the chocolate pudding layer. For a more artisanal touch, consider making your own chocolate shortbread cookies—this allows for control over sweetness, texture, and ingredient quality.
Homemade cookies also give you the option to reduce preservatives and eliminate palm oil, offering a cleaner, more wholesome version of the base. Just be sure to grind them finely and allow the butter to properly bind the crust mixture.
Enhance the filling: from instant pudding to homemade mousse
The filling is typically made with instant chocolate pudding, which is quick and reliable, but for a more luxurious mouthfeel, replacing it with homemade chocolate mousse makes a noticeable difference. Mousse, made with melted dark chocolate, whipped cream, and a touch of egg yolk (or aquafaba for a vegan option), delivers a deeper, more authentic chocolate flavor and a smoother, airier texture.
Another option is to blend in a spoonful of espresso or orange zest into the cream cheese layer. These small additions subtly enhance the overall flavor profile, balancing the sweetness with either brightness or bitterness, depending on your choice.
Health-conscious swaps that retain indulgence
If you're looking for a version that’s a bit lighter or caters to specific dietary needs, several healthy substitutions can be made:
- Use Greek yogurt instead of cream cheese to reduce fat and add a boost of protein.
- Replace whipped topping with unsweetened coconut cream or aquafaba whipped foam for dairy-free alternatives.
- Choose gluten-free sandwich cookies for the base and topping, especially useful when serving guests with sensitivities.
- Opt for reduced-sugar pudding or make your own chocolate layer using avocado mousse for a plant-based, nutrient-rich spin.
Each of these changes can maintain the dessert’s visual appeal and creamy texture while improving its nutritional profile.
The importance of structure and assembly order
A common issue with homemade dirt cake is improper layering. Spreading the filling too soon over a soft crust can cause it to break apart. It’s essential to chill the cookie crust thoroughly before adding the next layers. Similarly, both the cream cheese mixture and pudding layer should be slightly firm before topping with the final Oreo crumb layer.
Layering in a trifle dish or individual cups can also improve presentation and portion control. Clear containers allow for a more attractive display and help maintain structure while serving.
Creative decoration ideas that also add flavor
Beyond aesthetics, decorations can be functional. Consider using chocolate-coated almonds as “rocks” or adding candied ginger bones for a spicy surprise. If you're serving adults, cherry liqueur-soaked sponge bits can be layered into the base for a dramatic and flavorful twist.
For a more gourmet version, add a drizzle of salted caramel between layers or a sprinkle of flaky sea salt over the top before serving. These additions provide a sweet-salty balance that enhances the dessert's richness without overpowering it.
Why homemade always tastes better
Making this dessert at home allows full control over the quality of ingredients, from using organic dairy to selecting fair-trade chocolate. The result is a dessert that’s not only better-tasting but also free of unnecessary additives and artificial flavors often found in pre-made mixes or store-bought versions.
Additionally, the process of preparing and decorating the cake brings an emotional connection that’s hard to replicate with packaged products. Whether crafting spooky grave markers or letting kids personalize their cup portions, the experience becomes part of the celebration.
Mistakes to avoid for the perfect graveyard dirt cake
- Overmixing the filling can lead to a runny texture. Whip until just combined to retain lightness.
- Skipping the chilling steps reduces structural integrity and may cause layers to collapse.
- Adding decorations too early can result in soggy cookies and discolored candies. Always garnish shortly before serving.
- Using low-quality chocolate pudding leads to a bland filling. Always taste-test your pudding layer before assembling.
These pitfalls are easily avoidable but can significantly affect the outcome if overlooked.
This recipe thrives on customization. Whether adding a pinch of cinnamon to the crust or infusing the pudding with peppermint extract for a chilly twist, small changes allow you to tailor the cake to different palates. You can even theme it differently—switch Halloween candies for edible flowers and make a “spring garden” version using the same base structure.
Ultimately, a great dirt cake is more than its layers. It’s the careful balance of texture, temperature, flavor, and decoration that creates an unforgettable dessert, whether for Halloween or any time you crave playful indulgence.
Allergens present in the recipe:
- Gluten (from Oreo cookies)
- Dairy (cream cheese, milk, whipped topping)
- Soy (may be present in chocolate or candy)
Suggested substitutions for allergens and gluten:
- Gluten-free Oreo-style cookies can replace standard Oreos.
- Lactose-free cream cheese and plant-based whipped topping (e.g., coconut or soy-based) can be used for dairy-sensitive individuals.
- Ensure pudding mix and candies are labeled gluten-free and allergen-free if necessary.
Vitamins and minerals per serving (approximate):
- Calcium: 120 mg – supports bone strength and nerve function
- Iron: 2.5 mg – essential for red blood cell production
- Potassium: 180 mg – helps maintain normal fluid balance
- Magnesium: 22 mg – supports muscle and nerve function
- Vitamin A: 110 µg – contributes to vision and immune health
- Vitamin B12: 0.6 µg – supports energy metabolism and brain function
- Phosphorus: 110 mg – important for strong bones and teeth
Antioxidants per serving (approximate):
- Flavonoids (from cocoa): 150 mg – may improve heart health and reduce inflammation
- Phenolic acids: 75 mg – support cellular repair and antioxidant defense
- Theobromine: 100 mg – a mild stimulant and heart-protective compound found in chocolate
- Vitamin E: 1 mg – helps protect cells from oxidative damage
- Zinc: 1 mg – supports immune function and skin repair
Recipes worth trying