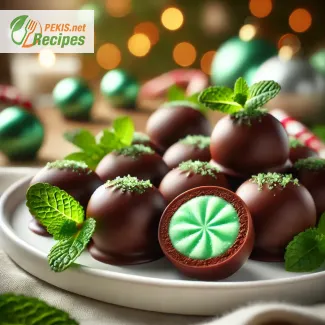
Homemade Christmas candies with mint flavor are the perfect festive treat to elevate your holiday season. Imagine a decadent, smooth dark chocolate shell giving way to a creamy, refreshing mint center that melts in your mouth, leaving behind a crisp, invigorating aftertaste. These delightful candies capture the essence of the holidays, combining the best of both sweetness and refreshing mint, making them an ideal indulgence for cozy winter nights, family gatherings, or as thoughtful homemade gifts for your loved ones.
The rich flavor of mint is a timeless favorite during the festive season. It evokes memories of winter nights, hot cocoa, and the fresh, cool air outside, blending seamlessly with the warmth and sweetness of chocolate. The mint-infused center of these candies provides a perfect balance of refreshing coolness and indulgent creaminess, while the outer dark chocolate layer adds a touch of richness that makes each bite a luxurious treat. Whether you're preparing them for a holiday gathering or gifting them in beautifully packaged boxes, these candies will undoubtedly impress with both their flavor and elegant presentation.
What sets these homemade Christmas candies apart is their handcrafted nature. Unlike store-bought options, these candies are made with premium ingredients, ensuring a fresher, more authentic taste. The use of fresh mint or high-quality mint syrup allows the mint flavor to shine through, offering a more vibrant and natural taste compared to artificial flavors. Additionally, these candies can be customized to your personal preference by adjusting the sweetness or adding additional flavors such as a hint of vanilla or citrus zest for extra complexity.
Making these candies is not only a delicious endeavor but also a fun and rewarding experience. The process itself is simple yet satisfying, and the end result is a batch of stunning mint-flavored treats that look as good as they taste. Whether you're an experienced chocolatier or a beginner, this recipe is approachable and perfect for anyone looking to add a personal touch to their holiday celebrations. The mint chocolate combination is a universally loved pairing, ensuring that these candies will be a hit with family, friends, and guests of all ages.
Aside from their delicious taste, these candies also make for a wonderful holiday gift. Packaging them in beautiful gift boxes or jars, tied with festive ribbons, transforms them into a thoughtful and homemade gift that's sure to be appreciated. With their smooth texture, rich chocolate, and refreshing mint flavor, they offer a luxurious touch that is perfect for the holiday season. Whether you’re hosting a Christmas party or simply looking to surprise someone with a special treat, these candies are the perfect solution. Their homemade appeal adds a personal touch that store-bought candies just can't match.
Moreover, homemade Christmas candies with mint flavor can be easily tailored to meet dietary needs. If you're looking to reduce sugar or cater to specific dietary preferences, you can substitute regular sugar with alternatives like stevia, erythritol, or coconut sugar, ensuring a healthier version without compromising on flavor. The candies can also be made gluten-free by using gluten-free ingredients, making them accessible to a wider range of guests and family members. Additionally, using high-quality dark chocolate can increase the antioxidant content, making them a slightly healthier indulgence compared to other candy options.
The inclusion of mint also offers a number of health benefits. Mint has long been celebrated for its ability to aid digestion, relieve headaches, and promote fresh breath, making these candies a satisfying treat that not only delights the taste buds but also offers a hint of wellness. The combination of dark chocolate and mint may also have mood-boosting effects, helping to enhance the festive spirit and provide a moment of indulgence during the often hectic holiday season.
In summary, homemade Christmas candies with mint flavor are an exceptional way to celebrate the season. They embody the joy and warmth of the holidays, offering a perfect balance of refreshing mint and rich chocolate. Whether you’re preparing them for a special occasion, sharing them with friends and family, or gifting them to loved ones, these candies will undoubtedly bring a touch of festive cheer and luxurious flavor to your celebrations.
- Prepare Ingredients: Begin by melting the butter in a small saucepan over low heat. Once the butter has melted, add the heavy cream and stir to combine well.
- Melt Chocolate: In a separate bowl, melt the dark chocolate over a double boiler or in the microwave, stirring occasionally until smooth. Once melted, add powdered sugar, mint syrup, and vanilla extract. Stir until well incorporated.
- Add Mint: Stir in the fresh mint powder (or ground dried mint) into the chocolate mixture. Mix thoroughly to ensure the mint flavor is evenly distributed throughout.
- Form Candies: Allow the chocolate mixture to cool slightly until it is safe to handle. With a spoon, scoop the mixture and shape it into small balls, about the size of a walnut. Place the formed candies on a tray lined with parchment paper.
- Chill: Once all candies are shaped, place the tray in the refrigerator for at least 2 hours, or until the candies have firmed up and the chocolate has fully set.
- Coat in Chocolate (Optional): For a glossy finish, you can melt additional dark chocolate and dip each candy into it, allowing it to set again in the refrigerator for a final coating.
When it comes to making homemade Christmas candies with mint flavor, there are many ways you can tweak and adjust the recipe to better suit your personal taste, dietary needs, and even presentation. This recipe offers a foundation of creamy mint centers encased in rich dark chocolate, but with a few thoughtful adjustments, you can elevate it further, add variety, or customize it to meet dietary preferences. Below, I’ll provide several tips and tricks that can influence the flavor, texture, appearance, and healthfulness of the recipe, so you can make the perfect batch of festive treats.
1. Adjusting the Chocolate:
The choice of chocolate is one of the most impactful aspects of the recipe. The type of chocolate you use can drastically alter the taste and overall sweetness of the candies.
- Dark Chocolate: The recipe calls for dark chocolate (70% cocoa), which provides a rich, slightly bitter taste that contrasts wonderfully with the minty filling. Dark chocolate is also a healthier option, rich in antioxidants and lower in sugar. However, if you prefer a sweeter treat, you can use milk chocolate instead. Milk chocolate will give the candies a creamier, less intense flavor. You may want to reduce the amount of powdered sugar slightly if you’re using milk chocolate to avoid overly sweet candies.
- White Chocolate: For a more decadent and visually appealing version, try using white chocolate for the coating. White chocolate pairs beautifully with mint and will provide a lovely contrast, especially if you're creating mint-filled bonbons with a green filling. Keep in mind that white chocolate is sweeter than dark chocolate, so you might want to adjust the amount of mint syrup to ensure the balance of flavors is right.
- Vegan or Dairy-Free Options: If you're making these candies for someone with dietary restrictions or preferences, you can easily make them dairy-free by using dairy-free chocolate (available in most health food stores) and substituting butter and cream with coconut oil or vegan butter and coconut cream. Vegan chocolate can have a slightly different texture, but it will still work well for this recipe, providing that necessary chocolate coating and contrast to the mint.
2. Mint Flavor Variations:
The mint flavor in these candies is central to their identity, but there are several ways to adjust the intensity or enhance the mint experience.
- Fresh Mint vs. Mint Extract: The recipe calls for mint syrup or mint extract, but if you prefer a more natural, fresh flavor, you could opt for fresh mint leaves. To incorporate fresh mint, finely chop the leaves and steep them in hot cream to infuse the flavor before adding it to the chocolate. This method will give the candies a brighter, more aromatic mint taste. However, fresh mint may result in a slightly less smooth texture compared to using extract or syrup.
- Adjusting Mint Intensity: The amount of mint syrup or extract can be increased or decreased depending on your personal taste. If you love a strong minty kick, you can add a few extra drops of extract. On the other hand, if you prefer a milder flavor, reduce the mint content slightly. Adding a bit of lemon zest or a touch of citrus essence can also work well with mint, creating a refreshing citrus-mint combination that adds complexity to the candies.
- Herbal Alternatives: If you enjoy experimenting with flavors, you can replace mint with basil, oregano, or even thyme to create an herb-infused chocolate candy. While this would move away from the classic mint flavor, it will introduce unique flavor profiles and make your candy more unconventional.
3. Customization of the Center Filling:
While the recipe provides a basic mint-flavored filling, you can modify it to suit your taste and dietary needs. Here are some suggestions:
- Creamy Filling: The original recipe uses butter and heavy cream for a smooth, creamy filling. However, if you're looking for a lighter option, you can substitute the heavy cream with Greek yogurt for a tangy and creamy filling. This will also provide extra protein. Alternatively, using silken tofu or coconut cream will keep the filling rich but dairy-free.
- Healthier Sweeteners: If you're aiming to reduce the sugar content or make the candies more suitable for people with diabetes or those following a low-sugar diet, consider substituting sugar with a healthier sweetener like stevia, erythritol, or monk fruit sweetener. Keep in mind that some sweeteners, especially stevia, can be more intense than sugar, so it's essential to adjust the quantities carefully. A natural maple syrup or honey could also be used for a slightly more complex sweetness, though these alternatives will make the candies less suitable for strict vegan diets.
- Adding Texture: For a bit of crunch or texture contrast, try adding finely chopped nuts like almonds, hazelnuts, or pistachios into the mint filling. The combination of creamy, smooth chocolate with crunchy nuts can offer a delightful eating experience. If you prefer something a bit more decadent, you could even fold in some chopped dark chocolate into the filling for an extra chocolatey bite.
4. Coloring the Filling:
While the traditional approach to mint-flavored candies is to keep the filling a neutral cream color, you can make your treats more festive by adding color.
- Natural Food Coloring: A few drops of natural green food coloring can give the mint filling a fresh, vibrant green hue, perfect for Christmas-themed treats. If you prefer to keep things natural, consider using spinach powder or spirulina powder to achieve a deep green color. These green powders are also packed with additional vitamins and minerals, so you can boost the health benefits of your treats as well.
- Color Combinations: If you are making candies for other holidays or special occasions, you can experiment with different shades like red for Valentine’s Day or yellow for Easter by using natural colorants derived from fruits or vegetables.
5. Perfecting the Texture:
The texture of your mint candies is a key element that influences the overall experience. To ensure the texture is just right, consider these tips:
- Chilling Time: After forming the candies, it's important to allow them to chill for several hours or even overnight. The chocolate coating will firm up more reliably when left to set in the refrigerator, ensuring the candies hold their shape. If you prefer a firmer texture, you can leave the candies in the fridge for longer than the suggested 2 hours.
- Tempering Chocolate: For a glossy, professional finish, consider tempering the chocolate before coating the candies. Tempering ensures that the chocolate hardens evenly, creating a shiny, crisp finish with a satisfying snap when you bite into it. While tempering can be a bit tricky, it's an excellent technique to master if you're serious about creating polished, high-quality chocolates.
- Storage: Once the candies are fully set, they should be stored in a cool, dry place or in an airtight container. If the weather is warm or you live in a humid climate, store the candies in the refrigerator to prevent the chocolate from becoming soft or melting. Just make sure to bring them to room temperature before serving for the best texture and flavor.
6. Packaging and Presentation:
A thoughtful and elegant presentation can make these homemade candies even more special. You can package them in festive boxes, mason jars, or clear treat bags tied with ribbons. Adding a personal touch, such as a handwritten gift tag or decorative accents like sprigs of mint, will make the candies feel even more like a personalized gift. The candies also make a great addition to a holiday dessert platter, where their vibrant mint flavor can complement other treats.
7. Healthier Alternatives:
If you're trying to make these candies healthier without sacrificing taste, there are several substitutions you can make. Instead of using traditional sugar in the filling, opt for coconut sugar, honey, or agave syrup. For a more fiber-rich candy, you can include chia seeds or flax seeds in the filling. These ingredients not only add texture but also boost the nutritional value of the candies.
By following these tips, you can truly tailor the homemade Christmas candies with mint flavor recipe to suit your preferences, whether that means adjusting the sweetness, experimenting with flavors, or even making the candies dairy-free or vegan. With a little creativity and some simple ingredient swaps, you can create a treat that’s perfect for any occasion, while ensuring your candies are fresh, flavorful, and uniquely yours.
- Allergens:
- Dairy (from butter and cream)
- Cocoa (from chocolate)
- Gluten:
- This recipe is naturally gluten-free, so it is safe for people with celiac disease or gluten sensitivity.
Ingredient Substitution Tips to Eliminate Allergens and Gluten:
- For a dairy-free version: You can substitute coconut oil or vegan butter for the regular butter, and use coconut cream instead of heavy cream to achieve a rich and creamy texture.
- For a gluten-free version: Ensure that the chocolate and powdered sugar used are labeled as gluten-free to avoid any cross-contamination.
- Vitamin A: 0.4 μg
- Supports healthy vision and skin, and plays a role in immune function.
- Vitamin C: 1 mg
- Important for immune health, tissue repair, and acts as an antioxidant.
- Vitamin E: 0.5 mg
- An antioxidant that helps protect cells from oxidative stress and supports skin health.
- Calcium: 30 mg
- Essential for bone and teeth health, as well as muscle function.
- Magnesium: 40 mg
- Important for muscle and nerve function, and energy production.
- Flavonoids (from dark chocolate): 0.5 mg
- Flavonoids in dark chocolate help reduce inflammation, lower blood pressure, and protect against heart disease by reducing oxidative stress.
- Polyphenols (from mint): 5 mg
- Mint is rich in polyphenols, which have anti-inflammatory properties, may improve digestion, and contribute to overall cardiovascular health.
