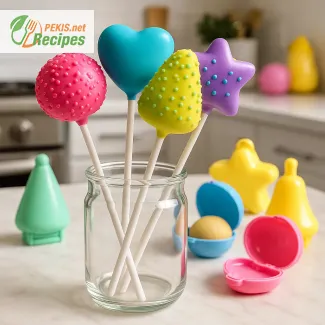
Create Delightful Treats: Fun No‑Bake Cake Pops for Every Occasion
Easy homemade cake pops with shape molds – star, heart, ball, triangle
When it comes to making fun desserts that are as pleasing to the eye as they are to the palate, few treats compare to no-bake cake pops. These bite-sized sweets combine creativity, ease of preparation, and irresistible flavor – all without the need for an oven. Whether you're planning a party, preparing snacks with your kids, or simply indulging in some weekend kitchen fun, this quick and easy cake pop recipe lets you shape and decorate like a pro using vibrant plastic molds in the shape of a star, heart, round ball, or triangle.
Thanks to the convenience of modern kitchen tools like no-bake cake pop molds, you don’t need advanced baking skills or lengthy prep time. The secret to perfect results lies in shaping a moist cake mixture into uniform, charming forms, then finishing them with a generous dip into candy melts or chocolate glaze. These molds allow for precise, mess-free shaping – just press, chill, and pop onto sticks for the ultimate handheld dessert.
Shaping cake pops without baking: child-friendly, mess-free and creative
One of the most delightful aspects of no-bake cake pops is their versatility in shape and style. The molds come in a variety of playful designs such as stars, hearts, trees, or classic spheres, making it easy to match your dessert to any occasion. Birthdays, Valentine’s Day, holiday parties – there's always a reason to craft your own decorated cake pops.
These cake pops are especially suitable for activities with children, offering a safe and hands-on dessert project without needing to handle hot appliances. By using plastic molds, even young kids can easily form the cake mixture into their favorite shape. Simply fill the mold, press to seal, and cool it down – in the fridge or freezer – to create a firm base ready for decorating.
Why candy melts and chocolate coatings are ideal for cake pops
To complete the cake pops, the chilled shapes are dipped into melted candy coating or tempered chocolate, creating a delicious shell that not only enhances flavor but adds structural integrity. This coating hardens quickly and allows for endless decoration options, from colored sprinkles and crunchy sugar pearls to mini flowers or drizzled chocolate threads.
Using candy melts ensures a smooth, even coating with vibrant color possibilities, while dark, milk, or white chocolate glazes provide a more classic, rich finish. The combination of a soft interior and crisp shell is part of what makes these pops such a favorite among dessert lovers.
Customize flavors and colors to match any theme
The beauty of no-bake cake pops is in their adaptability. Start with a simple mix of cake crumbs and frosting or a no-bake substitute like crushed cookies and cream cheese. Then match your coating color and toppings to the mood – pastel tones for baby showers, gold and red for holidays, or even bold neons for kids’ parties.
Add flavor extracts like vanilla, strawberry, lemon, or peppermint to the base to take your pops to the next level. A heart-shaped strawberry-flavored cake pop dipped in white chocolate and finished with red sprinkles? Instant crowd-pleaser. A gold-dusted star pop with dark chocolate and a dash of cinnamon? Perfect for winter evenings.
Ideal gift idea or party treat that travels well
These cute no-bake treats aren’t just perfect for your own enjoyment – they make great gifts and party favors. Their size and structure make them easy to wrap individually or arrange in decorative jars or boxes. And since they don’t rely on fresh cream or perishable ingredients, they’re perfect for events, bake sales, or holidays where you need make-ahead desserts.
The use of plastic molds adds even more convenience – you can create several dozen pops in uniform size, ensuring consistency and visual appeal. Their charming shape and colorful decoration make them stand out on dessert tables and photos alike.
Kitchen essentials: what you need for perfect no-bake cake pops
To successfully prepare these treats, all you need is:
- Cake crumbs or cookie base
- Frosting or binding mixture
- Shape molds (heart, star, triangle, ball)
- Lollipop sticks
- Candy melts or chocolate for coating
- Toppings like sprinkles, pearls, mini fondant decorations
The molds are reusable, easy to clean, and lightweight – a favorite tool for both casual home bakers and anyone wanting to explore creative cake decoration without investing in expensive equipment.
Make memories in the kitchen – and fun desserts for all ages
Whether you're prepping for a themed party, looking for a fun family project, or want to surprise someone with homemade sweets, no-bake cake pops deliver on every level. From their eye-catching shapes to their delicious taste and mess-free process, they turn dessert-making into a moment of joy. With the help of these versatile plastic molds and some imagination, everyone can become a cake pop artist.
- Make the cake pop base:
Crumble the cake into a large mixing bowl until you get a fine, uniform texture. Use your fingers or a food processor to break it down evenly. - Mix with binder:
Add cream cheese, vanilla extract, powdered sugar, salt, and softened butter to the cake crumbs. Mix thoroughly using your hands or a spatula until the mixture holds together and is soft but firm. - Shape with molds:
Take your plastic molds in desired shapes (heart, star, triangle, or ball). Fill one half with a heaped spoon of the cake mixture, press to fill all edges. Close the mold and press gently. Remove excess from the sides and open carefully. Repeat until all pops are shaped. - Chill the shaped pops:
Place the shaped pops on a tray lined with baking paper and refrigerate for 30 minutes or freeze for 15 minutes to firm them. - Insert sticks:
Dip the tip of each stick into melted candy coating or chocolate, then insert into each cake shape. This helps secure the stick once the coating sets. - Coat the cake pops:
Melt the candy melts or chocolate in a heatproof bowl over a pot of simmering water or in short bursts in the microwave. Dip each pop into the melted coating, turning to fully cover. Let excess drip off. - Decorate immediately:
While still wet, decorate each pop with sprinkles, sugar pearls, or mini fondant flowers. Stand the cake pops upright in a block of styrofoam or a glass to dry. - Set and serve:
Let the coated cake pops set completely at room temperature or refrigerate for quicker results. Serve once the coating is firm and decorations are dry.
Creative Ways to Upgrade No-Bake Cake Pops at Home
Expert tips for flavor, texture, and presentation improvements
While no-bake cake pops are already a fun and crowd-pleasing treat, there are many ways to elevate the standard recipe into something truly special. With the right ingredients, techniques, and presentation, you can transform a basic version into a gourmet dessert perfect for birthdays, gifts, or festive occasions. Whether you're aiming for richer taste, smoother texture, or healthier options, these suggestions are designed to bring your cake pops to the next level.
Choosing the right base: cake types and binding alternatives
Your base mixture is the foundation of great cake pops. While most people use leftover sponge or store-bought cake crumbs, consider baking a moist homemade cake with ingredients like buttermilk, yogurt, or sour cream for better texture and flavor. Chocolate, vanilla, lemon, or even carrot cake can each add unique notes depending on the theme or season.
For the binder, traditional cream cheese works well, but experimenting with mascarpone, Greek yogurt, or even nut butters (like almond or peanut) can lend a richer or nuttier profile. Using flavored cream cheese (e.g., strawberry, honey, or vanilla) subtly changes the taste without overpowering the base.
Boosting flavor naturally
One of the easiest upgrades is to enhance the base with natural flavorings. Add citrus zest, such as lemon or orange, to brighten the mix. A touch of instant espresso powder can deepen the taste of chocolate pops. Spices like cinnamon, cardamom, or nutmeg work wonders when paired with fall-inspired flavors.
For texture, incorporate finely chopped toasted nuts, dried fruits, or crushed freeze-dried berries into the cake mixture before shaping. These ingredients not only add complexity but improve the nutritional profile too.
Healthier substitutions without compromising taste
To create a more balanced treat, use whole-grain sponge cake or reduce sugar in the base by using naturally sweet elements like mashed banana or date paste. Replace traditional butter with coconut oil or avocado puree for a dose of healthy fats.
Choose dark chocolate or low-sugar candy melts for coating. For the binding mixture, low-fat cream cheese or plant-based alternatives can help reduce saturated fat content while maintaining structure and moisture.
Decoration ideas with a purpose
The coating and decoration are where cake pops shine visually. To make them stand out while keeping them wholesome, use natural food colors derived from beetroot, spirulina, turmeric, or butterfly pea flower. These not only look beautiful but also add mild earthy notes and antioxidants.
Top your pops with seeds (like chia or hemp) for crunch and nutrition or use desiccated coconut, crushed pistachios, or cacao nibs instead of sprinkles for a more refined finish.
Why homemade cake pops always taste better
Store-bought versions often contain preservatives, artificial flavors, and stabilizers that compromise both taste and nutrition. Homemade cake pops let you control every element – from the sweetness level to the quality of chocolate used – ensuring a fresher and more personalized result.
By adjusting sweetness and selecting high-quality ingredients, you’ll achieve better taste and texture with fewer additives. Plus, the opportunity to decorate and shape each pop yourself adds a touch of creativity that’s impossible to match commercially.
Common mistakes to avoid when making cake pops
- Overmixing the base: If the cake mixture becomes too dense or sticky, the pops will be heavy and difficult to shape. The mix should feel pliable but not wet.
- Skipping chilling time: This is crucial to ensure the pops don’t fall apart when dipping. Always chill until firm.
- Using the wrong coating temperature: If the candy melts are too hot, they may melt the pops. If too cool, the coating will be thick and uneven. Aim for a smooth, fluid texture.
- Not anchoring the sticks properly: Dip the stick in the coating before inserting to secure it. Let it set before dipping the whole pop.
Adjusting texture for better mouthfeel
If your cake pop feels too mushy, reduce the amount of binder. For a firmer bite, consider mixing in cookie crumbs like graham crackers, digestive biscuits, or shortbread. These absorb moisture and add crumbly contrast.
To increase creaminess without over-softening, use a combination of cream cheese and ricotta or add a small spoon of vanilla pudding mix to the binder for a smoother mouthfeel.
Flavor fusion and creative pairings
Elevate the sensory experience by pairing flavors like:
- Lemon cake + raspberry glaze + white chocolate coating
- Red velvet base + vanilla cream cheese + dark chocolate shell
- Gingerbread cake + maple frosting + caramel drizzle
These pairings turn simple pops into themed, dessert-bar-worthy creations.
Storage and serving tips
Always store cake pops in an airtight container in the fridge if not serving immediately. Let them sit at room temperature for 10 minutes before enjoying to soften the coating slightly.
If transporting, use styrofoam blocks or cake pop stands to keep them upright and prevent smudging. Wrap individually for gifting using clear treat bags and colored ties for an elegant touch.
Allergens present in the recipe:
- Gluten (cake crumbs)
- Milk (cream cheese, butter, chocolate)
- Soy (candy melts, possibly)
Substitution tips for allergens and gluten:
- Use gluten-free cake crumbs for a gluten-free version.
- Replace cream cheese with dairy-free alternatives like vegan cream cheese or coconut cream.
- Choose dairy-free chocolate or candy coating made with plant-based ingredients.
- Verify sprinkles are free from allergens, as some contain gluten or soy lecithin.
Vitamins and minerals per serving (approximate):
- Calcium: 28 mg – supports strong bones and teeth
- Iron: 0.5 mg – important for oxygen transport in blood
- Vitamin A: 110 IU – contributes to vision and skin health
- Vitamin D: 5 IU – aids calcium absorption
- Magnesium: 7 mg – helps nerve and muscle function
- Phosphorus: 32 mg – supports energy metabolism
Antioxidants per serving (approximate):
- Flavonoids from dark chocolate (if used): 20 mg – help reduce inflammation
- Phenolic acids from cocoa (if used): 12 mg – support heart health
- Vanillic acid (from vanilla): 3 mg – natural antioxidant with soothing effects
- Color compounds (from natural sprinkles): 2 mg – may support cellular protection
Recipes worth trying