Create Spooky Fun with These Colorful Halloween Cake Pops
Perfect no-bake party treats that bring monster faces to life
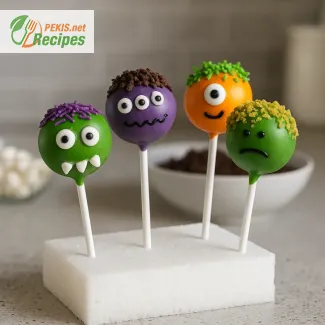
When it comes to easy Halloween treats for kids, few options are as playful, eye-catching, and satisfying as Monster Faces Cake Pops. These bite-sized sweets are not only a visual delight but also a fantastic way to involve children in festive food crafting. Whether you're planning a Halloween birthday party, a classroom celebration, or simply a themed dessert table, these cake pops serve as the ideal centerpiece — fun to look at and even more fun to eat.
Their popularity has soared in recent years thanks to their versatility, simplicity, and the endless room for creative expression. With no need for complicated baking techniques, these treats are accessible for all skill levels. The real charm lies in the decorating process, where melted chocolate coatings become canvases for goofy grins, creepy eyes, and outrageous monster hair.
Why Monster Cake Pops Are the Go-To Halloween Dessert
Monster-themed cake pops stand out because they merge classic dessert comfort with themed fun. Unlike cupcakes or full-sized cakes, they’re easy to distribute, portion, and serve — especially for events involving kids. They can be made ahead of time, stored easily, and don’t require any cutlery, making them a favorite for parents and party planners alike.
For children, the process of dipping, decorating, and designing their own monster faces provides entertainment beyond the final bite. From swirling food coloring into melted candy melts to attaching edible googly eyes or shaping teeth with mini marshmallows, kids get to play chef and artist at the same time.
These cake pops also offer flexibility in flavors and fillings. Whether you're using vanilla, chocolate, or red velvet as your base, you can tailor the interior to suit any taste preference. Pair that with colored coatings and monster-themed sprinkles, and you've got a wildly customizable treat that fits any Halloween aesthetic.
Best Occasions to Serve Monster Cake Pops
Monster Faces Cake Pops are perfect for a range of Halloween events:
- School Halloween parties: Nut-free and mess-free options are available.
- Birthday celebrations: Custom monsters can match your child’s favorite colors or characters.
- Fall festivals and trunk-or-treat events: Easy to wrap individually and hand out.
- Home décor snack tables: Add height and visual appeal by placing them in decorated styrofoam blocks.
You can even create cake pop bouquets by arranging them in themed jars, making them a stunning edible gift or spooky table decoration.
Ingredients That Make These Pops Stand Out
The foundation of a great monster cake pop lies in the balance between moist cake crumbs and rich frosting, which are rolled together into uniform spheres. From there, the magic happens through vibrantly colored candy melts, edible eyes, and fun candy accessories. Popular choices include:
- Colored candy melts (green, purple, orange)
- Candy eyes in various sizes
- Lollipop sticks or cake pop sticks
- Crumbled cookies or cereal for monster hair
- Gel icing pens for fine details
These ingredients not only add flair but also texture, making each bite unique and exciting.
Tips for Creating the Perfect Monster Expression
To create memorable monster faces, consider the following decoration ideas:
- Use a toothpick to add sharp teeth or wiggly smiles.
- Create crazy hair with chocolate sprinkles or cotton candy.
- Stack multiple candy eyes for a “mutant” monster look.
- Add colored sugar or edible glitter for a magical finish.
The key is to let imperfections shine — the messier the monster, the more adorable (or terrifying) it becomes!
Storage and Make-Ahead Advice
Because these cake pops are coated in chocolate or candy, they’re stable at room temperature and can be made several days in advance. Once decorated, place them upright in a foam block or a cake pop stand and let them set completely. Afterward, store them in an airtight container, separating layers with parchment paper.
Avoid refrigeration unless necessary, as moisture may affect the coating’s texture or color. If you’re prepping for a large event, you can freeze the formed cake balls (before coating) for up to a month, then dip and decorate closer to your celebration date.
Getting Kids Involved in the Decorating Process
One of the best aspects of Monster Faces Cake Pops is that they double as an interactive activity for children. Set up a decorating station with pre-rolled cake balls, various melted candy coatings, and toppings. Provide kid-friendly tools like piping bags or plastic knives, and watch creativity take over.
This setup works wonderfully for Halloween sleepovers, classroom stations, or family baking nights, turning the process into a bonding experience that ends in laughter—and a sugar rush.
The Visual Appeal That Makes Them Unforgettable
A well-made monster cake pop isn’t just food — it’s a mini sculpture. With their bright colors, goofy expressions, and bite-sized charm, they immediately grab attention. When grouped together on a platter or stand, they bring a sense of energy and whimsy that instantly signals celebration.
In social settings, guests are drawn to them for their visual fun, and they photograph beautifully — making them ideal for sharing on social media or party albums. Their uniqueness ensures they’ll be remembered long after the last one is eaten.
The Secret Behind Their Popularity
What really sets Monster Faces Cake Pops apart is their combination of visual delight, hands-on fun, and indulgent flavor. They don’t just sit on the dessert table — they invite engagement. They’re the kind of treat kids proudly show off before devouring, and adults can’t resist snapping a photo of.
Whether you're baking with family or preparing for a crowd, these cake pops bring imagination and flavor together in one unforgettable Halloween treat.
- Crumble the cake base: Use your hands or a food processor to break the sponge cake into fine crumbs. Ensure there are no large pieces.
- Mix with frosting: In a mixing bowl, combine the cake crumbs with buttercream frosting. Knead until the texture resembles moldable dough. Add more frosting if the mixture is too dry.
- Form balls: Scoop out portions of the dough (about the size of a walnut) and roll them into smooth, round balls. You should get about 20.
- Insert sticks: Dip the end of each lollipop stick into melted candy melts and push it halfway into each cake ball. Chill in the fridge for 15 minutes to firm up.
- Prepare the coating: Melt candy melts in a microwave-safe bowl, stirring every 20–30 seconds until smooth. Add vegetable oil to thin the coating if needed.
- Dip the pops: Submerge each chilled cake pop into the melted coating, letting excess drip off. Rotate to ensure full coverage.
- Decorate monster faces: While the coating is still wet, immediately add candy eyes, marshmallow teeth, chocolate chips, or crushed cereal for hair. Use icing pens and edible glitter for extra features.
- Set completely: Stick the cake pops upright into a styrofoam block or drying rack. Let them set at room temperature until the coating is firm to the touch.
Transform Your Halloween Cake Pops into Irresistible Masterpieces
Ingredient tweaks and pro tips to elevate your monster-themed treats
Crafting Monster Faces Cake Pops can be a delightful experience, but with the right adjustments, this fun treat can evolve into something truly extraordinary. From enhancing flavor depth to avoiding common mistakes, small improvements can make a big difference in texture, appearance, and overall enjoyment. Here's how you can refine the traditional monster cake pop recipe and customize it to suit various dietary preferences or creative goals.
Upgrade the cake base for more flavor complexity
Most basic cake pop recipes use plain sponge or box-mix cake, which is perfectly fine — but opting for a homemade cake base allows you to control sweetness, texture, and depth of flavor. Instead of plain vanilla or chocolate, consider these variations:
- Red velvet cake: adds rich cocoa notes and pairs beautifully with cream cheese frosting.
- Pumpkin spice cake: ideal for fall, this brings in warm spices like cinnamon, nutmeg, and clove.
- Lemon or orange zest sponge: adds brightness and contrast to sweet coatings.
Using butter-based cakes instead of oil-based mixes also creates a firmer crumb, which holds together better when shaping the balls.
Rethink the binding element: frosting alternatives
While traditional cake pops are mixed with buttercream, there are ways to make this component more interesting or health-conscious:
- Cream cheese frosting gives a tangy depth that balances sweet coatings.
- Nut butters (like almond or peanut butter) add richness and protein, though they're best used for older kids or adults due to allergy risks.
- Mashed banana or pumpkin purée offers a natural sweetness and moisture for a lower-sugar version.
Adjust the quantity carefully — too much binding makes the mixture sticky, while too little causes crumbling.
Experiment with coatings and textures
Instead of just using colored candy melts, enhance the visual appeal and mouthfeel of the outer layer:
- Add coconut oil or vegetable shortening to the melts for a smoother finish and better dipping consistency.
- Mix crushed freeze-dried raspberries or matcha powder into white coating for natural color and added flavor.
- Use dark chocolate or ruby chocolate for gourmet-style monster pops.
Adding a tiny pinch of sea salt to the coating gives contrast and enhances the sweetness without changing the look.
Go beyond candy eyes: creative decoration elements
Standard candy eyes and sprinkles do the job, but you can make your monsters more unique with elevated toppings:
- Use licorice strings for monster mouths or wild hair.
- Attach tiny pretzels as horns or arms for 3D structure.
- Replace marshmallow teeth with white chocolate shards or piped royal icing for precision.
These details not only improve the look but can change the textural experience of each bite.
Health-conscious and allergy-friendly alternatives
Creating a more wholesome version of these cake pops is possible without sacrificing fun:
- Use whole grain or almond flour cakes as a base for added fiber and nutrients.
- Choose dark chocolate with a high cocoa percentage for the coating.
- Opt for fruit-based binders (like apple purée) instead of sugary frosting.
- Select natural colorants such as beet powder, turmeric, or spirulina to dye coatings without artificial dyes.
Always verify decorations are allergen-free if preparing for groups or classroom settings.
Avoiding common cake pop mistakes
Even experienced bakers can run into issues when making cake pops. Here’s what to watch out for:
Crumbling cake balls
If the cake-to-frosting ratio is off, your pops may not hold shape. Use just enough binder to mold the cake — about one part frosting to four parts crumbs works well.
Coating cracks
If the cake balls are too cold and the coating is too hot, the pops may crack after dipping. Let chilled balls rest for a couple of minutes before dipping and stir melts frequently to avoid overheating.
Drippy or uneven coatings
Dipping in thick melts without thinning agents can result in clumps or dripping. Add a small amount of vegetable oil or coconut oil to achieve a silky consistency.
Falling off the stick
Always insert the stick into melted candy before pushing it into the cake ball. This acts as “glue” and keeps the ball secure after setting.
Customize for themes and seasons
Monster cake pops are naturally suited for Halloween, but small tweaks can adapt them for year-round fun:
- Swap monster faces for snowmen or reindeer during winter.
- Use pastel coatings and flower details for spring or birthday celebrations.
- Create zombie, mummy, or alien versions with alternate face designs and colors.
This makes the base recipe more versatile and reusable, allowing for thematic dessert options without starting from scratch.
Why homemade always wins
While store-bought cake pops exist, the homemade version offers unbeatable advantages:
- You control the quality of ingredients, avoiding preservatives or artificial additives.
- Flavor is fully customizable — both inside and out.
- It becomes an interactive family or party activity, fostering creativity and bonding.
- You can adjust sweetness levels, accommodate dietary restrictions, and add meaningful personal touches.
The flexibility of this recipe allows it to grow with your needs, whether that means healthier ingredients, gourmet presentation, or simply more fun.
With just a few mindful adjustments, Monster Faces Cake Pops can evolve from a cute snack to a personalized, show-stopping dessert that’s as memorable as it is delicious.
Allergens present in the recipe:
- Gluten (from sponge cake)
- Milk (buttercream, candy melts, chocolate)
- Eggs (in sponge cake)
- Soy (some candy melts)
Tips for allergen-free and gluten-free alternatives:
- Replace sponge cake with gluten-free cake mix
- Use dairy-free buttercream and vegan candy melts
- Choose egg-free sponge cake for egg allergies
- Verify decorations are allergen-safe (e.g., vegan eyes, gluten-free sprinkles)
Vitamins and minerals per serving (approximate):
- Calcium – 18 mg: supports bone health
- Iron – 0.6 mg: supports oxygen transport
- Vitamin A – 40 µg: essential for vision
- Vitamin D – 0.3 µg: aids calcium absorption
- Potassium – 45 mg: regulates fluid balance
- Magnesium – 6 mg: supports nerve function
- Vitamin E – 0.5 mg: protects cells from damage
- Vitamin B12 – 0.2 µg: helps red blood cell formation
Antioxidants per serving (approximate):
- Beta-carotene – 80 µg: boosts immune system and skin health
- Polyphenols – 15 mg: contributes to reduced inflammation
- Flavonoids – 10 mg: supports cardiovascular health
- Vitamin C – 0.5 mg: assists in collagen production and immunity
Recipes worth trying