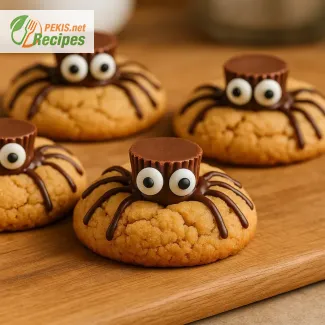
24 servings, 20 minutes prep, 12 minutes bake, 32 minutes total. Spooky Peanut Butter Spider Cookies combine creamy peanut butter, soft cookie dough, and rich dark chocolate to create playful Halloween treats with candy eyes and edible legs. Perfect for parties, they balance sweet and salty flavors while doubling as festive table décor. Store at room temperature for 2 days, freeze for 2 months, or reheat at 150 °C for 8–10 minutes to refresh their chewy texture.
PEKIS – professional chef and recipe developer with over 25 years of experience, specialized in European and international cuisine. I’ve spent countless Halloweens experimenting with playful treats, and these Spooky Peanut Butter Spider Cookies are one of my favorite ways to bring a mix of flavor and fun to the table. Working with peanut butter and dark chocolate has always been a passion of mine, especially when turning simple ingredients into festive creations that make both kids and adults smile.
Frighteningly Fun Spider Cookies with Peanut Butter
A playful Halloween dessert with spooky charm and nutty flavor
Dark chocolate tones blended with creamy peanut butter form the base of these spider cookies that look scary but taste irresistibly sweet. Each bite combines the chewy softness of the cookie with the slightly salty, nutty richness of the peanut butter, balanced by decorative details that make them perfect for Halloween parties. Their design—complete with candy eyes and chocolate legs—makes them not just a treat but also a centerpiece for any spooky-themed table. Children and adults alike are drawn to these cookies for their festive appearance and unforgettable flavor.
The story behind spider cookies for Halloween
Spider-shaped sweets have become a modern Halloween tradition, inspired by the combination of playful fright and indulgent taste. Although the exact origin is hard to trace, the idea grew popular in the United States in the late 20th century, when home bakers started experimenting with peanut butter cookies and adding chocolate truffles or peanut butter cups as bodies. Over time, creative decoration with edible eyes and piped chocolate turned these cookies into a Halloween classic that spread worldwide. Today they are recognized as one of the most charming seasonal bakes, merging fun design with comforting flavors.
Why you will love these spooky cookies
- Eye-catching Halloween design with chocolate “legs” and candy eyes
- Sweet and salty flavor from the peanut butter base
- Fun to prepare with kids, thanks to simple decoration steps
- Perfect make-ahead dessert for Halloween gatherings
- Works as both a party centerpiece and a playful edible gift
Ingredients that create the magic
- Peanut butter brings a creamy, nutty base that pairs beautifully with sugar and flour, creating a soft texture.
- Butter and sugar add richness and sweetness, helping the cookies stay chewy yet firm enough to hold decoration.
- Flour and eggs give structure, making sure the cookies bake evenly and stay tender.
- Chocolate not only intensifies flavor but also works as edible “legs” and decoration for the spiders.
- Candy eyes or sugar pearls transform plain cookies into spooky creatures children love.
Storage and make-ahead tips
- Store at room temperature in an airtight container for up to 2 days.
- Freeze for up to 2 months; thaw at room temperature before serving.
- Reheat at 150 °C (300 °F) for 8–10 minutes to refresh texture.
Related spooky treat you may enjoy
Looking for more festive ideas? Try these fun Halloween Monster Chocolate Truffles with Candy Eyes – another playful dessert with the same spooky charm.
Creative variations for spider cookies
- Replace peanut butter with almond butter for a slightly different nutty flavor.
- Use mini chocolate muffins as spider bodies for an extra fluffy texture.
- Try white chocolate coating with red candy eyes for a scarier effect.
- Add a hint of pumpkin spice to the dough for an autumn twist.
- Decorate with pretzel sticks instead of piped chocolate for crunchy spider legs.
Serving ideas for Halloween parties
- Arrange cookies on a black serving tray with cobweb decorations.
- Pair with warm drinks such as hot cocoa or spiced apple cider.
- Use them as edible party favors wrapped in transparent bags with spooky ribbons.
- Place them around a Halloween cake to create a dessert table full of themed details.
Enticing textures and flavors
Every bite reveals a combination of creamy nut flavors, chocolate intensity, and playful crunch from decorative details. Unlike plain cookies, these Halloween spider cookies stand out for their bold appearance, making them a conversation starter and a guaranteed hit for festive nights. Their balance of sweet and savory notes ensures they are not only fun to look at but also delicious to eat.
- Preheat oven to 180 °C (350 °F). Line a baking tray with parchment paper.
- In a large bowl, beat together peanut butter, softened butter, brown sugar, and white sugar until creamy.
- Add the egg and vanilla extract, mixing until smooth.
- In a separate bowl, combine flour, baking soda, and salt. Gradually fold the dry ingredients into the wet mixture until a soft dough forms.
- Shape the dough into 24 small balls and place them evenly spaced on the prepared baking tray.
- Bake for 10–12 minutes until edges are lightly golden but centers remain soft.
- Immediately press a mini peanut butter cup into the center of each warm cookie to form the spider’s body.
- Allow cookies to cool slightly, then pipe melted dark chocolate around each candy cup to create eight spider legs.
- Gently attach candy eyes on each spider body using a small dab of melted chocolate as glue.
- Leave cookies to set completely before serving.
FAQ questionWhat peanut butter works best for spider cookies?
Use no-stir peanut butter (the standard shelf-stable kind). Its consistent fat-to-solids ratio keeps the dough cohesive and the cookies chewy with clean edges. Natural peanut butter that separates can make the dough oily and cause spreading; if that’s all you have, whisk until perfectly homogeneous and add a touch more flour if the dough looks slick.
FAQ questionHow do I stop the “spider legs” from smudging or breaking?
Pipe the legs with melted dark chocolate once the cookies are warm—not hot—so the chocolate sets quickly without running. Let the piping firm up at room temperature or pop the tray in the fridge for 5–7 minutes. For crisp lines, use a small piping tip or a snipped piping bag and keep strokes short and decisive. If legs are cracking, the chocolate is over-set; warm it gently to a fluid ribbon.
FAQ questionCan I make these ahead and freeze them?
Yes. Bake, decorate, and let set fully, then freeze in layers separated by parchment for up to 2 months. Thaw at room temp in a sealed container to avoid condensation on the candy eyes. To refresh texture, warm on a tray at 150 °C (300 °F) for 8–10 minutes. Undecorated cookies also freeze well; add peanut butter cups and chocolate legs after thawing for the freshest finish.
FAQ questionHow do I adapt them if I need gluten-free or peanut-free?
Swap the flour for a gluten-free all-purpose blend (1:1), choosing a mix with xanthan gum for tender, non-crumbly results. For peanut-free, use sunflower seed butter; it mimics the body and savory-sweet balance of peanut butter without nuts. If you also need egg-free, replace the egg with a flaxseed “egg” (ground flax + water) to retain moisture and structure.
FAQ questionWhy did my cookies spread too much or turn dry?
Excess spread comes from warm dough, a hot kitchen, or too little flour. Chill the dough 20–30 minutes and check that flour is measured accurately. Dry or cakey cookies indicate over-baking or too much flour; pull them when the edges are lightly golden and centers look soft. Using brown sugar for part of the sweetener helps lock in moisture and chew.
FAQ questionWhat’s the best way to attach candy eyes so they don’t fall off?
Dab a small spot of melted chocolate on the back of each eye and press onto the peanut butter cup while the chocolate is still tacky. Let set undisturbed until firm. Avoid buttercream “glue”; it stays soft and can loosen at room temp. If transporting, refrigerate briefly so the eyes and chocolate legs are fully set.
FAQ questionCan I swap the peanut butter cups for another “spider body”?
Absolutely. Try chocolate truffles, malted milk balls, or a dollop of thick ganache piped into a round. Keep bodies bite-sized so they sit securely and don’t weigh down the cookie. If you prefer a lighter profile, use a mound of peanut butter frosting chilled until firm, then add candy eyes and pipe the legs with dark chocolate.
Halloween desserts work best when they combine visual fun with flavors people already love. These Spooky Peanut Butter Spider Cookies bring together the nostalgic taste of peanut butter cookies, the richness of dark chocolate, and playful decorations that instantly set the mood for a party. They are easy to bake in batches, which makes them an ideal choice for gatherings with friends, family, or school events.
Their strength lies in versatility. The cookies can be served as a centerpiece on a Halloween dessert table, wrapped individually as edible gifts, or paired with other themed treats like truffles or cupcakes. Because the design is so striking, they naturally create a conversation starter while still being familiar enough in taste to appeal to everyone.
Home bakers often look for recipes that balance fun presentation with reliability, and this one delivers. With a chewy texture, salty-sweet balance, and charming spider shape, it’s a treat that captures the essence of the holiday. For those dealing with dietary restrictions, easy substitutions allow everyone to enjoy without losing the playful spirit.
When stored properly, the cookies keep their texture and appearance, making them convenient to prepare ahead of time. Whether you’re baking for children or adults, these spider cookies are proof that festive baking doesn’t have to be complicated. The result is a tray of cookies that look as good as they taste, combining creativity, flavor, and seasonal charm.
Allergens present in the recipe
- Peanuts
- Milk (butter, chocolate, peanut butter cups)
- Eggs
- Gluten (wheat flour)
Tips for replacing allergens
- Replace wheat flour with gluten-free all-purpose flour blend to make cookies gluten-free.
- Replace butter with plant-based margarine for a dairy-free version.
- Use sunflower seed butter instead of peanut butter for a nut-free alternative.
- Replace egg with a flaxseed or chia seed egg substitute (1 tbsp seeds + 3 tbsp water).
- Vitamin E: 1.5 mg – supports immune system and skin health
- Magnesium: 30 mg – contributes to muscle and nerve function
- Phosphorus: 70 mg – supports bone and teeth health
- Potassium: 120 mg – helps regulate blood pressure
- Calcium: 20 mg – essential for strong bones
- Iron: 0.7 mg – supports oxygen transport in the blood
- Polyphenols from dark chocolate: 50 mg – help reduce oxidative stress and support heart health
- Resveratrol (trace amounts in chocolate): <1 mg – contributes to anti-inflammatory effects
- Flavonoids from cocoa: 40 mg – promote circulation and may improve cognitive function
Recipes worth trying