Elevating Your Desserts with the Power of a Culinary Torch
Everything you need to know about using a kitchen torch like a professional
A kitchen torch is one of those tools that, once introduced into a kitchen, reveals its true potential beyond the expected. While it's often associated with creating the signature glass-like crust of a crème brûlée, the possibilities stretch far wider. From enhancing flavor and texture to adding a restaurant-quality finish to both sweet and savory dishes, this compact tool has found its place in home and professional kitchens alike.
In this guide, we explore the full scope of the culinary torch—what it is, how it works, what dishes it’s best suited for, its culinary advantages, and how it can expand your kitchen repertoire in surprising ways.
What is a kitchen torch?
A kitchen torch, also called a culinary blow torch or chef’s torch, is a handheld device that emits a controlled high-heat flame, usually powered by butane. It’s designed for quick, precise application of heat, ideal for tasks like caramelizing sugar, melting cheese, toasting toppings, or even blistering vegetables.
Unlike ovens or stovetops that radiate heat over a broad area, a torch offers pinpoint control, allowing for focused searing or caramelization without overcooking the rest of the dish. Its portability and versatility make it a favorite among professionals, as well as an increasingly popular tool among home cooks who want to enhance presentation and taste.
How does a kitchen torch work?
Most kitchen torches operate using a pressurized gas canister, typically filled with butane. When ignited, the torch releases a blue flame that can reach temperatures upwards of 1,500°C (2,732°F), ideal for quick browning or charring. The flame is adjustable in most models, allowing the user to modify the intensity depending on the task at hand.
The process works through combustion: as the gas flows through the nozzle and ignites, the resulting flame is directed by the user to the surface of the food. Because the heat is highly concentrated, the change in the food’s surface happens rapidly, typically in just a few seconds.
Why use a kitchen torch in cooking?
The main benefit of a kitchen torch is precision. While ovens and grills can provide ambient heat, a torch allows for direct heat application, giving cooks more control over the final texture and appearance of a dish. Whether it’s the crisp topping on a dessert or the golden bubbles on a cheese crust, the visual appeal and taste are both enhanced with torching.
Additional benefits include:
- Speed: Achieve results in seconds that would take minutes in a broiler.
- Texture: Create crispy, caramelized, or charred finishes that elevate mouthfeel.
- Control: Apply heat exactly where it’s needed without affecting other parts of the dish.
- Creativity: Use it across many types of cuisine, from pastry arts to grilling to garnishing.
Safety considerations and handling tips
Using a torch in the kitchen does require careful handling. Always follow these guidelines:
- Use the torch on a heat-resistant surface.
- Keep flammable materials away from the flame.
- Always turn off the gas when not in use.
- Let the nozzle cool down before storage.
- Keep away from children and pets.
- Do not invert the torch during use unless the model specifically supports it.
Proper handling ensures that you can safely enjoy the versatility of the kitchen torch without risking accidents.
Types of kitchen torches
There are several variations of culinary torches, each suited to different uses and preferences:
- Standard butane torches: Most common and sufficient for general home use.
- Professional-grade torches: Designed for higher output and longer use times.
- Multi-gas torches: Some models are compatible with propane or MAPP gas for intense flames.
- Built-in refillable torches: Feature built-in fuel tanks, often smaller and portable.
- Trigger-start torches: Offer one-handed ignition and are more user-friendly.
When choosing a model, consider the adjustability of flame, fuel capacity, and ease of use.
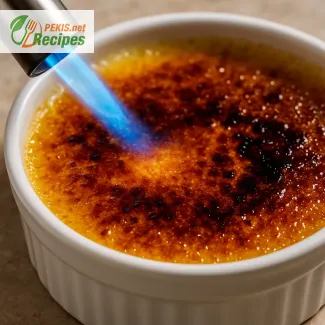
Crème brûlée and custard desserts
Few desserts highlight the utility of a culinary torch better than crème brûlée. The delicate vanilla custard with a contrasting brittle caramelized sugar crust is iconic—and the signature top layer is impossible to achieve without a flame.
Using a torch for crème brûlée gives control over the color and consistency of the caramelization, allowing you to create a thin, glassy crust that cracks under the spoon and enhances both taste and texture.
Other desserts that benefit from torching include:
- Crema catalana
- Pot de crème with caramel topping
- Baked puddings and custards with sugared lids
- Rice pudding with brûléed tops
Torches add visual drama and textural complexity to custard-based desserts that would otherwise appear one-dimensional.
Toasted meringue and marshmallow toppings
Another popular use is for meringue desserts such as lemon meringue pie, baked Alaska, and meringue cookies. Instead of baking, a torch can gently brown the outer layer, giving it that toasted look and slight smokiness without drying out the interior.
It’s also the best tool for creating golden brown marshmallow toppings on cakes, brownies, or cupcakes. This gives you campfire flavor without needing a fire pit, perfect for s’mores-inspired desserts.
Melting cheese and browning casseroles
In savory cooking, a kitchen torch for melting cheese is a fantastic asset. Whether it’s melting gouda over a French onion soup, adding the finishing touch to a macaroni and cheese, or crisping the top of a gratin, the torch helps create that perfect bubbly, golden-brown finish.
This technique also works for:
- Lasagna tops
- Croque monsieur sandwiches
- Baked pasta dishes
- Au gratin potatoes
The result is an instantly appetizing look and a better texture with crispy edges and melted centers.
Roasting vegetables and fruits
The torch is not just for sweets and cheeses—it also shines when it comes to blistering vegetables or charring fruit skins.
Use a kitchen torch to:
- Roast peppers for peeling the skin
- Char tomatoes for salsa or sauces
- Blister corn kernels for a smoky salad
- Caramelize bananas, peaches, or figs for topping pancakes or yogurt
This adds depth of flavor, especially when seeking a grilled or roasted finish without firing up the barbecue or oven.
Caramelizing sugar on various desserts
Beyond crème brûlée, caramelizing sugar with a torch is an elegant way to finish:
- Fruit tarts
- Cheesecakes
- Flavored puddings
- Mini pavlovas
Sprinkle a thin layer of sugar and apply the flame until it melts and hardens. The result is a crispy, shiny surface that intensifies sweetness and offers a satisfying crunch.
Enhancing cocktail presentations
Bartenders and mixologists use torches to add flair and aroma to drinks. Some ways include:
- Torching citrus peels to release essential oils over a cocktail
- Caramelizing garnishes like sugar rims or fruit
- Adding smoky flavor to an old fashioned or Manhattan
A kitchen torch for cocktail garnish helps create drinks that look as good as they taste.
Making crispy meat and fish skin
For those who enjoy perfectly crisp skin on meat or fish, a torch can finish dishes after sous-vide cooking. For example:
- Crisp chicken skin on thighs or breasts
- Sear fat on steak edges without overcooking the center
- Torch salmon skin for a restaurant-style texture
- Glaze meats with honey or teriyaki sauces and then torch for a sticky finish
The direct flame ensures that exterior textures are developed without affecting the moist, tender interior.
Finishing baked goods and pastries
Use a torch for final touches on baked items, such as:
- Toasting coconut flakes or nuts on cakes
- Crisping croissant or Danish edges
- Adding color to sugar-glazed donuts
- Slightly charring puff pastry for depth of flavor
Bakers appreciate the precision and speed a torch offers in customizing appearance and texture.
Cleaning and maintenance tips
To keep your kitchen torch in optimal condition, follow these best practices:
- Refill only with high-quality butane to avoid clogging
- Store upright and in a dry place
- Clean the nozzle occasionally to remove sugar or fat build-up
- Use a protective cap to keep the ignition tip clean
- Avoid overfilling and check for leaks regularly
Routine maintenance ensures safety and prolongs the lifespan of the tool.
Common mistakes to avoid
Even experienced users can make mistakes when using a culinary torch. Some of the most common include:
- Holding the flame too close, which can burn or unevenly heat the food
- Torching wet surfaces, where moisture prevents caramelization
- Over-caramelizing sugar, leading to bitterness
- Ignoring ventilation, which can result in smoky residue indoors
- Leaving the torch unsupervised while still hot
Awareness and control are key to getting consistent results.
Tips for better results with every use
To master the art of torching:
- Always dry the surface before applying sugar or flame
- Use fine sugar for more even caramelization
- Apply the flame in small circular motions
- Let the surface cool completely before serving for best texture
- Test the flame setting on a safe surface before applying to food
Mastering these tips will allow you to use your culinary torch confidently across a variety of dishes.
Summary of creative uses
A kitchen torch is far more than a single-purpose gadget. Its ability to add texture, finish, and flavor instantly opens the door to a wide range of creative culinary applications, including:
- Gourmet dessert toppings
- Savory finishes for meat and cheese
- Visual enhancements in cocktails
- Roasted fruits and vegetables
- Quick caramelization and charring
Whether you're preparing a dinner party dessert or adding a final touch to weekday meals, this tool delivers professional results at home, turning ordinary dishes into extraordinary ones.