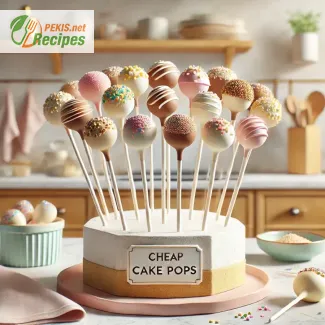
Create Party Magic with These Affordable Homemade Cake Pops
A fun and wallet-friendly dessert idea for birthdays, baby showers, and every celebration
When you're looking for a festive and budget-friendly dessert, few treats deliver as much joy as cake pops. These colorful, bite-sized confections combine the charm of cupcakes with the playful convenience of lollipops. Perfect for parties, school events, or casual get-togethers, cheap cake pops prove that delicious sweets don’t need to be expensive. Made with simple pantry ingredients and customizable decorations, they’re not only economical but endlessly versatile.
While professional-looking cake pops may appear complex, making them at home is surprisingly simple. With leftover cake, basic frosting, and a little creativity, you can craft a stunning dessert that rivals bakery quality without the hefty price tag. Their compact size makes them ideal for portion control, and because they require no expensive tools or hard-to-find ingredients, they’re an accessible option for novice bakers and experienced hosts alike.
Why cake pops are the ultimate low-cost party dessert
In recent years, cake pops have become a staple at celebrations, from weddings to baby showers. Their popularity isn’t just about the look—it’s about practicality. A single batch can serve a crowd, they’re easy to transport, and guests can enjoy them without plates or forks. If you’re hosting a party on a budget, these little treats offer a visually impressive and crowd-pleasing solution.
With just a few ingredients—often leftovers from other baking projects—you can make dozens of eye-catching pops. Think of them as a delicious way to reduce waste while saving money. Using offcuts from sponge cakes or even cake mix from a box, you can roll, dip, and decorate without straining your grocery budget.
Decorating cake pops is also an opportunity for creativity. From vibrant sprinkles to colored chocolate coatings, you can match the pops to any event theme. Kids love helping out with this step, making cake pop making a fun family activity. And since they freeze well, you can prepare them in advance, reducing stress on event day.
Smart ingredient swaps to save money without sacrificing taste
When aiming for cheap cake pops, it's essential to focus on affordable ingredients that still deliver great texture and flavor. Instead of premium cake or specialty frostings, opt for:
- Boxed cake mix: Available in various flavors and very cost-effective.
- Homemade frosting: A simple buttercream made with margarine or affordable butter substitutes works beautifully.
- Candy melts or white chocolate chips: For coating, budget-friendly baking chocolate or even tinted white chocolate can offer a glossy, festive finish.
For rolling the pops, wooden skewers or paper straws make an excellent alternative to store-bought cake pop sticks. And when it comes to coatings and toppings, bulk-buy sprinkles or DIY colored sugar can reduce costs significantly.
How to make cheap cake pops look luxurious
Even with a small budget, presentation matters. A few strategic tricks can elevate your pops from homemade to showstopping:
- Uniform size: Use a melon baller or small scoop to ensure consistency.
- Smooth dipping: Thin your chocolate coating with a bit of vegetable oil for a smoother, more even surface.
- Creative stands: Use Styrofoam blocks, egg cartons, or even halved apples to hold pops upright while they set.
Color coordination can also make a big visual impact. Sticking to a few colors that match your event theme creates an elegant, professional look. Minimalism is often cheaper and more striking than overdecorated pops.
Popular flavor combinations that won’t break the bank
When it comes to flavor, affordable doesn’t mean boring. Some of the most-loved cake pop flavors can be made with inexpensive supermarket staples. Here are a few budget-friendly favorites:
- Vanilla cake + strawberry frosting + white chocolate coating
- Chocolate cake + cream cheese frosting + dark chocolate shell
- Lemon cake + lemon glaze + powdered sugar dusting
- Red velvet cake + vanilla frosting + crushed cookie topping
You can even repurpose day-old cake or cupcakes for the base. The key is to balance moisture and structure, allowing the pops to hold their shape while staying soft inside.
Cake pops as a money-saving gift or fundraiser idea
One of the best-kept secrets of homemade cake pops is how well they work as gifts or fundraising items. Wrapped individually in cellophane with a ribbon, they make a charming and cost-effective gift for teachers, coworkers, or classmates. For bake sales, they offer high visual appeal and low production cost, allowing for strong profit margins on each pop sold.
If you’re running a school fundraiser or planning party favors, this recipe will help you keep your budget in check while offering something people genuinely enjoy. Their shelf-stable nature also makes them ideal for transport and advance prep, reducing last-minute kitchen chaos.
Make-ahead magic: cheap cake pops for stress-free planning
Whether you’re preparing for a large event or just want to keep treats on hand, cake pops can be made ahead and frozen. Once dipped and decorated, allow them to harden completely and store them in airtight containers. This way, you’re spreading out the workload, maximizing freshness, and avoiding last-minute baking stress.
Defrosting is easy—just take them out of the freezer the night before serving and allow them to reach room temperature slowly. Their compact size makes them thaw quickly without losing texture, and your guests will never know they weren’t made that morning.
With a bit of planning, the right ingredients, and a few presentation tricks, cheap cake pops become the perfect solution for delicious, affordable, and stylish desserts.
- Preheat the oven to 180 °C (350 °F) and line a small baking tray (approx. 20 cm x 20 cm / 8 in x 8 in) with parchment paper.
- In a large mixing bowl, whisk together eggs and sugar until light and fluffy.
- Slowly add the sunflower oil, milk, and vanilla extract while continuing to whisk.
- Sift in the flour, baking powder, and salt, and fold gently to create a smooth batter.
- Pour the batter into the prepared baking tray and bake for 25 minutes or until a toothpick inserted into the center comes out clean.
- Let the cake cool completely, then crumble it finely into a mixing bowl.
- In a separate bowl, mix the softened cream cheese and powdered sugar until creamy.
- Combine the frosting mixture with the crumbled cake and mix thoroughly to form a moist dough.
- Divide the mixture into 20 equal portions and roll each into a tight ball.
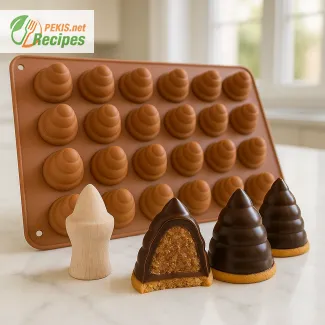
- Melt the chocolate or candy melts in a microwave-safe bowl, stirring every 30 seconds until smooth.
- Dip the tip of each stick into the melted chocolate, then insert it halfway into each cake ball.
- Place the pops in the freezer for 10–15 minutes to firm up.
- Remove and dip each cake pop fully into the melted chocolate, letting excess drip off.
- Decorate with sprinkles if desired and place upright in a stand or Styrofoam block to set.
- Allow the coating to harden at room temperature for at least 15 minutes before serving.
Transform Your Cake Pops: Flavor, Texture & Creative Upgrades
Tips for elevating a basic cake pop recipe into something extraordinary
Mastering the art of homemade cake pops opens a door to endless culinary creativity. While the standard version is already a beloved treat, adding small, thoughtful tweaks can turn an inexpensive party snack into a gourmet dessert. By adjusting ingredients, experimenting with textures, and avoiding common mistakes, you can customize cake pops to better suit your taste, occasion, or dietary goals. Whether you're baking for kids, prepping for an elegant event, or aiming for a healthier alternative, the humble cake pop can become so much more.
Simple ingredient upgrades that enhance flavor
Swapping or upgrading ingredients can have a significant impact on flavor depth and mouthfeel. Here are a few easy ways to enrich your cake pop base:
- Use brown sugar in place of white sugar to introduce a subtle caramel note and add extra moisture.
- Replace vegetable oil with melted butter for a richer, more indulgent crumb.
- Add citrus zest (lemon or orange) to the batter for brightness, especially when working with vanilla or berry-based cake mixes.
- Stir finely chopped nuts, like almonds or hazelnuts, into the dough for added crunch and nutty undertones.
- Infuse the frosting with spices such as cinnamon, cardamom, or nutmeg for seasonal depth.
Adding a few drops of flavored extracts (almond, coconut, peppermint) to the coating or filling can elevate your pops while keeping costs low. For example, peppermint extract paired with dark chocolate coating offers a sophisticated winter version.
Healthier options without losing appeal
If you’re aiming to make your cake pops healthier, there are effective substitutions that don’t compromise flavor:
- Use whole wheat pastry flour instead of white flour for more fiber and a slight nutty flavor.
- Opt for low-fat cream cheese or Greek yogurt in the frosting for less saturated fat and a protein boost.
- Reduce sugar in the dough and rely more on natural sweetness from ingredients like mashed banana or unsweetened applesauce.
- Coat pops in dark chocolate instead of white chocolate to increase antioxidants and reduce sugar content.
- Decorate with shredded coconut, crushed freeze-dried fruits, or seeds instead of candy sprinkles for a nutrient-rich topping.
You can also bake the cake layer using a sugar-free cake mix or natural sweeteners like stevia blends. Keep in mind that some sugar substitutes may affect the texture slightly, so start with small batches when experimenting.
Common mistakes and how to fix them
Even though cake pops are simple, small errors can affect their shape, taste, or presentation. Avoid these common pitfalls:
- Cake too dry: If the cake is overbaked or crumbled while still warm, it will be too dry to hold shape. Let the cake cool fully and use enough frosting to bind it.
- Using too much frosting: While you want moist dough, excess frosting can make pops too soft and prone to sliding off the stick. Start with a small amount and mix gradually.
- Dipping issues: If your coating is too thick, it may pull the pop off the stick. Thin the chocolate with a touch of vegetable oil for a smoother dip.
- Setting pops in the fridge: While chilling helps firm the dough, dipping cold pops into warm chocolate causes cracking. Allow them to return to room temperature before dipping.
- Uneven shaping: Hand-rolling inconsistently sized balls leads to uneven cooking and presentation. Use a small cookie scoop or tablespoon for accuracy.
Why homemade cake pops are worth the effort
There’s a clear advantage to preparing cake pops at home. Not only do you save money, but you also gain control over ingredients, freshness, and presentation. Store-bought versions often use preservatives, artificial flavorings, and cheaper fillers to maintain shelf stability. When you make your own, you can prioritize quality, flavor, and personalization.
You also have full creative freedom. Want galaxy-themed pops with edible glitter? Or birthday cake pops filled with sprinkles? At home, you’re not limited by commercial flavor trends or uniform designs. Every batch can be uniquely tailored to your event, dietary needs, or seasonal themes.
Creative ways to level up your cake pops
Once you’ve mastered the basics, these additional techniques can take your cake pops to a more refined level:
- Layered fillings: Hide a mini jam center inside the cake ball for a surprise burst of flavor.
- Textured coatings: Roll dipped pops in chopped nuts, toasted coconut, cookie crumbs, or crushed pretzels for added contrast.
- Dual-dipped pops: Dip first in dark chocolate, let set, then partially dip again in white chocolate at an angle for a two-tone finish.
- Painted designs: Use edible food paint or luster dust to decorate pops with flowers, patterns, or messages.
- Theme molds: Shape the cake into hearts, stars, or seasonal icons using silicone molds for holiday-specific treats.
If you're baking for a larger crowd, creating a pop bar with different coating and topping options allows guests to decorate their own, turning dessert into an interactive experience.
Seasonal variations and flavor inspiration
Seasonality can inspire the use of fresh ingredients and targeted flavors:
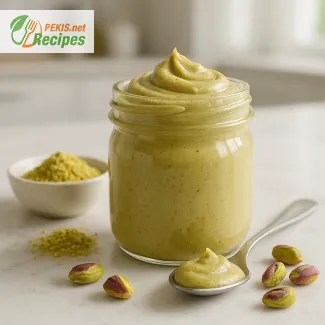
- Spring: Carrot cake pops with cream cheese frosting and crushed pistachio topping.
- Summer: Lemon or strawberry pops with yogurt glaze and dried raspberry dust.
- Autumn: Spiced pumpkin pops with cinnamon glaze or caramel coating.
- Winter: Peppermint chocolate pops with crushed candy cane toppings or eggnog-flavored frosting.
Pair your pops with complementary beverages—hot cocoa, fruit smoothies, or flavored teas—for a complete dessert experience. Their small size also makes them ideal for pairing with multiple flavors in one serving tray.
Practical storage tips for freshness
To keep your cake pops tasting fresh, store them in an airtight container at room temperature for up to three days. For longer shelf life, refrigerate them (coated) for up to one week, or freeze for up to a month. When freezing, wrap each pop individually in plastic wrap to prevent moisture loss and flavor transfer.
Always allow frozen cake pops to thaw slowly at room temperature, still wrapped, to avoid condensation on the coating. This preserves the smooth finish and texture of your decorations.
By applying these techniques, thoughtful substitutions, and creative ideas, you can enhance every aspect of your cake pop recipe—from nutrition and appearance to flavor and ease of serving.
Allergens present in the recipe:
- Wheat (gluten)
- Eggs
- Milk (dairy)
Suggested substitutions for allergen-free version:
- Replace wheat flour with gluten-free baking flour (1:1 ratio)
- Replace eggs with chia seed gel (1 tbsp chia seeds + 3 tbsp water per egg)
- Replace cream cheese with plant-based cream cheese
- Use dairy-free white chocolate for coating
Vitamins and minerals per serving (approximate):
- Vitamin A: 65 µg – supports vision and immunity
- Vitamin D: 0.5 µg – helps regulate calcium and bone health
- Vitamin B2 (Riboflavin): 0.1 mg – supports metabolism
- Calcium: 25 mg – essential for bones and teeth
- Iron: 0.6 mg – supports oxygen transport in blood
- Magnesium: 8 mg – aids in nerve and muscle function
- Phosphorus: 40 mg – important for bone structure
- Potassium: 60 mg – helps regulate fluid balance
- Zinc: 0.3 mg – contributes to immune defense
Antioxidants per serving (approximate):
- Vitamin E: 0.6 mg – protects cells from oxidative stress
- Phenolic compounds (from vanilla and chocolate): 4 mg – may reduce inflammation
- Flavonoids (from cocoa): 3 mg – support heart health and blood circulation
Recipes worth trying