How to Make the Perfect Enchanted Cream for Decorating Cakes and Cupcakes
Light, stable, and irresistibly creamy for every celebration
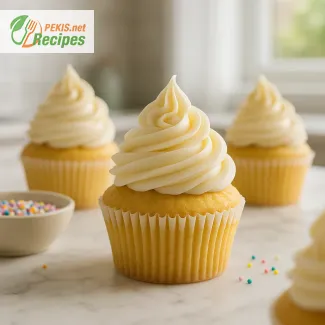
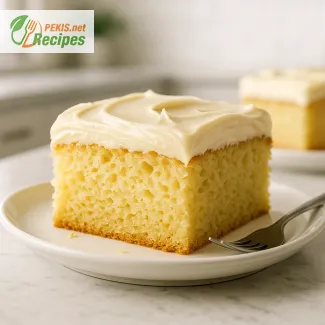
Creating a beautiful dessert isn’t just about flavor—it’s also about presentation, and nothing elevates a cake or cupcake quite like a perfectly whipped, fluffy cream topping. If you’re looking for a quick yet professional finish, the Enchanted Cream mix is the modern baker’s secret weapon. Known for its ease of use and exceptional stability, this versatile mix produces a smooth, light, and airy frosting that holds its shape for hours, making it ideal for both beginners and advanced decorators.
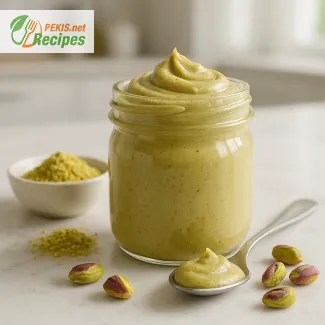
The Enchanted Cream mix is a dry powder base that, when combined with cold milk or water and optionally a touch of cream, transforms into a luscious whipped topping in just minutes. Unlike buttercream, it offers a lighter mouthfeel and is less greasy, making it particularly well-suited for layered cakes, cupcakes, eclairs, mini desserts, and even as a filling in pastries. It’s also less sweet than traditional frostings, making it a favorite for those who prefer a more balanced flavor profile.
What makes Enchanted Cream different from other frosting bases?
The science behind the magic texture
What sets Enchanted Cream apart is its unique formulation designed for volume, stability, and versatility. Unlike traditional whipped cream, which can collapse after a few hours, this cream is built to last. Once whipped, it holds its shape for hours at room temperature and even longer in the fridge. That makes it the go-to option for professional bakers working in high-volume or event-based environments.
Because of its powdered base, you can customize both the texture and flavor. Add more or less liquid depending on whether you need it firm for piping flowers and borders, or light for spreading. You can also mix in flavorings, coloring gels, freeze-dried fruit powders, or even liqueurs to adapt the cream to any theme or occasion.
Key benefits of using Enchanted Cream mix
Why professionals and hobby bakers alike love it
- Quick preparation: Just mix with cold liquid and whip for 3 minutes
- Stability: Holds shape for hours, even outside the fridge
- Customizable: Adjust consistency, flavor, and color
- Low sweetness: Balanced taste that complements cakes
- Reusable: Can be stored and re-whipped after chilling
- Professional finish: Creates a clean, smooth texture for decorating
Whether you’re preparing a tiered wedding cake or a batch of birthday cupcakes, Enchanted Cream provides a no-fail solution to get the perfect texture every time. Its high yield and consistent results make it an efficient and reliable choice for anyone who bakes regularly.
Common uses and creative applications
Go beyond basic frosting with endless decorating ideas
While most people associate Enchanted Cream with classic cake toppings, its uses go far beyond that. It’s ideal for:
- Layer cakes: Spread thinly between cake layers for a light bite
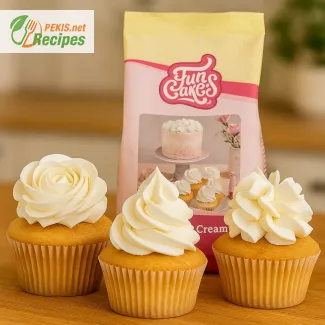
- Cupcake swirls: Use a piping bag and star tip for beautiful peaks
- Pastry filling: Inject into éclairs, cream puffs, or doughnuts
- Fruit tarts: Add a dollop on top of fresh seasonal fruit
- Trifles and dessert cups: Layer with sponge cake and mousse
- Ice cream accompaniments: Serve with scoops for added richness
Because of its excellent structure, it holds shape even under fondant or chocolate decorations. And thanks to its neutral base, it pairs beautifully with extracts like vanilla, lemon, almond, or coffee, allowing for total personalization.
Who is it for and when to use it
The ideal choice for any baking occasion
The Enchanted Cream mix is ideal for anyone who needs reliable results with minimal prep time. Whether you're baking for a birthday, a wedding, or just a weekend treat, it gives you professional-grade results without requiring complicated techniques or ingredients. It’s perfect for:
- Home bakers looking for foolproof decoration
- Pastry chefs needing a stable base for creative designs
- Catering professionals preparing large dessert quantities
- Beginner decorators wanting confidence and consistency
Because it doesn’t require refrigeration until after whipping and can be made in advance, it fits perfectly into busy baking schedules. Plus, its silky texture and smooth finish make even basic bakes look sophisticated.
Expert tips for best results
Maximize volume, color, and flavor
To get the most out of your Enchanted Cream mix, follow these expert tips:
- Use very cold liquid: Chilled milk or water increases volume and fluffiness
- Whip at high speed: Achieve the perfect texture in just 3 minutes
- Let it rest: After whipping, let the cream sit for 5–10 minutes for better stability
- Avoid overmixing: Stop whipping as soon as peaks form to prevent graininess
- Store covered: Keep leftovers in the fridge and rewhip if needed
For extra flavor, try incorporating citrus zest, espresso powder, or flavored syrups. If you want a creamier texture, replace part of the milk with heavy cream or condensed milk. And for vibrant colors, use gel-based food coloring to avoid affecting consistency.
- Chill the ingredients: Ensure that both the milk and cream are well chilled before starting. Cold liquid helps achieve maximum volume and fluffiness.
- Combine the mix: In a large mixing bowl, add the Enchanted Cream mix powder. Pour in the cold milk and cold heavy cream.
- Whip the mixture: Using a hand mixer or stand mixer, beat on high speed for about 3–4 minutes. The cream should become light, fluffy, and firm enough to hold peaks.
- Let it set: Allow the whipped cream to rest for 5 minutes before using. This stabilizes the texture.
- Use or store: Use immediately for piping or spreading. If preparing in advance, cover and refrigerate for up to 24 hours. Rewhip gently if needed before use.
Application suggestions:
- Pipe onto cupcakes using a star nozzle
- Spread over cake layers for filling and covering
- Use as a topping for brownies, mousse, or dessert jars
- Flavor with vanilla, lemon, cocoa, or fruit extracts if desired
- Add gel coloring to match any party theme
Enhancing Your Enchanted Cream with Creative Variations and Expert Tips
Small adjustments that lead to big improvements in flavor, texture, and presentation
Even though the base recipe for Enchanted Cream is simple and reliable, there are multiple ways to elevate it into something even more refined and custom-tailored for your desserts. Whether you’re using it as a cake filling, a cupcake swirl, or a light frosting, subtle ingredient modifications and thoughtful preparation can make a big difference in the final result. From improving the flavor profile to achieving a healthier version, this guide offers insight into how to adapt and perfect this classic mix-based cream.
How adding ingredients changes the taste and structure
The original preparation calls for milk, cream, and Enchanted Cream powder, resulting in a light, neutral-flavored frosting. However, adding or swapping ingredients opens a world of possibilities:
- Vanilla extract (5 ml / 1 tsp): Adds depth and rounds out the sweetness, giving it a more homemade feel.
- Citrus zest (½ tsp of lemon or orange): Introduces a fresh, tangy note that cuts through the richness—perfect for summer desserts.
- Instant coffee powder (1 tsp): Transforms the cream into a mocha-style topping that pairs beautifully with chocolate cakes.
- Cocoa powder (1 tbsp): Turns the frosting into a mild chocolate cream without making it overly sweet or heavy.
- Mascarpone (50 g): When blended into the whipped cream, it adds richness and a slight tang while improving firmness and stability.
Each of these additions subtly alters the cream’s flavor, aroma, and texture, allowing you to match it to a wide range of dessert styles—from fruity sponges to dark, dense chocolate cakes.
Why homemade is better than pre-filled toppings
Although ready-to-use toppings and aerosol creams are widely available, preparing your own Enchanted Cream ensures:
- Control over ingredients: No preservatives or artificial stabilizers
- Customization: You can adjust sweetness, color, texture, and flavor
- Superior texture: Freshly whipped cream holds better on warm days and doesn’t melt as quickly
- Longer piping time: Homemade cream maintains its shape longer in piping bags, allowing for precise decoration
A fresh batch of homemade cream also aligns better with dietary needs—you choose exactly what goes in, including lactose-free options, plant-based alternatives, or organic ingredients.
Common mistakes and how to avoid them
Even though the recipe is simple, a few missteps can lead to disappointing results. Here’s what to watch for:
- Using warm milk or cream: This reduces volume and prevents the cream from whipping properly. Always use cold liquid.
- Overwhipping: When the cream is whipped too long, it becomes grainy. Stop mixing as soon as firm peaks form.
- Wrong ratios: Too much milk and too little powder results in a runny cream that won’t hold shape.
- Not letting it rest: After whipping, a short resting time allows air bubbles to stabilize, creating a smoother texture.
- Storing uncovered: Exposure to air dries out the surface. Always store in an airtight container.
By paying attention to these small details, you can achieve consistent and professional results every time.
Healthier variations without sacrificing texture
For those who want to lighten the recipe without compromising the aesthetic or mouthfeel, here are a few tested modifications:
- Replace cream with full-fat Greek yogurt: Adds tanginess and reduces saturated fat while maintaining body.
- Use plant-based milk and vegan whipping cream: Almond milk, oat milk, or coconut cream work well.
- Reduce sugar: Mix in half the powder and combine it with unsweetened whipped cream or soft quark.
- Add fiber: Stir in 1 tsp of ground chia seeds or oat fiber to boost nutritional value subtly.
- Natural colorants: Use beet juice for pink, spirulina for green, or turmeric for yellow without adding chemicals.
These changes are ideal for those watching their sugar intake or looking to include more nutrient-dense ingredients without sacrificing that signature smooth finish.
Seasonal flavor inspirations and pairing ideas
To keep your Enchanted Cream exciting year-round, use seasonal ingredients to influence the flavor:
- Spring: Add elderflower syrup or strawberry purée
- Summer: Use passion fruit concentrate or coconut milk
- Autumn: Blend in cinnamon, pumpkin spice, or caramel extract
- Winter: Mix with peppermint extract or spiced chocolate for festive desserts
For pairing, consider the cake base: a rich chocolate cake benefits from a citrusy or espresso cream, while a vanilla sponge works well with berries or almond flavoring.
Final texture enhancements with minimal effort
You can refine the texture of your whipped Enchanted Cream by:
- Adding gelatin (½ tsp bloomed): This adds structure, especially useful for tall cakes or warm environments
- Using a chilled metal bowl: Keeps ingredients colder during whipping for more stable peaks
- Double whipping: Whip once to soft peaks, chill for 10 minutes, then whip again to firm peaks for exceptional texture
- Sifting the mix before use: Prevents lumps and creates a silky base
Small adjustments like these allow for precision and consistency, making even the simplest decoration look elegant.
Tools that help achieve professional results
While the ingredients play a critical role, so do the tools:
- Piping bags with different nozzles: Choose star, leaf, rose, or French tips to vary the design
- Angled spatula: Ideal for smooth spreading over cake surfaces
- Turntable: Allows smoother application and precise layering
- Kitchen scale: For accurate measurement of powder to liquid ratios
Having the right tools makes the process easier and the results more predictable, especially when you’re preparing multiple batches or detailed decorations.
Allergens present in the recipe:
- Milk (from both cream and milk)
- May contain traces of soy and gluten depending on the brand of Enchanted Cream mix
Tips for allergen and gluten replacement:
- Replace cow’s milk with unsweetened soy milk or rice milk
- Replace heavy cream with whippable coconut cream or soy cream
- Use a gluten-free certified Enchanted Cream mix brand
- Always check the label to avoid cross-contamination
Vitamins and minerals per serving (approximate):
- Calcium: 90 mg – supports bone health
- Vitamin A: 160 µg – contributes to skin and eye health
- Vitamin D: 0.6 µg – aids calcium absorption and immune function
- Magnesium: 8 mg – supports muscle function
- Potassium: 140 mg – helps regulate fluid balance
- Phosphorus: 70 mg – essential for energy production and bone maintenance
Antioxidants per serving (approximate):
- Beta-carotene: 80 µg – protects cells from oxidative stress
- Vitamin E: 0.3 mg – supports skin repair and immune function
- Selenium: 2 µg – helps protect against cellular damage
Recipes worth trying