The Secret to a Perfectly Flat Sponge Cake Every Time
Master the Art of Creating a Level Cake Base Without Any Dome
One of the most common challenges bakers face when preparing a sponge cake for layering or decorating is dealing with the dreaded dome-shaped top. Whether you're a seasoned cake artist or a weekend baking enthusiast, achieving a flat, even sponge can often feel like chasing perfection. This recipe changes that experience forever. Crafted specifically to eliminate the need for trimming or leveling, this sponge cake ensures you get a smooth, flat surface straight from the oven — making it the ideal base for any celebration cake, wedding tier, or minimalist dessert presentation.
Imagine slicing into a cake where every layer stacks beautifully without bulging sides or uneven edges. With this flat cake sponge recipe, you won't just save time — you'll elevate the consistency and aesthetics of every cake you create. Say goodbye to wasteful carving and hello to precision baking.
At the heart of this technique lies a balance of ingredients, careful temperature control, and a few professional tricks that eliminate over-rising and cracked tops. What sets this recipe apart is its dedication to structure and texture — producing a light, fluffy sponge that still holds its shape beautifully under the weight of frosting, fillings, or fondant. The result? A sponge that is not only moist and airy, but also uniform and symmetrical across its entire surface.
This approach is particularly beneficial when you're working with delicate mousse fillings, layered cream, or ganache where an even base is essential for both stability and presentation. Thanks to the lack of dome, you no longer need to worry about crumbly tops or uneven slicing. The cake emerges from the oven level and golden, ready to be transformed into a masterpiece.
The texture of the sponge is both tender and resilient, offering the perfect bite while still being strong enough to support additional layers. It’s suitable for everything from buttercream-finished cakes to fondant-covered showstoppers. And because the surface is so flat, decorators find this sponge to be a dream when applying smooth icing or intricate designs.
Another advantage of this recipe is its adaptability. Whether you flavor it with vanilla, almond extract, citrus zest, or cocoa powder, the structure remains intact, ensuring you get a flat result regardless of variations. It's perfect for baking in round pans, square molds, or even for custom shapes that require precision.
What makes a sponge rise unevenly? Often it's a combination of overbeating the batter, uneven oven temperatures, or too much leavening agent. This recipe accounts for all those factors and guides you through each step to avoid them. We’ve eliminated unnecessary ingredients and replaced them with measured precision — the result is a sponge that rises gently, evenly, and without a hump in the center.
Many professional bakers use this type of sponge as their go-to base for multi-tiered cakes. It’s light enough to be enjoyable, yet structured enough to hold weight — a rare balance that’s difficult to achieve in home baking without the right technique. And the best part? You don’t need any special tools or techniques. No cake strips, no trimming, no upside-down cooling required — just follow the method and let the batter work its magic.
Whether you're preparing a birthday cake, an anniversary dessert, or a simple layer cake, this flat sponge will become your new essential recipe. Its clean lines and flawless surface give your cakes a polished, professional finish that stands out — both visually and in flavor. The simplicity and elegance of this base allow your fillings and toppings to shine without interference from an uneven base.
If you're tired of lopsided cakes or wasting delicious sponge by trimming it down, this recipe offers the perfect solution. Let your creativity flow with stacked designs, dramatic fillings, or minimalist naked cakes — all built on a perfectly flat sponge foundation that sets the stage for success.
Coming up next: we’ll dive into the full step-by-step recipe, including exact measurements, baking times, and preparation tips that ensure flawless results every time. Whether you’re making it for a birthday, wedding, or just because — this no-dome sponge will quickly become your favorite.
Stay tuned for the full recipe and discover how to create your most precise, picture-perfect cakes yet.
- Preheat the oven to 160°C (320°F). Grease and line the bottom of a 24 cm (9.5 inch) round cake tin with parchment paper. Do not grease the sides.
- In a large mixing bowl, beat the eggs and sugar together for 8–10 minutes until the mixture becomes thick, pale, and triples in volume.
- In a small saucepan, gently heat the milk and sunflower oil until just warm, not boiling.
- Sift the flour and baking powder together into a separate bowl. Gradually fold the dry ingredients into the egg mixture using a spatula. Do not overmix.
- Add the salt and vanilla extract. Slowly pour the warm milk and oil mixture into the batter while continuing to fold gently until fully incorporated.
- Pour the batter evenly into the prepared cake tin. Tap the tin lightly on the counter to release any air bubbles.
- Bake in the preheated oven for 30 minutes or until a toothpick inserted into the center comes out clean.
- Once baked, remove the cake from the oven and let it cool in the tin for 10 minutes. Run a knife around the edge, then remove the sponge and place it on a wire rack to cool completely.
- Do not invert the cake. Let it cool upright to preserve its flat shape.
How to Bake a Level Sponge Cake for Flawless Layering
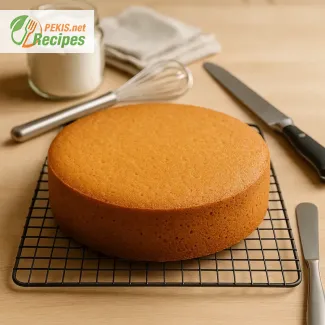
Discover the Technique for a Flat and Even Sponge Base
There’s something profoundly satisfying about creating a beautifully even cake layer — a sponge that doesn’t puff up in the middle or crack at the top, but instead bakes smooth and level, ready to be layered, filled, and frosted without trimming or shaping. If you've ever been frustrated by domed cakes or wasted precious sponge just to achieve a flat surface, you're not alone. This method and recipe offer the perfect solution: a flat cake sponge that bakes evenly every single time.
Unlike traditional sponge cake recipes that often result in a rounded or hilly center, this version has been carefully crafted for structural precision and visual perfection. The balance of moisture, leavening agents, and temperature results in a cake that rises just enough to be light and airy but settles gently without collapsing or over-expanding. This makes it ideal for anyone looking to assemble professional-looking cakes with multiple layers.
Whether you're preparing a wedding cake, a birthday masterpiece, or a simple tea-time dessert, this sponge provides the ultimate base — one that is consistent, uniform, and beautifully golden from edge to center. And because it's designed to bake flat, you eliminate the need for unnecessary tools like leveling strips or complex baking rings. What you get instead is a stress-free baking experience that yields professional results.
Why flat sponge cakes matter
The shape and structure of a sponge cake lay the foundation for the entire dessert. A flat sponge ensures that each layer stacks evenly, preventing your cake from leaning, sagging, or appearing lopsided. This is especially important when working with buttercream, ganache, or delicate mousses, where even the slightest dome can throw off your symmetry and ruin the final presentation.
A domeless cake is not just about aesthetics; it also impacts the distribution of flavors and textures. With an even surface, each slice contains balanced proportions of cake and filling, resulting in a more harmonious bite. This attention to detail elevates your cake from homemade to bakery-quality.
Characteristics of a perfect flat sponge
This sponge is known for its tender yet resilient crumb. It is light and airy thanks to the whipped eggs, yet moist enough from the subtle blend of milk and oil to retain structure without becoming dry. The outer edges remain level with the center, creating a uniform profile that doesn’t require trimming.
Because there’s no dome to remove, you retain 100% of the baked cake, minimizing waste and maximizing efficiency. The sponge slices cleanly, with no crumbling or tearing, and holds up beautifully under layers of frosting or fondant. It is also neutral in flavor, allowing you to pair it with virtually any filling, from zesty citrus curds to rich chocolate ganache.
Who should use this recipe?
Whether you're an experienced pastry chef or a home baker experimenting with tiered cakes for the first time, this recipe is for you. It’s particularly useful for:
- Layered celebration cakes
- Fondant-covered designer cakes
- Naked cakes where presentation matters
- Stacked desserts requiring precision
It’s also an excellent choice for bakers working on tight schedules. Because the sponge requires no additional carving or flipping, you’ll save valuable time without compromising on quality.
The science behind a no-dome sponge
The secret to an evenly baked sponge lies in understanding a few key baking principles. By controlling oven temperature, batter density, and leavening strength, you can guide the sponge to rise evenly. In this recipe, the oven is kept at a moderate temperature, allowing the batter to rise gently and bake through without forming a crust too early, which often causes doming.
Additionally, the batter is aerated with a careful balance of whipped eggs and sugar. This provides the lift without over-expansion. The use of a neutral oil instead of butter helps distribute moisture evenly, while warm milk ensures the batter remains fluid and doesn't seize when mixed.
The result? A sponge that bakes flat, smooth, and even, ready to become the flawless base for your most ambitious cake creations.
Practical tips for better results
- Avoid opening the oven door early. Sudden temperature changes can cause uneven baking.
- Use room-temperature ingredients. This ensures even mixing and prevents clumping.
- Don’t overmix after adding flour. It can deflate the batter and create dense pockets.
- Use a good-quality cake pan. Even heat distribution is key to a level bake.
Once you try this method, you’ll never go back to cutting or leveling cakes again. A flat sponge doesn’t just look better — it feels better, it slices better, and it lets your creativity shine in every beautifully even layer.
Coming up: the full recipe with ingredients, preparation steps, and nutritional information to help you bake your perfect no-dome sponge from scratch.
Allergens:
Contains eggs, gluten (wheat), and may contain traces of nuts if flour is processed in shared facilities.
Gluten-free or allergen-friendly tips:
- Replace all-purpose flour with a 1:1 gluten-free flour blend containing xanthan gum for structure.
- For egg allergies, substitute each egg with 60 g (¼ cup) unsweetened applesauce or a commercial egg replacer.
- For dairy-free, use plant-based milk such as oat or almond milk.
- Vitamin B2 (riboflavin): 0.2 mg – supports energy metabolism
- Vitamin A: 75 IU – important for vision and immune function
- Iron: 0.8 mg – helps transport oxygen in the blood
- Calcium: 22 mg – essential for bone strength
- Phosphorus: 67 mg – supports healthy bones and teeth
- Selenium: 7.8 µg – protects cells from oxidative damage
- Vitamin E: 0.6 mg – supports skin health and cell protection
- Lutein + Zeaxanthin: 42 µg – contribute to eye health and combat oxidative stress
Recipes worth trying