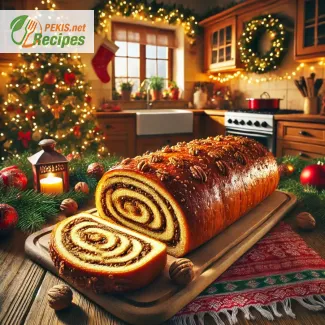
Christmas Potica is a beloved Slovenian holiday pastry, deeply ingrained in the festive traditions of this beautiful Central European country. This sweet, yeasted cake, rolled with rich fillings like walnuts, poppy seeds, or tarragon, embodies the warmth, joy, and celebration of the Christmas season. Its flaky, golden exterior, coupled with its aromatic, hearty filling, makes it not only a treat for the taste buds but also a feast for the eyes, capturing the essence of the holidays.
Baking the perfect Christmas Potica requires patience, attention to detail, and a commitment to using the finest ingredients. Unlike many other festive cakes or pastries, potica is much more than just a dessert; it’s a symbol of family, heritage, and tradition. This multi-layered pastry represents the blending of textures and flavors, much like the way holiday memories are made—layer upon layer, each one more delightful than the last.
The Essential Components of a Perfect Potica
At its core, Christmas Potica is a delicate, yeast-leavened dough that is typically filled with a variety of rich fillings. The dough itself must be light, airy, and slightly sweet, setting the perfect base for the generously spread filling. Whether you opt for a classic walnut filling, a poppy seed paste, or a more modern twist with chocolate or dried fruits, each variation speaks to the versatility and rich history of the recipe.
What makes the dough so important is the right balance between texture and elasticity. To achieve this, the dough needs to be mixed carefully to avoid overworking it. It should feel soft but not sticky, allowing it to roll out easily without tearing. The yeast used for the dough is the key to achieving the lightness that defines potica. Fresh yeast is often preferred as it gives the dough a richer flavor compared to the instant variety.
The next vital step in creating the perfect potica is the filling. The most traditional and beloved filling is the walnut mixture, which combines finely ground walnuts, sugar, vanilla, cinnamon, and a splash of rum or brandy for an added depth of flavor. This filling is both sweet and nutty, creating a rich and comforting taste that pairs perfectly with the lightness of the dough.
While walnuts are the classic choice, popcorn seed and even chocolate fillings have gained popularity, adding an extra layer of indulgence. Each version offers a unique texture and flavor, catering to a variety of tastes. Some bakers add raisins, dried fruits, or even zest of citrus fruits to brighten the filling, ensuring that each bite is a delightful surprise.
The Art of Rolling and Shaping Potica
Once the dough has risen and the filling is prepared, the real artistry of making potica begins: rolling and shaping. The dough must be gently rolled out into a thin rectangle, ensuring an even layer of filling is spread across the surface. This is a delicate step, as overstuffing or uneven spreading of the filling can cause the potica to break open during baking.
After spreading the filling, the dough is carefully rolled into a log shape, making sure that the edges are sealed well to prevent the filling from leaking out. This step is crucial as it ensures that the potica holds its shape during baking and bakes evenly. Once rolled, the dough is placed into a greased baking pan, and another short rise allows the dough to expand further before it’s placed in the oven.
The ideal potica should rise to a beautiful round shape, with the filling visible in swirled layers as you cut through the cake. The appearance is as important as the taste, and a perfectly baked potica will have a beautiful golden brown crust, glistening with a touch of glaze made from egg wash.
Baking Potica to Perfection
Baking is the final and most critical step in the potica-making process. The oven should be preheated to a moderate temperature, around 180°C (350°F). This temperature is crucial because it allows the potica to bake evenly without burning the outside before the inside is fully cooked.
A perfect potica will take around 45 to 60 minutes to bake, depending on the size and thickness of the dough. During the last few minutes, a light golden brown crust should form, giving the potica its signature appearance. If the top of the potica begins to brown too quickly, it’s important to cover it loosely with aluminum foil to prevent it from burning while the inside continues to cook.
Once baked, the potica must be allowed to cool before slicing. This resting time ensures that the layers settle, making it easier to slice cleanly. The result should be a soft, buttery dough surrounding a rich, flavorful filling, with the perfect balance between crispiness and softness.
Why Christmas Potica is More Than Just a Dessert
Christmas Potica is not just another pastry; it’s a symbol of tradition and togetherness. This beloved treat is often shared with family and friends during the holiday season, bringing people closer and creating memories that will last a lifetime. The process of making potica is as much about the experience of creating it with loved ones as it is about the final result.
In Slovenia, baking a potica is often a family event—generations pass down their knowledge of how to make the best potica, each one adding their own little twist or secret ingredient. It’s a celebration of heritage, and the very act of preparing it brings a deep sense of connection to one’s roots.
A Delicious Tradition That Lasts Through Generations
Christmas Potica is a cherished part of the holiday celebrations, and with the right techniques, anyone can create this festive treat at home. Whether you stick with the classic walnut filling or experiment with new flavors, the joy of making and sharing this cake will always remain. By following the tips and tricks outlined here, you will be able to make the perfect potica every time—soft, flavorful, and utterly irresistible.
Whether you are a novice baker or a seasoned pro, Christmas Potica provides an opportunity to try your hand at an iconic holiday recipe that embodies the essence of Slovenian Christmas traditions. Make it your own, and it will surely become a favorite centerpiece on your holiday table, a sweet reminder of family, warmth, and the joy of the season.
1. Preparing the dough:
- In a small bowl, warm the milk to about 35-40°C (95-105°F) and dissolve the sugar in it. Add the yeast and stir gently. Let it sit for 10 minutes until frothy.
- In a large mixing bowl, sift the flour and add the salt, lemon zest, and melted butter. Mix together.
- Create a well in the center of the flour mixture and add the yeast mixture and eggs. Mix well to combine.
- Knead the dough on a lightly floured surface for about 10 minutes until smooth and elastic.
- Place the dough in a lightly greased bowl, cover with a damp cloth, and let it rise in a warm place for about 1 hour or until doubled in size.
2. Preparing the filling:
- In a saucepan, heat the milk and add the sugar. Stir until dissolved.
- Add the ground walnuts, cinnamon, and vanilla sugar. Stir to combine and cook on low heat for a few minutes until thickened.
- Remove from heat and add the melted butter and rum (if using).
- Allow the mixture to cool before adding the beaten egg and mixing well. Stir in the soaked raisins.
3. Assembling the potica:
- Once the dough has risen, gently punch it down to remove air bubbles. Transfer it to a floured surface and roll it out into a rectangle, about 0.5 cm (¼ inch) thick.
- Spread the cooled walnut filling evenly over the dough, leaving a 2 cm (1 inch) border along the edges.
- Carefully roll the dough into a log shape, ensuring the edges are sealed to prevent the filling from spilling out.
- Grease a round or rectangular baking pan and place the rolled dough inside, ensuring it fits snugly. Let it rise for another 30 minutes.
4. Baking the potica:
- Preheat the oven to 180°C (350°F).
- Brush the top of the potica with a mixture of egg yolk and milk for a golden finish.
- Bake for 50-60 minutes or until the top is golden brown and a toothpick inserted comes out clean. If the top browns too quickly, cover with aluminum foil and continue baking until fully cooked.
- Let the potica cool for 15 minutes in the pan, then transfer it to a cooling rack to cool completely.
This Christmas Potica recipe is the perfect way to bring warmth, tradition, and festive spirit to your holiday table. Whether you’re following the classic walnut filling or experimenting with a twist, the process of baking potica is a joyful experience that creates lasting memories. Enjoy the delicious outcome of your hard work and share it with loved ones, as this traditional Slovenian treat is sure to become a cherished part of your own family’s holiday traditions.
Expert Tips for Perfecting the Christmas Potica Recipe
Baking the perfect Christmas Potica involves more than just following a recipe—it’s about understanding the finer details and making adjustments based on your preferences, environment, and available ingredients. This beloved Slovenian dessert, rich with history, offers ample opportunities to make it uniquely yours while still preserving its traditional essence. The following expert tips will guide you through the various stages of preparation, from dough to filling, and even baking, allowing you to tweak this recipe to perfection.
1. Choosing the Right Flour and Ingredients for the Dough
The foundation of any good potica is the dough, and the choice of flour is crucial to its texture. For the most authentic result, it’s recommended to use all-purpose flour (type 500), which ensures the dough remains light and airy, but it can also handle the substantial weight of the filling. If you wish to achieve an even lighter dough, you can substitute a portion of the all-purpose flour with bread flour for a higher protein content, which will help the dough rise even more. This will lead to a more fluffy and tender result.
Alternative flours can be used for specific dietary needs. For instance, you can experiment with gluten-free flour blends, but keep in mind that they may require additional adjustments, such as xanthan gum to provide structure. For a more nutritious option, you could replace some of the all-purpose flour with whole wheat flour, but the texture may be denser.
The dough should be kneaded until it’s smooth and elastic. Over-kneading can lead to a tough texture, while under-kneading will result in an uneven rise. A good indicator is that the dough should stretch without tearing and bounce back when poked. It’s also essential to ensure the dough is not too sticky or too dry. A slightly tacky but not overly sticky dough will rise well and create a beautifully light texture once baked.
2. Perfecting the Yeast and Dough Rising Process
The yeast is a pivotal element of the dough, and ensuring its activity is key to achieving the desired fluffiness. Fresh yeast is traditionally preferred over dry yeast because it provides a richer flavor and a softer texture in the final product. When using fresh yeast, be sure to dissolve it properly in warm milk (around 35–40°C/95–105°F), with a pinch of sugar to activate it. Let it sit for about 10 minutes until it becomes frothy. If it doesn't bubble or foam, the yeast might be inactive, and you’ll need to start over with fresh yeast.
When it comes to rising the dough, a warm environment is necessary for optimal yeast activity. Place the dough in a bowl, cover it with a damp cloth, and let it rise for about 1 hour in a warm, draft-free place. If you’re in a cooler environment, you can create a makeshift proofing box by turning on the oven for a few minutes to warm it slightly, then turning it off and placing the dough inside to rise.
If you want the dough to have a deeper flavor, you can let it rise slowly in the refrigerator overnight. This extended fermentation allows the yeast to develop a more complex taste and will also improve the dough’s texture, resulting in a softer and fluffier potica.
3. Customizing the Filling for Your Perfect Potica
The filling is what sets the potica apart, and while the traditional walnut filling is beloved, this is where you can get creative. Classic walnut filling combines ground walnuts, sugar, cinnamon, and a touch of rum. The walnuts provide a rich and nutty flavor, but if you want a lighter, more complex filling, consider experimenting with other options.
a. Walnut Alternatives:
- Hazelnuts: For a slightly milder nut flavor, hazelnuts make a fantastic substitute for walnuts. Their buttery taste blends beautifully with the other ingredients, especially if you toast them slightly before grinding.
- Poppy seeds: Another traditional filling for potica, poppy seeds give the cake a more earthy, slightly nutty flavor. To prepare them, simmer them in milk and sugar, then grind them to release their oils. This adds moisture to the filling and prevents it from being too dry.
- Chopped dried fruits: Adding raisins, apricots, or figs to the filling can introduce a delightful sweetness and chewiness that contrasts wonderfully with the nutty texture.
b. Sweetening the Filling:
The level of sweetness in the filling can be adjusted based on your taste preferences. Reducing the sugar slightly can make the potica less sweet and allow the natural flavors of the nuts and spices to shine. If you prefer a richer filling, you can add more sugar or experiment with honey for a deeper flavor.
c. Other Additions:
Consider incorporating spices like cloves, nutmeg, or cardamom to the filling for added complexity. These spices complement the warmth of cinnamon and give the potica a more festive flavor. You can also add vanilla extract or lemon zest to enhance the overall aroma.
The egg in the filling helps to bind everything together and adds a slight creaminess. If you're aiming for a more decadent filling, you can add a bit of heavy cream or butter to the walnut mixture. For a vegan alternative, use plant-based butter and a flaxseed egg substitute.
4. Rolling and Assembling the Potica
Once the dough has risen and the filling is ready, the next critical step is rolling the dough. Roll the dough out on a lightly floured surface to about 0.5 cm thickness (¼ inch). It should be thin but sturdy enough to hold the filling.
The key here is not to overstuff the potica, as this can cause the dough to break or the filling to spill out. Spread the filling evenly, leaving a small border around the edges. After filling, roll it tightly but gently, being careful not to press too hard, which can make the dough too dense.
For a neater appearance, pinch the edges tightly and tuck them underneath the rolled dough. Place the dough in a greased baking pan, making sure it fits snugly to avoid gaps during baking. Allow the potica to rise for 30 minutes before baking to ensure it reaches its full potential.
5. Baking the Potica to Perfection
Baking the potica requires careful attention to temperature and timing. Preheat the oven to 180°C (350°F), and bake the potica for 50–60 minutes, or until it is a golden brown color and a skewer inserted comes out clean. If the top starts to brown too quickly, cover it loosely with aluminum foil and continue baking.
The potica’s crust should be crispy and shiny due to the egg wash applied before baking. If you want an even more flavorful crust, you can brush it with a simple syrup (sugar and water boiled together) after baking, which will give it a glossy finish.
6. Cooling and Serving the Potica
After baking, it’s important to let the potica cool completely on a cooling rack. If you cut into it while it’s still warm, the filling can be too gooey and messy. Once cooled, the potica will hold its shape and be easier to slice.
If you want to store it, you can wrap it tightly in plastic wrap or place it in an airtight container, where it will stay fresh for several days. The flavors will actually improve after a day or two as the filling sets.
Baking the perfect Christmas Potica is an art, and with these expert tips, you have the tools to create a delicious, festive dessert that will impress your family and friends. By paying attention to the small details—from selecting the right flour and yeast to experimenting with filling flavors and spices—you can elevate this traditional Slovenian recipe to new heights. Whether you stick to the classic walnut filling or get creative with your variations, the result will be a show-stopping centerpiece for any holiday table. Enjoy the process, and most importantly, enjoy the sweet, rich flavors of this beloved festive treat!
- Contains gluten (wheat flour)
- Contains nuts (walnuts)
- Contains dairy (butter, milk)
- Contains eggs
Tips for Ingredient Substitutions to Avoid Allergens and Gluten:
- Gluten-free option: Use a gluten-free flour blend for baking. Make sure to choose a blend that includes xanthan gum or add it separately to mimic the texture of traditional flour.
- Nut-free option: Replace walnuts with sunflower seeds or pumpkin seeds for a similar texture.
- Dairy-free: Substitute butter with plant-based margarine and milk with almond milk or coconut milk.
- Egg-free: Use flaxseed meal (1 tablespoon of ground flaxseeds mixed with 3 tablespoons of water) to replace each egg.
- Vitamin B1 (Thiamine): 0.2 mg (helps in energy metabolism and nervous system function)
- Vitamin E: 2 mg (antioxidant that supports healthy skin and cell function)
- Magnesium: 50 mg (important for muscle and nerve function)
- Calcium: 60 mg (supports bone health)
- Vitamin E: 2 mg (helps protect cells from oxidative stress, contributing to skin health and reducing inflammation)
- Polyphenols (from walnuts): High content (promotes heart health and has anti-inflammatory properties)
- Flavonoids (from cinnamon): Beneficial for heart health and blood sugar regulation
