Discover the Art of Making Perfect Onigiri
A Timeless Japanese Delight
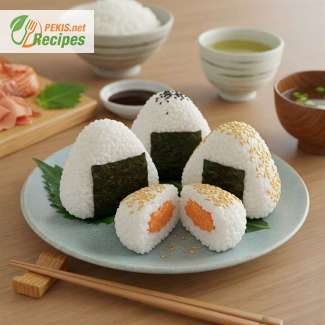
Onigiri, also known as Japanese rice balls, is a beloved staple of Japanese cuisine that has been enjoyed for centuries. These simple yet incredibly flavorful rice balls are not only a convenient and portable snack but also a reflection of Japanese culture and tradition. Whether you enjoy them as a light lunch, an on-the-go snack, or part of a larger meal, onigiri offers a unique blend of taste and texture that makes it irresistible.
While at first glance onigiri may seem like just a ball of rice, its true charm lies in its versatility. With countless fillings, from savory salmon and tuna to umami-rich miso and pickled plums, onigiri can be customized to suit any taste preference. The combination of seasoned rice, crisp nori seaweed, and delicious fillings makes every bite an explosion of flavor.
A Dish with Deep Cultural Roots
Onigiri has a long and fascinating history in Japan, dating back over a thousand years. Traditionally, it was a practical way for samurai and travelers to carry rice as a portable meal. Over time, onigiri evolved from a humble, homemade snack to a popular item found in convenience stores, sushi restaurants, and even high-end gourmet establishments. Today, it remains a comfort food that brings a sense of nostalgia and warmth to many.
What makes onigiri so special is that it is not just a meal—it is a connection to tradition. From mothers packing homemade onigiri for their children’s lunches to families preparing them for picnics under the cherry blossoms, this dish is an integral part of Japanese life.
Why You’ll Love Making Onigiri at Home
One of the best things about onigiri is how simple yet rewarding it is to make. Whether you're a seasoned home cook or just starting your culinary journey, onigiri is an accessible recipe that doesn’t require fancy ingredients or special cooking skills. All you need is freshly cooked Japanese rice, a bit of seasoning, and your favorite fillings to create a meal that is both satisfying and nutritious.
Here’s why making onigiri at home is a must-try experience:
- Customizable – Choose from classic fillings like tuna mayo, salted salmon, or pickled plum (umeboshi), or get creative with your own unique combinations.
- Easy to prepare – With just a few simple steps, you can make restaurant-quality onigiri in your own kitchen.
- Perfect for meal prep – Onigiri can be made in advance and stored for later, making it a great option for lunchboxes, road trips, or quick snacks.
- A fun family activity – Get kids involved in shaping and wrapping their own rice balls, turning mealtime into an enjoyable experience.
The Secret to Perfect Onigiri
Making onigiri may seem straightforward, but there are a few key techniques that can elevate your rice balls from good to exceptional.
- Use the right rice – Short-grain Japanese rice (often labeled as sushi rice) is essential for achieving the right texture. Its slightly sticky nature helps the rice hold together without falling apart.
- Season the rice – Lightly seasoning the rice with salt enhances its natural sweetness and brings out the flavors of the filling.
- Shape with care – Traditionally, onigiri is shaped into triangles, but you can also make round or cylindrical variations. Wetting your hands with a bit of salted water prevents the rice from sticking.
- Add the nori at the right time – If eating immediately, wrap the onigiri with crispy seaweed for a satisfying crunch. If storing for later, keep the nori separate until you're ready to eat to prevent sogginess.
Exploring Different Onigiri Variations
While classic onigiri recipes are widely loved, there are many creative variations that add new flavors and textures to this timeless dish.
- Yaki Onigiri – Grilled rice balls brushed with soy sauce for a smoky, crispy exterior.
- Miso Onigiri – Rice mixed with savory miso paste, offering a rich and deep umami flavor.
- Chirimen Onigiri – A delicate version featuring tiny dried fish for a salty-sweet contrast.
- Modern Fusion Onigiri – Experiment with avocado, cheese, kimchi, or even spicy tuna for an innovative twist.
Elevate Your Japanese Cooking Skills
Mastering onigiri is a great way to deepen your appreciation for Japanese cuisine. Once you’ve perfected this dish, you’ll find it easier to explore other traditional Japanese recipes like sushi, miso soup, tempura, and donburi bowls.
Onigiri is more than just a snack—it’s a culinary experience that embodies simplicity, tradition, and creativity. Whether you’re making them for yourself, sharing with loved ones, or packing them for an adventure, onigiri brings a little piece of Japan into every meal.
- Cook the rice: Rinse the rice under cold water until the water runs clear. Drain and place in a pot with 500 ml (2 cups) of water. Let it soak for 30 minutes. Then, bring to a boil, cover, and simmer on low heat for 12-15 minutes. Remove from heat and let it steam for another 10 minutes.
- Season the rice: In a small bowl, mix the rice vinegar, sugar, and salt. Gently fold this mixture into the cooked rice while it's still warm.
- Prepare the fillings: Flake the cooked salmon, drain the canned tuna, remove pits from umeboshi, or mix miso paste with a little water for a smooth consistency.
- Shape the onigiri: Wet your hands with water and lightly sprinkle with salt to prevent sticking. Take about 100 g (⅓ cup) of rice and flatten it in your palm. Place your chosen filling in the center and fold the rice around it, shaping it into a triangle or ball. Repeat with the remaining rice and fillings.
- Wrap with nori: If eating immediately, wrap each onigiri with a strip of nori for added texture and flavor. If storing for later, keep the nori separate until ready to eat.
Enhancing the Classic Onigiri Recipe with New Flavors and Techniques
Elevating Onigiri with Unique Ingredients
Traditional onigiri is a simple yet flavorful dish, but there are many ways to enhance its taste and texture by introducing new ingredients and techniques. While classic fillings like grilled salmon, tuna mayo, and pickled plum are widely loved, experimenting with fusion flavors can create exciting variations.
- Avocado and Wasabi Mayo – Adding mashed avocado with a touch of wasabi-infused mayonnaise creates a creamy and mildly spicy filling that pairs well with the sticky rice.
- Teriyaki Chicken – A sweet and savory alternative, using grilled chicken coated in teriyaki sauce enhances the umami depth of the onigiri.
- Kimchi and Cheese – A fusion of Japanese and Korean flavors, spicy fermented kimchi with melted cheese inside warm rice creates a rich contrast of textures and flavors.
- Sesame and Miso Paste – Mixing miso paste into the rice along with a sprinkle of toasted sesame seeds intensifies the savory complexity of the dish.
Why Homemade Onigiri is the Best Choice
While store-bought onigiri is convenient, making it at home offers numerous advantages in terms of flavor, nutrition, and freshness.
- Quality Control – Homemade onigiri allows you to choose high-quality ingredients, ensuring fresh rice, organic fillings, and natural seasonings without preservatives.
- Customizability – You can adjust the seasoning and fillings to match your personal taste preferences and dietary needs.
- Healthier Options – Store-bought varieties often contain excess sodium and preservatives, while homemade onigiri can be prepared with wholesome, natural ingredients.
- Freshness – Onigiri tastes best when freshly made, as the rice retains its soft and fluffy texture, and the nori remains crisp.
Avoiding Common Mistakes
Even though onigiri is a relatively simple dish to prepare, there are several common mistakes that can affect the final outcome.
- Using the Wrong Type of Rice – Regular long-grain rice lacks the stickiness needed to hold the onigiri together. Always use short-grain Japanese rice or sushi rice.
- Not Rinsing the Rice Properly – Failing to rinse excess starch from the rice can result in a gummy or overly sticky texture. Rinse the rice until the water runs clear.
- Handling the Rice When It's Too Hot – While warm rice is easier to shape, extremely hot rice can cause burns and difficulty in handling. Let it cool slightly before forming onigiri.
- Adding Too Much Filling – Overstuffing the onigiri makes it difficult to shape and increases the risk of it falling apart. Keep the filling portion moderate.
- Wrapping Nori Too Soon – If the nori is wrapped around the rice while it's still hot, it absorbs moisture and becomes soggy. Wait until just before serving to maintain its crispness.
Making Onigiri a Healthier Option
Traditional onigiri is already a wholesome dish, but it can be made even healthier by using nutritious ingredients and cooking techniques.
- Switching to Brown Rice – Substituting white rice with brown rice increases the fiber content, making it a more filling and heart-healthy option.
- Reducing Sodium Levels – Instead of heavily salted fillings, use natural seasonings like lemon zest, fresh herbs, or low-sodium soy sauce.
- Incorporating More Vegetables – Mixing finely chopped spinach, carrots, or shiitake mushrooms into the rice boosts the nutritional profile of onigiri.
- Using Alternative Wraps – Instead of nori, try shiso leaves or thinly sliced cucumber for a refreshing and nutrient-rich wrap.
The Role of Umami in Onigiri
One of the defining features of onigiri is its deep umami flavor, which can be enhanced through specific ingredients:
- Kombu (Sea Kelp) – Cooking the rice with a small piece of kombu infuses a subtle, oceanic umami taste.
- Bonito Flakes – Adding shaved bonito flakes into the filling gives an extra savory dimension.
- Soy Sauce & Miso – Both soy sauce and miso are rich in glutamates, the natural compounds responsible for umami flavor.
Perfecting the Texture of Onigiri
Texture plays a huge role in onigiri enjoyment. The perfect onigiri should be firm yet tender, holding its shape without being too dense. Achieve this by:
- Using the Right Water Ratio – Cook rice with a 1:1.25 rice-to-water ratio to achieve the perfect soft yet structured texture.
- Shaping with Gentle Pressure – Avoid pressing the rice too tightly, as it can become dense and hard instead of light and fluffy.
- Keeping Your Hands Moist – Lightly wetting your hands prevents the rice from sticking while allowing smooth shaping.
Creative Presentation Ideas
Onigiri doesn’t have to be limited to a simple triangle shape. You can make it visually appealing by:
- Shaping It Into Fun Designs – Try making round, cylindrical, or even animal-shaped onigiri using food molds.
- Garnishing with Edible Flowers & Sprinkles – A touch of furikake (seasoned rice sprinkles), black sesame seeds, or edible flowers can add a gourmet touch.
- Serving with a Side of Pickles & Soup – Pairing onigiri with Japanese pickles (tsukemono) and a bowl of miso soup creates a balanced and authentic meal.
Enhancing traditional onigiri doesn’t mean compromising its authenticity—it’s about adapting the recipe to modern tastes and health-conscious preferences while maintaining its cultural significance. Whether through new fillings, healthier alternatives, or improved techniques, onigiri remains an iconic and versatile dish that can be enjoyed in countless ways.
- Contains fish (salmon/tuna) if used as filling.
- Gluten-free when prepared traditionally. However, miso paste and some soy sauces may contain gluten.
- Alternative: Use tamari (gluten-free soy sauce) or miso labeled gluten-free.
- Vitamin B1 (Thiamine): Supports energy metabolism.
- Vitamin B3 (Niacin): Essential for brain function and skin health.
- Iron: Helps with oxygen transport in the body.
- Magnesium: Supports muscle and nerve function.
- Polyphenols (from umeboshi & nori): Protect cells from oxidative stress.
- Omega-3 fatty acids (from fish fillings): Reduce inflammation and support heart health.
- Carotenoids (from nori): Support vision and immune health.
Recipes worth trying