Creating the perfect sourdough bread is a culinary journey that combines artistry, patience, and science. This professional recipe offers an in-depth guide for home bakers eager to master sourdough's unique complexity, resulting in a loaf that is not only flavorful but also visually stunning and texturally satisfying. Baking sourdough at home isn’t just about following a recipe; it's about understanding the nuances of wild fermentation, flour varieties, and the rhythm of rising and baking times. Achieving an airy crumb, chewy crust, and that signature tangy taste is a craft, and with this recipe, you’ll learn to create bakery-quality sourdough in the comfort of your kitchen.
The popularity of sourdough bread has surged in recent years, not only because of its taste but also because of its health benefits. Sourdough is easier to digest compared to conventional bread, thanks to the natural lactic acid bacteria that develop during fermentation. This process also reduces gluten content and increases the bread’s nutritional value, making it rich in vitamins B1, B6, and B12, as well as minerals like magnesium, potassium, and zinc. Whether you are a seasoned baker or a curious beginner, baking sourdough will elevate your baking skills and offer a healthier alternative to store-bought bread.
The Art of Fermentation
At the heart of sourdough lies its unique fermentation process, where wild yeast and beneficial bacteria interact to create the bread’s distinct flavor. Unlike commercial yeasts, wild yeast requires time to develop, allowing for a more complex flavor profile with subtle notes that make each loaf unique. The fermentation process is lengthy but incredibly rewarding, as it produces a loaf with improved digestibility and nutritional benefits. The fermentation also adds to the bread’s aroma, making every slice an experience of rich, layered flavors.
Crafting Texture and Flavor
A perfect sourdough bread is defined by its texture—crusty on the outside, yet airy and tender on the inside. This combination is achieved through proper kneading, folding, and proofing techniques that allow the dough to develop strength without overworking it. The balance between a crunchy exterior and a soft crumb is a testament to skill, and this professional recipe is designed to help home bakers achieve just that. The recipe will guide you through every step, from choosing the right flour to the ideal baking time and temperature, to create a loaf with an exquisite crust and moist, open crumb.
Importance of Patience and Precision
Baking sourdough requires patience and attention to detail. Each step, from feeding the starter to the final bake, is crucial. This recipe emphasizes precision, giving home bakers a clear timeline for each step of the process. The success of sourdough bread often depends on factors like room temperature, humidity, and the activity level of the starter, making each loaf a unique creation shaped by its environment. Sourdough starters are living cultures, and nurturing them requires understanding and care.
Visual Appeal and Presentation
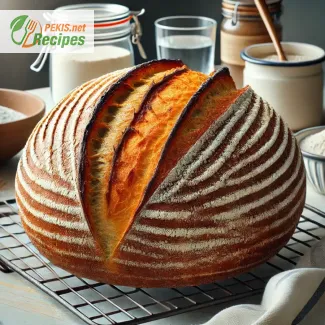
A well-crafted sourdough loaf is a visual delight. The golden, caramelized crust, marked with artisan scoring patterns, adds to the bread’s beauty and personality. Scoring is an art form in itself, allowing bakers to leave a personal mark on each loaf. When done correctly, it enhances the bread’s appearance and allows for optimal oven spring, resulting in a beautifully domed loaf. This recipe will guide you on scoring techniques, so each loaf not only tastes but also looks like it came from a professional bakery.
Baking sourdough is more than a culinary activity; it’s an experience that combines tradition, science, and personal expression. With this professional recipe, you’ll be equipped to create sourdough bread that stands out for its taste, texture, and appearance.
1. Activate the Starter
- The night before baking, feed your sourdough starter by mixing equal parts of flour and water until smooth. Cover and leave at room temperature for 12 hours or until doubled in size.
2. Mix the Dough
- In a large mixing bowl, combine 350 ml (1 ½ cups) water and 100 g (3.5 oz) of active sourdough starter. Stir until the starter is mostly dissolved.
- Add 500 g (1 lb, 4 cups) bread flour and 10 g (2 tsp) salt to the mixture. Mix until a shaggy dough forms.
3. Autolyse (Resting Phase)
- Cover the dough with a damp cloth and let it rest for 30 minutes. This helps to hydrate the flour and begin gluten development.
4. Kneading and Folding
- After resting, perform a series of "stretch and folds" instead of traditional kneading:
- Wet your hands to prevent sticking.
- Lift one side of the dough and fold it over to the opposite side.
- Rotate the bowl and repeat the process for each side of the dough, folding a total of 4-5 times.
- Cover and let rest for 30 minutes.
- Repeat this stretch-and-fold technique 3-4 times at 30-minute intervals. This builds strength in the dough without overworking it.
5. First Rise (Bulk Fermentation)
- After the final fold, cover the dough and let it rise at room temperature for about 4 hours, or until it has doubled in size.
6. Shaping the Dough
- Gently transfer the dough onto a floured surface, taking care not to deflate it.
- Shape the dough into a round or oval loaf, depending on your preference and baking vessel (round for a Dutch oven or oval for a bread pan).
- Place the shaped dough in a well-floured proofing basket or bowl lined with a cloth.
7. Second Rise (Proofing)
- Cover the dough with a cloth and refrigerate it for 8-12 hours. This slow fermentation enhances flavor and makes the dough easier to score before baking.
8. Preheat the Oven
- About 30 minutes before baking, preheat your oven to 250°C (480°F) with a Dutch oven or baking stone inside.
9. Scoring and Baking
- Remove the dough from the refrigerator and carefully turn it out onto parchment paper.
- Score the top with a sharp knife or razor blade to allow steam to escape.
- Carefully transfer the dough into the preheated Dutch oven or onto the baking stone. Cover with the lid if using a Dutch oven.
- Bake at 250°C (480°F) for 20 minutes with the lid on, then reduce to 230°C (450°F) and bake for another 20-25 minutes with the lid off until the crust is golden brown.
10. Cooling
- Remove the bread from the oven and let it cool on a wire rack for at least 1 hour before slicing.
Mastering Your Sourdough Bread Recipe: Professional Tips for Enhancing Flavor, Texture, and Technique
Crafting perfect sourdough bread requires a combination of the right ingredients, proper technique, and fine adjustments that elevate the quality of the final loaf. Each element, from the sourdough starter to the baking time, impacts the bread’s flavor, texture, and appearance. This guide provides professional tips to help you take control of each aspect of the recipe, enabling you to achieve superior results with every bake.
1. Optimize the Sourdough Starter
Your starter’s health and maturity directly affect the bread’s rise, flavor, and consistency. Here are some professional ways to enhance your sourdough starter:
- Refresh Your Starter Regularly: Feed the starter with equal parts flour and water 12 hours before use to ensure it's active and bubbly. Regularly discarding and refreshing it keeps the yeast and bacteria active, promoting a stronger rise.
- Adjust Starter Hydration: A starter with a hydration level between 80%-100% creates a balanced crumb and mild sour flavor. For a more tangy flavor, increase hydration to promote acetic acid, which adds sourness.
- Temperature Control: Keep your starter in a warm area (around 21-26°C/70-80°F) for faster activity. Cooler temperatures slow the starter down, which can add complexity but may require longer fermentation times.
2. Experiment with Flour Types
Different flours offer varied textures and flavors, allowing for a customized sourdough profile:
- High-Protein Bread Flour: This is ideal for a chewy crumb and strong gluten structure, leading to a more open crumb and better rise.
- Whole Grain Flour: Using a portion of whole wheat or rye flour (10-20%) introduces nutty flavors and enhances fermentation. These flours contain more nutrients, which feed the starter, potentially creating a more robust sour profile.
- Gluten-Free Alternatives: Substitute with a blend of gluten-free flours like rice, sorghum, or buckwheat, if catering to gluten sensitivities. Be prepared for a denser loaf, as gluten-free flours lack the elasticity of traditional flours.
3. Control the Dough Hydration
Dough hydration impacts both the bread’s crumb structure and difficulty of handling. Adjusting hydration levels can lead to different textures and rise patterns:
- Higher Hydration (70-80%): Results in an open crumb with larger air pockets and a softer texture. It’s best for achieving a more artisanal look but requires practice with handling wetter dough.
- Lower Hydration (60-65%): Creates a denser crumb with smaller, even holes and a firm texture. This is ideal for beginner bakers and provides a more manageable dough.
- Adjust for Humidity: In humid environments, reduce water slightly to avoid overly sticky dough, and increase water in dry conditions.
4. Master the Fermentation Process
The bulk fermentation and proofing stages are critical in developing flavor and texture. Here’s how to fine-tune this process:
- Control Bulk Fermentation Time: Allow the dough to ferment for 4-6 hours at room temperature. Longer fermentation enhances flavor and yields a lighter, more open crumb. If overproofed, the bread may collapse during baking.
- Refrigerate for Cold Fermentation: Extending proofing in the refrigerator for 12-18 hours (cold retardation) enhances sour flavors, slows down yeast activity, and improves the final structure.
- Fold During Bulk Fermentation: Perform stretch-and-folds every 30 minutes during the first two hours of bulk fermentation. This technique strengthens the dough without overworking, encouraging a lighter texture and open crumb.
5. Shaping Techniques for a Beautiful Loaf
The shaping stage is key to achieving a professional look and structure. Follow these tips for an ideal shape:
- Pre-shape for Better Structure: After the first rise, pre-shape the dough into a round and let it rest for 10-15 minutes. This relaxes the gluten and prepares the dough for final shaping.
- Tension-Building Shape: When shaping, create surface tension by pulling the dough into a tight ball or oval. This step traps air bubbles, encouraging a more even crumb.
- Proof in a Basket or Bowl: A well-floured proofing basket supports the dough during its final rise, leading to a uniform shape. Lining with a cloth dusted with flour prevents sticking.
6. Scoring Techniques for Optimal Oven Spring
Scoring not only adds visual appeal but also influences the bread’s rise:
- Score at the Right Depth: Shallow cuts may restrict oven spring, while deep scores can collapse the loaf. Aim for cuts about 1 cm (½ inch) deep.
- Angle Your Blade: Hold the blade at a 45-degree angle for the best expansion. A straight blade leads to a rougher tear, whereas an angled blade encourages a smoother, more controlled opening.
- Experiment with Patterns: Simple diagonal lines provide good oven spring, while intricate designs can add a personalized touch. For softer doughs, opt for fewer scores to maintain structure.
7. Temperature and Baking Tips
Proper baking time and temperature ensure an even crust and a well-baked interior:
- Preheat Thoroughly: For best results, preheat the oven with a Dutch oven or baking stone at 250°C (480°F). A hot surface encourages oven spring and crust formation.
- Use Steam for a Crispy Crust: If not using a Dutch oven, place a pan of water in the oven for the first 15 minutes to create steam. Steam delays crust formation, allowing the loaf to expand more in the oven.
- Reduce Temperature Midway: After the initial 20 minutes, reduce the temperature to 230°C (450°F) and remove the lid for a golden, caramelized crust.
8. Enhance Flavor with Add-Ins
Personalize your sourdough by incorporating various add-ins:
- Seeds and Nuts: Sesame seeds, flaxseeds, or sunflower seeds add texture and flavor. Toast them lightly for a more robust taste and fold them in during the last stretch and fold.
- Dried Fruits: Dried figs, raisins, or cranberries introduce a hint of sweetness. Chop and hydrate them slightly to prevent burning during baking.
- Herbs and Spices: Fresh rosemary, thyme, or even a dash of cinnamon can transform your sourdough, making it more savory or sweet, depending on your preference.
9. Troubleshooting Common Issues
Sourdough baking has a learning curve, and every loaf helps improve technique. Here are solutions to common problems:
- Dense Crumb: This is often due to under-fermentation or insufficient dough hydration. Ensure the starter is active and increase water slightly.
- Flat Loaf: Over-proofing or weak gluten structure leads to a flatter loaf. Reduce proofing time or incorporate more folds during bulk fermentation to strengthen the dough.
- Burned Crust: Try baking at a slightly lower temperature or reduce baking time. You can also cover the loaf with foil if it browns too quickly.
10. Storing and Serving Sourdough
Once baked, proper storage and serving methods help maintain sourdough’s freshness:
- Storage: Store sourdough at room temperature in a bread bag or wrapped in a towel to keep the crust from becoming overly hard. Avoid refrigeration, as it dries out the crumb.
- Freezing: For longer storage, freeze the loaf in a sealed bag. When ready to eat, thaw and refresh by warming it in the oven at 180°C (350°F) for 10-15 minutes.
- Serving Suggestions: Toasted sourdough pairs well with savory spreads, olive oil, or butter, while fresh slices complement soups, salads, and cheeses.
Mastering sourdough bread requires time, patience, and practice. Each adjustment in ingredients, fermentation, and technique influences the final loaf, making each sourdough unique. With these tips, you’ll be able to customize the bread to fit your preferences, turning every loaf into a professional-quality creation that delights both visually and in flavor.
- Contains gluten due to wheat flour.
- To make it gluten-free, substitute with a blend of gluten-free bread flour, though results may vary in texture and flavor.
- Vitamin B1 (Thiamine): Essential for energy production.
- Vitamin B6: Supports brain health and hormone regulation.
- Vitamin B12: Vital for blood formation and neurological function.
- Magnesium: Important for muscle function and heart health.
- Potassium: Aids in maintaining normal blood pressure.
- Zinc: Supports immune function and skin health.
- Ferulic Acid: Found in whole grain flour; helps reduce inflammation.
- Phytic Acid: Acts as an antioxidant and can enhance mineral absorption.
