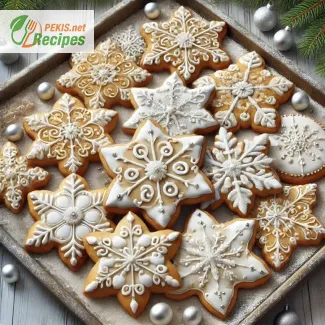
Christmas snowflake cookies are the embodiment of holiday magic in edible form, a delightful treat that transforms your festive season into a celebration of sweetness and charm. These intricately designed cookies are not just a dessert; they are an artistic representation of winter’s most delicate wonders, the snowflakes. Each cookie, with its perfectly shaped points and symmetrical patterns, captures the beauty of the snow that blankets the earth in a serene white during the holiday season.
Crafted with a buttery, tender dough, Christmas snowflake cookies melt in your mouth, leaving behind a lingering sweetness that pairs perfectly with a steaming cup of cocoa or a fragrant spiced latte. The base dough is rich and smooth, often infused with vanilla, almond, or citrus zest, giving it a nuanced depth of flavor that feels indulgent yet comforting. Whether you choose to keep them simple or embellish them with shimmering royal icing, edible pearls, or a light dusting of powdered sugar, each bite is a symphony of taste and texture.
These cookies are perfect for gatherings, gifting, or creating lasting family traditions. Imagine an evening spent in a warm kitchen, the scent of freshly baked cookies filling the air, as children and adults alike gather around the table to decorate these festive masterpieces. Decorating snowflake cookies is an invitation to creativity, where you can channel the magic of winter’s intricate designs into edible works of art. Icing in soft whites, icy blues, and sparkling silvers transforms each cookie into a miniature snowflake, unique in its detail, just like real snowflakes.
What sets Christmas snowflake cookies apart is their ability to bring joy to every moment of the season. Their delicate beauty makes them an excellent choice for holiday dessert spreads, adding a touch of elegance to the table. Wrapped in clear cellophane and tied with a satin ribbon, they become the perfect hostess gift or party favor. They are also an ideal treat to include in your annual cookie exchange, where their stunning appearance and delicious flavor are guaranteed to impress.
While their aesthetic appeal is undeniable, the true magic lies in their universal appeal. From young children marveling at the snowflake patterns to adults savoring the sophisticated flavors, these cookies bridge generations. The combination of a light, crisp texture with the sweetness of icing or the simplicity of a powdered sugar finish ensures they remain a timeless holiday favorite.
For those who love to add a personal touch, variations abound. You can opt for gluten-free flours, incorporate spices like cinnamon or nutmeg for a warm, festive twist, or even dip half of the cookie in chocolate for an extra layer of indulgence. Regardless of the modifications, the essence of the cookie—a celebration of winter’s beauty and holiday cheer—remains unchanged.
Incorporating these cookies into your holiday traditions creates memories that last a lifetime. From the first mix of dough to the final swipe of icing, every step of the process is an opportunity to connect with loved ones, share laughter, and create something truly special. They’re not just cookies; they’re moments of joy, creativity, and love shared during the most wonderful time of the year.
Christmas snowflake cookies are more than a recipe—they are a symbol of the season’s wonder. Their elegance, flavor, and versatility make them a staple for anyone looking to add a touch of magic to their holiday celebrations. Whether you’re creating a snowy wonderland on your cookie tray or sharing them with friends and family, these cookies embody the spirit of Christmas in every bite. So, roll out the dough, dust off the snowflake cutters, and let your creativity shine as you craft these festive treats that capture the heart of the holidays.
- Prepare the Dough:
- In a large mixing bowl, cream the softened butter and powdered sugar together until light and fluffy.
- Add the egg yolk and vanilla extract, mixing until fully incorporated.
- Add Dry Ingredients:
- Sift together the all-purpose flour and salt. Gradually add the dry mixture to the wet ingredients, stirring until a dough forms.
- If the dough is too dry, add 1–2 tablespoons of milk to bring it together. The dough should be smooth but not sticky.
- Chill the Dough:
- Shape the dough into a disc, wrap it in plastic wrap, and refrigerate for at least 1 hour. This helps the dough firm up and makes it easier to handle.
- Shape the Cookies:
- Preheat the oven to 180°C (350°F) and line baking sheets with parchment paper.
- Roll out the chilled dough on a lightly floured surface to about 5 mm (¼ inch) thickness.
- Use snowflake-shaped cookie cutters to cut out the cookies and transfer them to the prepared baking sheets.
- Bake:
- Bake in the preheated oven for 10–12 minutes or until the edges are lightly golden.
- Allow the cookies to cool on the baking sheet for 5 minutes before transferring them to a wire rack to cool completely.
- Decorate:
- Once cooled, decorate the cookies with royal icing, creating intricate snowflake patterns.
- Add edible pearls or a light dusting of powdered sugar for a festive touch.
Enhancing and Customizing Christmas Snowflake Cookies: Expert Tips for a Perfect Bake
Christmas snowflake cookies are already a delightful holiday treat, but there’s always room for improvement or customization to suit personal preferences, dietary needs, or creative whims. Here’s an in-depth guide on how to elevate this classic recipe, offering professional insights into ingredient choices, preparation techniques, and decoration tips.
1. Ingredient Tips for Improved Texture and Flavor
a. Flour Selection
The recipe calls for all-purpose flour, which works well for tender cookies. However, for a crisper texture:
- Replace 50 g (¼ cup) of all-purpose flour with cake flour to make the cookies lighter.
- For whole-grain enthusiasts, substitute 50% of the all-purpose flour with spelt or whole wheat pastry flour, which adds a nuttier flavor without compromising tenderness.
b. Butter Quality
Butter is a key component in shortbread-style cookies:
- Use European-style butter with a higher fat content for a richer, creamier flavor.
- For a dairy-free version, opt for vegan butter sticks that mimic the structure and fat content of traditional butter.
c. Sweeteners
Powdered sugar gives the dough a fine crumb, but experimentation can lead to exciting results:
- Add 15 g (1 tbsp) of brown sugar for a slightly caramelized undertone.
- Substitute half the powdered sugar with coconut sugar for a deeper, more complex flavor profile.
2. Enhancing the Dough for Special Flavors
a. Seasonal Spices
While the original recipe doesn’t include spices, adding a pinch of:
- Cinnamon, nutmeg, or cardamom can give the cookies a festive warmth.
- Incorporate ground ginger for a subtle zing that pairs beautifully with royal icing.
b. Extracts and Zest
Vanilla extract is the base flavor, but it can be enhanced or replaced with:
- Almond extract for a nutty profile that complements the buttery dough.
- Add 1 tsp of lemon or orange zest to brighten the flavor, creating a fresh, citrusy twist.
3. Techniques for Consistent Results
a. Dough Handling
- Chill the Dough Properly: After mixing, chilling the dough for at least one hour prevents the cookies from spreading during baking. For intricate snowflake shapes, chilling for 2–3 hours is ideal.
- Avoid Overworking: Overmixing can activate gluten, resulting in tough cookies. Mix until just combined for the best texture.
b. Rolling and Cutting
- Use Parchment Paper: Roll the dough between sheets of parchment paper to avoid sticking and to maintain an even thickness.
- Rotate the Dough: Rotate the dough as you roll to prevent it from sticking and to ensure uniformity.
4. Baking Optimization
a. Even Baking
- Use light-colored baking sheets to avoid over-browning. Dark pans can cause the bottom of the cookies to brown too quickly.
- Bake one sheet at a time in the middle of the oven for even heat distribution.
b. Monitoring Time
- Watch the cookies closely after 8 minutes of baking. The edges should be lightly golden but not browned, ensuring a delicate texture.
5. Decorating Like a Pro
a. Royal Icing Mastery
- For intricate designs, use flooding and piping techniques with royal icing. Pipe an outline first, then flood the interior for a smooth, professional finish.
- Thin the icing slightly with water for smoother application but ensure it’s not too runny to maintain precision.
b. Adding Dimension
- Dust cookies lightly with edible glitter or pearl dust for a magical, snowy effect.
- Use edible silver or gold flakes to add luxury to your presentation.
c. Alternative Decorations
- For less sugary options, sprinkle finely ground nuts like almonds or pistachios onto the cookies before baking.
- Drizzle melted white or dark chocolate for a sophisticated look and richer taste.
6. Dietary Modifications
a. Gluten-Free Variation
- Replace all-purpose flour with a 1:1 gluten-free baking blend that includes xanthan gum for structure.
b. Vegan Adaptations
- Substitute the egg yolk with 15 g (1 tbsp) of flaxseed meal mixed with 45 ml (3 tbsp) water, allowing it to thicken for 5 minutes.
- Use dairy-free butter to replicate the richness of traditional butter.
7. Storage and Longevity
a. Storage Tips
- Store cookies in an airtight container at room temperature for up to 7 days.
- For longer storage, freeze undecorated cookies in a sealed bag or container for up to 3 months. Decorate after thawing for fresh results.
b. Gift Packaging
- Wrap individual cookies in cellophane bags with festive ribbons, ensuring they stay fresh while looking presentable.
8. Creative Variations
a. Flavored Icing
- Add a few drops of peppermint, orange, or almond extract to the royal icing for an added flavor dimension.
b. Shapes Beyond Snowflakes
- While snowflake cutters are classic, experiment with other holiday-themed shapes like stars, bells, or trees for variety.
9. Nutritional Adjustments
a. Reducing Sugar
- Lower the powdered sugar in the dough by 20 g (2 tbsp) and increase vanilla or citrus zest for natural sweetness.
b. Adding Fiber
- Swap 10% of the all-purpose flour with oat flour to increase fiber content while maintaining texture.
10. Presentation Tips
- Arrange cookies on a white or silver platter to highlight their intricate snowflake designs.
- Add a few sprigs of fresh rosemary or eucalyptus around the platter for an elegant, natural touch.
By incorporating these tips, you can adapt the Christmas snowflake cookie recipe to suit your needs while elevating its taste, texture, and presentation. Whether you’re creating a batch for family, friends, or festive gatherings, these enhancements ensure your cookies are not only delicious but also unforgettable.
- Contains gluten, dairy, and eggs.
Substitution Suggestions:
- For a gluten-free version: Use a gluten-free flour blend with xanthan gum.
- For a dairy-free version: Replace butter with plant-based margarine.
- For an egg-free version: Substitute the egg yolk with 1 tbsp (15 ml) of unsweetened applesauce.
- Vitamin A: 150 IU (supports vision and immunity).
- Calcium: 10 mg (essential for strong bones and teeth).
- Iron: 0.5 mg (promotes oxygen transport in the body).
- Vanilla Extract: Contains small amounts of vanillin, a natural antioxidant.
- Powdered Sugar: Trace amounts of polyphenols if unrefined sugar is used.
These antioxidants, while minimal in cookies, contribute to reducing oxidative stress in moderation.
Enjoy creating and savoring these festive cookies that capture the magic of the season!
