The Ultimate Guide to a Delicious and Simple Easter Bread
A Traditional Easter Delight with a Modern Twist
Easter is a time of celebration, family gatherings, and indulgence, and nothing brings people together quite like a freshly baked Easter bread. This delightful, slightly sweet, and buttery bread, traditionally braided and adorned with eggs, is a staple in many cultures around the world. Whether you’re familiar with Italian Pane di Pasqua, Greek Tsoureki, or the classic Eastern European Paska, this easy Easter bread recipe is a perfect way to create something special for your holiday table.
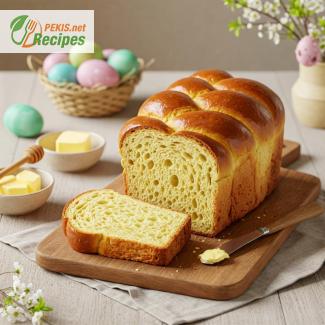
Made with simple pantry ingredients, this bread is soft, fluffy, and subtly sweet, making it an excellent treat for breakfast, brunch, or as a stunning centerpiece for Easter Sunday. The golden crust, lightly brushed with egg wash, gives it a perfect sheen, while the soft, aromatic interior melts in your mouth with every bite.
The Symbolism Behind Easter Bread
Easter bread is not just a delightful baked good; it is rich in symbolism and tradition. Many versions of this festive bread include braided dough, which represents the unity of the Holy Trinity in Christian traditions. Some recipes incorporate colored eggs, symbolizing renewal and new beginnings, a nod to the themes of Easter.
Historically, Easter bread has been a part of European holiday traditions for centuries. In Italy, families bake Pane di Pasqua, a ring-shaped bread often decorated with dyed eggs. In Greece, Tsoureki is flavored with mahleb and orange zest, while Eastern European countries favor Paska, sometimes decorated with religious symbols on the surface. No matter the variation, Easter bread remains a timeless classic that brings warmth and tradition to the holiday table.
Why You’ll Love This Recipe
This homemade Easter bread is not only delicious but also easy to prepare. It’s the perfect choice for both experienced bakers and beginners, requiring minimal effort but delivering impressive results.
Here’s why you should try this recipe:
- Soft, pillowy texture – The enriched dough makes it extra tender and fluffy.
- Lightly sweet with a hint of citrus – A subtle blend of vanilla and orange zest enhances its flavor.
- Perfectly golden crust – The egg wash creates a shiny, bakery-style finish.
- Customizable – Add raisins, nuts, or even chocolate chips for a unique touch.
- Great for gifting – A beautifully braided loaf makes a thoughtful Easter present.
Key Ingredients That Make the Difference
To achieve the best texture and flavor, choosing the right ingredients is essential. This Easter bread is made with:
- All-purpose flour – Provides the perfect balance of structure and softness.
- Milk and butter – Enrich the dough, giving it a tender crumb.
- Eggs – Enhance the bread’s richness and help with binding.
- Sugar and honey – Add a touch of sweetness without overpowering.
- Orange zest and vanilla – Elevate the aroma and add a fresh, citrusy note.
- Yeast – Ensures the bread rises beautifully, making it light and airy.
How to Serve Easter Bread
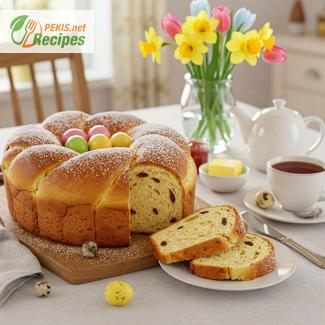
Once baked, this golden, fragrant loaf is a showstopper on the Easter table. Enjoy it warm with butter, drizzle it with honey or jam, or pair it with a cup of tea or coffee for a cozy breakfast. You can also toast leftovers for a delicious next-day treat or use slices to make French toast for a luxurious post-Easter breakfast.
For an extra festive touch, you can decorate your Easter bread by weaving dyed eggs into the braid before baking. These eggs cook as the bread bakes, making them an integral part of the presentation. A dusting of powdered sugar or a light glaze can also elevate the appearance and taste.
The Perfect Easter Baking Tradition
Baking homemade Easter bread is more than just making a delicious treat; it's about embracing tradition, creating memories, and bringing loved ones together. The process of kneading, shaping, and watching the dough rise fills the kitchen with warmth and anticipation, making it a cherished Easter tradition in many households.
With its light sweetness, soft texture, and beautiful braided shape, this Easter bread is a must-try for anyone looking to add a touch of homemade goodness to their holiday feast. Whether you follow the classic version or add your own creative twist, this recipe is sure to become a family favorite for years to come.
- Activate the yeast – Warm the milk to about 40°C (105°F) and dissolve the yeast with 1 tsp of sugar. Let it sit for 10 minutes until foamy.
- Mix the ingredients – In a large bowl, combine the flour, sugar, salt, and orange zest. Create a well in the center and add the eggs, melted butter, vanilla extract, and activated yeast mixture.
- Knead the dough – Knead for about 10 minutes until smooth and elastic. If the dough is too sticky, add a small amount of flour. If too dry, add a little milk.
- First rise – Place the dough in a greased bowl, cover with a kitchen towel, and let it rise for 1.5 hours or until doubled in size.
- Shape the bread – Once risen, divide the dough into three equal portions and roll each into a long rope. Braid the ropes together and tuck the ends underneath.
- Second rise – Transfer the braid onto a parchment-lined baking tray and let it rise for another 45 minutes.
- Apply the egg wash – Mix the egg yolk with water and gently brush it over the surface of the dough for a golden finish.
- Bake – Preheat the oven to 180°C (350°F) and bake for 25 minutes or until golden brown and hollow-sounding when tapped.
- Cool and serve – Let the bread cool completely before slicing. Enjoy with butter, honey, or jam.
Elevating Easter Bread: Tips for a More Flavorful and Perfect Bake
The Secrets to a Softer and More Aromatic Dough
The foundation of a great Easter bread lies in its dough, and small adjustments can lead to significant improvements in both texture and flavor. One of the best ways to make your bread softer and more fragrant is by enriching the dough with high-quality ingredients.
- Increase the butter content – Adding an extra 10-15 g of unsalted butter can result in a more tender crumb and a richer taste. However, be careful not to add too much, as excessive fat can make the dough heavy and prevent proper rising.
- Use whole milk instead of water – While some recipes call for water, replacing it with warm whole milk gives the bread a creamier texture and enhances its natural sweetness.
- Add an extra egg yolk – More egg yolks contribute to a softer, richer dough, creating an even more tender and airy final product.
- Experiment with aromatic spices – Adding a pinch of cinnamon, nutmeg, or cardamom can subtly enhance the bread’s overall depth of flavor without overpowering its delicate sweetness.
How to Achieve a Fluffier and More Evenly Baked Bread
One of the biggest challenges in making homemade Easter bread is ensuring an even, airy rise without dense spots. Here are a few techniques to help achieve perfect fluffiness:
- Use high-quality yeast – Opt for instant yeast or active dry yeast that is fresh and properly activated. Expired yeast will result in a dense, under-risen loaf.
- Knead the dough thoroughly – Kneading develops gluten, which gives the bread its characteristic soft yet structured crumb. Knead for at least 10 minutes or until the dough becomes smooth and elastic.
- Allow enough proofing time – Rushing the rising process can lead to a compact texture. Always let the dough double in size before shaping it. If your kitchen is cold, place the dough in a slightly warm oven (with the light on) to create an ideal rising environment.
- Bake at the right temperature – Baking at 180°C (350°F) ensures an even golden crust without over-browning. Using an oven thermometer helps maintain accuracy.
Enhancing the Flavor with Unique Ingredients
If you want to take your Easter bread to the next level, consider incorporating additional flavorful ingredients:
- Citrus zest – Adding lemon or orange zest infuses the dough with a bright, fresh aroma, complementing the sweetness of the bread.
- Honey or maple syrup – Replacing a portion of sugar with honey or maple syrup creates a deeper, more complex sweetness. These natural sweeteners also contribute to a moist, tender crumb.
- Almond or rum extract – A few drops of almond extract or rum flavoring can add an elegant, bakery-style depth of taste.
- Dried fruits or nuts – For a more textured and festive version, fold in golden raisins, chopped almonds, or even dark chocolate chips for extra indulgence.
The Benefits of Making Easter Bread at Home
Baking Easter bread from scratch offers several advantages over store-bought versions. Aside from having complete control over the quality of ingredients, homemade bread is free from preservatives and artificial flavors.
- Healthier ingredients – Store-bought Easter breads often contain hydrogenated oils, excessive sugar, and artificial enhancers. Homemade versions use natural butter, fresh eggs, and real flavorings, making them healthier and tastier.
- Customizable sweetness – Adjusting the sugar level allows you to control the sweetness according to your preference. If you prefer a more savory version, simply reduce the sugar and enhance it with herbs or cheese.
- More aromatic and fresh – Freshly baked bread fills your home with an inviting aroma, something that pre-packaged versions can never replicate.
Common Mistakes to Avoid When Making Easter Bread
Even experienced bakers can encounter challenges when making Easter bread. Here are some common pitfalls and how to prevent them:
- Dough is too dense or dry – This often happens when too much flour is added. The dough should feel slightly sticky but manageable. Add extra milk or butter if it feels too stiff.
- Bread is underbaked in the center – This can result from oven temperature fluctuations or an improperly shaped loaf. Always preheat your oven and check for doneness by tapping the bottom of the loaf—if it sounds hollow, it’s done.
- Yeast doesn’t activate properly – Using milk or water that is too hot can kill the yeast, preventing the dough from rising. Ensure that the liquid is lukewarm (around 40°C / 105°F) for proper activation.
Healthier Alternatives for a Nutrient-Rich Easter Bread
If you’re looking for a healthier twist on traditional Easter bread, consider these substitutions:
- Whole wheat flour – Replacing part of the all-purpose flour with whole wheat flour adds more fiber and nutrients, though the texture may be slightly denser.
- Plant-based milk – Swap dairy milk with almond, oat, or soy milk for a lactose-free version.
- Less sugar – Reduce the sugar by 20-30% without compromising taste, or use natural sweeteners like honey or coconut sugar.
- Heart-healthy oils – Instead of butter, use olive oil or avocado oil for a more nutrient-dense, heart-friendly option.
Perfecting Easter Bread
Making homemade Easter bread is both an art and a science, requiring the right ingredients, techniques, and patience. Small adjustments in the dough composition, rising time, and baking conditions can make a noticeable difference in texture and taste. Whether you prefer the traditional recipe or want to experiment with new flavors, this festive bread is a delicious way to celebrate Easter and bring loved ones together.
- Allergens present: Contains gluten, eggs, and dairy.
- Gluten-free alternative: Use gluten-free flour blend with xanthan gum to maintain elasticity.
- Dairy-free alternative: Substitute almond milk for regular milk and vegan butter for unsalted butter.
- Egg-free alternative: Use flaxseed meal (1 tbsp) mixed with water (3 tbsp) per egg.
- Vitamin A: 120 IU (supports vision and immunity)
- Calcium: 25 mg (strengthens bones)
- Iron: 1.2 mg (essential for oxygen transport)
- Magnesium: 15 mg (important for nerve function)
- Potassium: 100 mg (helps maintain fluid balance)
- Orange zest (Vitamin C, 3 mg) – boosts immunity and collagen production
- Vanilla extract (polyphenols) – has anti-inflammatory properties
This Easter bread is a perfect balance of tradition and flavor, making it a wonderful addition to any festive meal. Enjoy it fresh or toasted with your favorite spread!
Recipes worth trying
The Classic Margherita Pizza is a timeless Italian masterpiece that embodies simplicity, flavor, and authenticity in every bite. With its vibrant colors and minimalist approach to toppings, this…
Few culinary experiences compare to the satisfaction of sinking your teeth into a freshly baked garlic knot—a bite-sized bread roll that combines the perfect balance of softness, buttery richness…
A Timeless Easter Delight: The Art of Baking Easter Sweet Bread
The Rich Tradition Behind Easter Sweet BreadEaster is a time of celebration, renewal, and cherished traditions, and few…
The Ultimate Guide to Perfectly Fluffy and Crispy Arepas
A Taste of Tradition: The Rich History Behind ArepasFew dishes are as deeply rooted in South American cuisine as the beloved arepa…
Fluffy Buttermilk Biscuits represent the essence of Southern comfort, combining tender textures, buttery layers, and a rich, tangy flavor. This iconic recipe delivers a homemade delight that can…
Mini Panettone baked in a muffin tin is a delightful twist on the classic Italian holiday dessert. This recipe captures the essence of traditional Panettone – its rich, buttery flavor, soft and…


