The Art of Making Perfectly Soft and Fluffy Roti
A Culinary Staple in Indian Cuisine
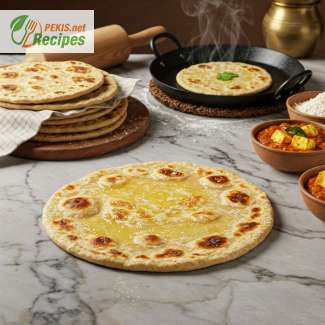
Roti, the quintessential Indian flatbread, holds a special place in traditional cooking. This simple yet incredibly versatile bread is a fundamental part of daily meals across India, Pakistan, and other South Asian countries. Made with just a few basic ingredients—whole wheat flour, water, and a pinch of salt—roti is a testament to the magic of simple cooking techniques that create exceptional flavors.
Unlike leavened bread, roti relies on careful preparation and the right kneading techniques to achieve its signature soft, pliable texture. Whether paired with a rich curry, a comforting dal, or even enjoyed with a dab of butter and honey, roti complements a wide array of flavors, making it an indispensable part of many traditional meals.
The Origins and Cultural Significance of Roti
The history of roti dates back thousands of years, with its roots deeply embedded in the Indian subcontinent. Often associated with home-cooked meals and family gatherings, roti has been a staple in Indian households for generations. Unlike naan, which is traditionally baked in a tandoor, roti is cooked on a hot griddle (tava), giving it a unique, slightly charred flavor without the use of oil or butter.
Every region has its own variations of roti, with subtle differences in preparation and texture. In North India, rotis are usually made with atta, a finely ground whole wheat flour that gives them a soft and chewy consistency. In contrast, some parts of South India and Pakistan prefer slightly thicker or crispier versions. The versatility of this humble bread makes it a common feature in not only Indian cuisine but also in the Caribbean and Africa, where variations like chapati and dal puri have gained popularity.
Mastering the Technique for Soft and Puffing Roti
Achieving the perfect roti requires skill and practice. The key to soft and fluffy rotis lies in kneading the dough properly and allowing it to rest. The dough must be smooth, elastic, and well-hydrated, ensuring that it rolls out evenly and cooks to perfection.
Another crucial step is cooking the roti at the right temperature. A hot griddle (tava) is essential for developing the characteristic golden-brown spots that indicate even cooking. When prepared correctly, rotis often puff up beautifully due to the trapped steam inside, creating a light and airy texture that pairs effortlessly with various dishes.
Why Homemade Roti is Always Better
While store-bought alternatives may seem convenient, nothing compares to the fresh, warm, and homemade roti. The process of making roti from scratch allows you to control the quality of ingredients and ensure a healthy, preservative-free option for your meals. Homemade rotis are also softer and more flavorful, offering an authentic taste that factory-made versions simply cannot replicate.
Moreover, learning to make traditional roti is a skill that connects generations. Many families pass down their techniques, creating a beautiful culinary tradition that links people to their heritage. The simple joy of rolling, cooking, and serving fresh rotis straight from the tava adds a touch of warmth and authenticity to every meal.
Pairing Roti with the Perfect Dishes
Roti’s neutral and slightly nutty flavor makes it an ideal companion for a variety of dishes. It pairs exceptionally well with:
- Rich and creamy curries like butter chicken, paneer tikka masala, or chana masala
- Lentil-based dishes such as dal tadka and dal makhani
- Vegetable stir-fries like aloo gobi, bhindi masala, or baingan bharta
- Pickles, chutneys, and yogurt-based dips, which add an extra layer of flavor
- Breakfast options, including stuffing rotis with scrambled eggs, cheese, or leftover curry for a delicious start to the day
The Secret to Storing and Reheating Roti
For those who prefer meal prepping, roti can be made in advance and stored properly for later use. Keeping rotis wrapped in a clean kitchen towel helps retain their softness. When reheating, a light sprinkle of water and a quick warm-up on the tava or in the microwave can bring them back to their fresh, soft state.
A Timeless Staple in Everyday Cooking
Making roti is more than just a cooking technique—it is a culinary art form that brings people together. Whether you are a beginner or an experienced home cook, perfecting the traditional roti recipe is a rewarding experience. With its simple ingredients, versatile nature, and deep cultural roots, roti remains a timeless staple that continues to nourish and delight across generations.
- Prepare the Dough: In a large mixing bowl, add whole wheat flour and salt (if using). Gradually add water while mixing with your hands or a wooden spoon.
- Kneading: Knead the dough for about 8-10 minutes until it becomes soft and pliable. If it's too sticky, add a little more flour; if too dry, add a few drops of water.
- Resting Time: Cover the dough with a damp cloth and let it rest for at least 30 minutes. This helps develop gluten, making the rotis softer.
- Rolling: Divide the dough into 8 equal portions and roll them into small balls. Lightly dust a rolling surface with flour and roll each ball into a thin circle of about 15 cm (6 inches) in diameter.
- Cooking: Heat a tava (griddle) or non-stick pan over medium-high heat. Place the rolled-out roti onto the hot surface and cook for about 30 seconds until bubbles start to form. Flip it and cook the other side for another 30-40 seconds. Flip once more and press gently with a spatula until it puffs up.
- Final Touch: Remove from heat and brush with a little ghee or butter (optional). Keep warm in a covered container lined with a cloth.
- Serving: Serve warm with curries, vegetables, or lentils.
Perfecting Your Roti: Tips and Techniques for the Best Indian Flatbread
Understanding the Key Elements of Roti
Roti is one of the most essential components of Indian cuisine, cherished for its simple preparation and incredible versatility. Whether paired with a rich curry or served as a side to a wholesome dal, this soft and pliable flatbread enhances every meal. While the recipe for roti is straightforward, achieving the perfect texture, softness, and puffiness requires attention to detail and the right techniques.
The secret to an excellent roti lies in three fundamental aspects:
- The flour: Using high-quality whole wheat flour (atta) ensures a soft and flavorful result.
- The kneading process: A well-kneaded dough is essential for elasticity and softness.
- The cooking technique: Proper heat control and cooking time play a crucial role in making the roti puff up beautifully.
Choosing the Right Ingredients for Better Texture and Flavor
The quality of ingredients makes a significant difference in how the roti turns out.
Best Flour for Roti
The type of flour you use impacts the texture and taste of your roti. Traditional Indian atta (whole wheat flour) is ideal, as it has a fine texture and a higher bran content, making rotis soft yet slightly chewy. If atta is unavailable, a mixture of all-purpose flour and whole wheat flour can be used, though the texture may differ slightly.
For an even healthier version, consider adding a small percentage of:
- Chickpea flour (besan) – Adds a nutty flavor and extra protein.
- Millet flour (bajra) – Enhances the nutritional profile and makes the roti slightly denser.
- Flaxseed meal – Contributes additional fiber and omega-3 fatty acids.
Adjusting the Water Content
The water-to-flour ratio is key in determining the softness of the dough. The dough should be smooth, slightly sticky, and elastic. Adding too little water will make the roti dry and stiff, while excessive water can make it difficult to roll out properly.
For an extra soft roti, warm water or a small amount of milk or yogurt can be added while kneading. These ingredients help retain moisture, making the roti softer for a longer period.
The Art of Kneading for Soft and Pliable Dough
Kneading is one of the most crucial steps in making roti. A well-kneaded dough ensures that the gluten develops properly, leading to a stretchy and elastic texture.
Kneading Tips for Perfect Roti
- Knead for at least 8-10 minutes until the dough is smooth.
- Let the dough rest for 30 minutes to allow the gluten to relax.
- If the dough feels too tight, add a few drops of water and knead again.
- If the dough is too sticky, lightly dust it with flour, but avoid over-drying it.
Rolling the Dough for Even Cooking
Rolling the dough into even circles ensures uniform cooking. The thickness of the roti affects how it puffs up on the griddle. A well-rolled roti should be thin but not too fragile, allowing it to cook evenly and develop beautiful brown spots.
To make rolling easier:
- Lightly dust the surface with flour, but avoid excess as it can make the roti dry.
- Rotate the dough while rolling to maintain a circular shape.
- Roll gently and evenly to prevent uneven cooking.
Mastering the Cooking Process
Cooking roti requires the right temperature and timing. The griddle or tava must be properly preheated, as a low temperature will make the roti dry and hard, while too high heat can burn it before it fully cooks.
Cooking Tips for a Soft and Fluffy Roti
- Cook the first side for about 30 seconds until small bubbles form.
- Flip and cook the second side for 40-50 seconds, pressing lightly with a spatula.
- Flip again and press gently – this encourages puffing, creating an airy texture.
- Use a direct flame method for extra puffiness – once partially cooked, hold the roti directly over the flame using tongs for a few seconds.
Brushing the cooked roti with a light layer of ghee or butter adds richness and prevents it from drying out.
Enhancing the Flavor with Additional Ingredients
While traditional roti is made with just flour, water, and salt, you can enhance the flavor and nutrition by incorporating other ingredients:
- A teaspoon of ghee or oil in the dough makes the roti softer and adds a hint of richness.
- A pinch of ajwain (carom seeds) or cumin seeds can improve digestion and add an aromatic taste.
- Chopped spinach or methi (fenugreek leaves) can be mixed into the dough for added nutrients and a delicious earthy flavor.
- Garlic or coriander leaves enhance the aroma and bring freshness to the roti.
Storing and Reheating for Maximum Freshness
Roti is best enjoyed fresh, but if you need to store them:
- Wrap the rotis in a clean kitchen towel and place them in an airtight container to prevent drying.
- Refrigerated rotis should be wrapped in foil or plastic wrap to maintain softness.
- To reheat, sprinkle a few drops of water and warm on a hot pan or microwave for a few seconds.
Common Mistakes to Avoid
Even experienced cooks sometimes struggle with making perfect roti. Here are some common mistakes and how to fix them:
- Dough too dry → Add a little extra water and knead until soft.
- Roti doesn’t puff up → Ensure proper rolling and press gently with a spatula while cooking.
- Too many cracks in the dough → Knead for a longer time to develop elasticity.
- Overcooked or stiff roti → Adjust the heat and cooking time accordingly.
Why Homemade Roti is Better
Making roti at home allows you to control the quality of ingredients and avoid preservatives found in store-bought options. Homemade roti is not just about flavor but also about preserving a culinary tradition that brings families together.
Whether you're a beginner or an experienced cook, mastering the art of roti-making is a skill worth developing. With the right techniques, attention to detail, and a bit of practice, you can create soft, delicious rotis every time, making your meals even more enjoyable.
- Contains gluten due to whole wheat flour.
Substitution Tips for Allergens & Gluten-Free Options:
- To make gluten-free roti, substitute whole wheat flour with a mix of gluten-free flours such as chickpea flour, sorghum flour, or millet flour. Adding a binding agent like xanthan gum or psyllium husk helps improve the texture.
- Iron: 0.8 mg (supports oxygen transport in blood)
- Magnesium: 20 mg (essential for muscle and nerve function)
- Phosphorus: 60 mg (contributes to bone health)
- Folate (B9): 10 mcg (aids in cell function and tissue growth)
- Selenium: 2 mcg (helps reduce oxidative stress)
- Polyphenols from whole wheat: Act as anti-inflammatory compounds
- Lignans: Support heart health by improving cholesterol levels
Recipes worth trying