Chocolate pie delivers a silky, rich chocolate filling in a buttery homemade crust, perfectly balanced between sweetness and depth. Ready in 3 hours total (25 min prep, 15 min cook, 25 min bake, 2 h chill), it serves 8 portions of pure indulgence. Made with dark chocolate, butter, cream, and eggs, it creates a smooth, glossy texture that melts in every bite. Best served chilled, this dessert keeps well for up to 3 days in the fridge, making it ideal for both special occasions and effortless make-ahead enjoyment.
Working with chocolate desserts has always felt like second nature — the way melted chocolate blends with butter and cream to form that smooth, glossy texture never stops being satisfying. Over time, I’ve learned how the right balance of dark chocolate and cream creates depth without heaviness, and how even a few extra minutes of cooling can transform the texture from good to extraordinary. Each detail matters — from the buttery crispness of the crust to the silky shine of the filling.
PEKIS – professional chef and recipe developer with more than 25 years of experience in cooking and baking, specializing in European and international cuisine.
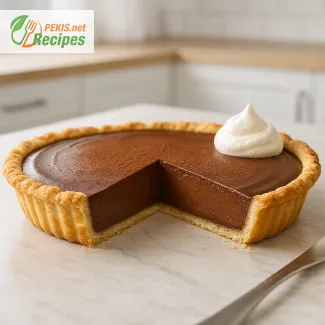
Decadent Homemade Chocolate Pie for True Dessert Lovers
Silky, rich, and irresistibly smooth — the classic chocolate pie that melts in every bite
When the first spoonful of chocolate pie meets your palate, everything else fades away. The creamy chocolate filling, the buttery, flaky crust, and the gentle hint of cocoa come together in one timeless dessert that feels both nostalgic and indulgent. This is the kind of pie that makes its presence known — deeply satisfying, velvety, and impossible to forget.
The story behind this chocolate classic
The origins of the chocolate pie trace back to early Southern American kitchens, where cocoa was blended into custard-like fillings and poured into pre-baked shells. Over time, bakers refined the recipe with dark chocolate, cream, and butter, creating the lush texture we associate with modern chocolate pie. It became a staple for Sunday dinners, family gatherings, and special celebrations — a dessert that feels like a warm embrace.
Today, variations exist all over the world — from French tarte au chocolat to Italian torta al cioccolato — yet the essence remains unchanged: smooth chocolate cream on a crisp, buttery crust.
The perfect balance of texture and flavor
A great chocolate pie depends on contrast — the crisp crust meeting the silky filling, the bittersweet cocoa balancing creamy richness. Using high-quality dark chocolate brings depth, while a touch of milk chocolate softens the flavor and enhances the sweetness. Butter, with its smooth texture and natural aroma, binds everything into harmony.
When the pie cools, the filling becomes luxuriously dense yet creamy, forming that irresistible glossy top that reflects the light like polished satin. Each slice holds perfectly, yet melts the moment it reaches the tongue.
Why you’ll love this chocolate pie
- Decadent texture – creamy, smooth, and balanced with a crisp crust
- Simple ingredients – made from pantry staples like butter, sugar, and eggs
- Versatile – perfect for celebrations or an everyday indulgence
- Crowd-pleasing – adored by both chocolate lovers and dessert purists
- Make-ahead friendly – can be prepared the day before and served chilled
Storage and make-ahead tips
Chocolate pie keeps beautifully when handled with care. Cover it loosely with plastic wrap and refrigerate for up to 3 days. The filling firms slightly, intensifying its chocolate flavor. If you prefer a softer texture, remove it from the refrigerator about 30 minutes before serving. For advance preparation, the crust can be baked a day ahead and filled once cooled.
Semantic spotlight: ingredients that define a perfect chocolate pie
Chocolate brings depth, butter adds richness, and cream ensures smoothness. A small amount of sugar balances the bitterness, while vanilla extract enhances complexity. Eggs provide structure, transforming the liquid mixture into a custard-like consistency when baked. Each ingredient plays a role in creating the signature silky texture and glossy finish that define this dessert.
Creative variations for modern bakers
- Salted caramel twist: Add a layer of salted caramel under the chocolate filling.
- Espresso infusion: Stir in a teaspoon of espresso powder for deeper flavor.
- Nut lover’s version: Sprinkle toasted hazelnuts or almonds over the top.
- Vegan delight: Use coconut cream and dairy-free chocolate for a plant-based treat.
- Frozen version: Chill completely and serve as a semi-frozen mousse tart for summer.
More chocolate inspiration for your kitchen
If you love rich, silky chocolate textures, explore also this recipe:
Rich Chocolate Butter Glaze for Cakes – Smooth and Shiny Frosting Recipe – perfect for topping your pies, cupcakes, or layer cakes with a mirror-like shine.
Serving ideas that elevate the experience
Serve the pie with lightly whipped cream or a drizzle of chocolate ganache. For contrast, pair it with fresh raspberries or a scoop of vanilla ice cream. Dusting the surface with cocoa powder or chocolate shavings adds a refined final touch. The key is to serve it slightly chilled — cold enough to hold its form but soft enough to melt luxuriously in the mouth.
A timeless dessert that defines comfort and elegance
The chocolate pie remains one of those desserts that never lose their appeal. It’s elegant enough for dinner parties, comforting enough for a quiet evening, and endlessly customizable to suit your mood. From the first flaky bite to the last silky crumb, it embodies everything that makes homemade desserts unforgettable — simplicity, nostalgia, and pure indulgence.
- Prepare the crust: Combine flour, sugar, and salt in a bowl. Add cold butter and rub it between your fingertips until the mixture resembles coarse crumbs. Gradually add cold water and knead lightly until a dough forms. Wrap in plastic and refrigerate for 30 minutes.
- Roll and bake: Roll the chilled dough to 3 mm (1/8 inch) thickness and fit it into a 23 cm (9 inch) pie dish. Prick the base with a fork. Line with parchment paper and fill with baking weights. Bake at 180°C (350°F) for 15 minutes. Remove the weights and bake another 10 minutes until golden. Cool completely.
- Make the chocolate filling: In a saucepan, heat milk and cream until steaming (do not boil). In a separate bowl, whisk egg yolks, sugar, and cornstarch until smooth. Gradually pour in the hot milk while whisking constantly. Return mixture to the saucepan and cook over medium heat until thickened and smooth.
- Add chocolate: Remove from heat, add chopped dark chocolate and butter, and stir until melted and glossy. Mix in vanilla extract for aroma and balance.
- Assemble: Pour the warm chocolate filling into the cooled crust, smoothing the top with a spatula. Let it cool at room temperature for 30 minutes.
- Chill and serve: Refrigerate for at least 2 hours to set completely. Before serving, dust with cocoa powder or top with whipped cream if desired.
FAQ questionCan I use milk chocolate instead of dark chocolate for this pie?
Yes, but adjust the sweetness. Milk chocolate contains more sugar and less cocoa, so the filling will be sweeter and slightly softer. If using milk chocolate, reduce the added sugar in the custard base by about 20–25% to keep the flavor balanced. For the best texture, combine two parts dark chocolate and one part milk chocolate — you get the creaminess of milk chocolate with the depth of dark chocolate.
FAQ questionWhy did my chocolate filling stay runny after chilling?
A chocolate pie filling usually fails to set when the custard wasn’t cooked long enough or the ratio of chocolate-to-liquid was too low. The mixture needs to be heated until it lightly thickens and coats the back of a spoon before adding chocolate. Also make sure the pie chills for at least 2 hours (better 4) so the cocoa butter and butter can firm up. If using low-fat milk instead of whole milk and cream, the filling can stay too soft — always use full-fat dairy for this recipe.
FAQ questionCan I make chocolate pie ahead of time?
Yes. This dessert is actually better the next day because the flavors blend and the texture becomes fully set. Prepare the crust and filling, assemble, and refrigerate tightly covered for up to 3 days. Before serving, dust with cocoa powder or add whipped cream so the topping stays fresh. Avoid leaving it at room temperature for long, because of dairy and eggs in the filling.
FAQ questionHow do I get a perfectly glossy chocolate surface?
Gloss comes from proper melting and emulsifying. Add the chocolate to the hot custard off the heat and stir until fully melted and smooth. Finish with a small amount of butter or cream to create a shine. Then do not touch or spread the top too much — every stroke leaves a mark. Pour the filling into the crust in one go, tap gently to release air bubbles, and let it set undisturbed for a smooth, glossy finish.
FAQ questionCan I make this chocolate pie without eggs?
Yes, but the texture changes. Eggs give the filling its custard-like structure. To make an egg-free version, thicken the milk-and-cream base with cornstarch (or a mix of cornstarch and cocoa) and finish with dark chocolate and butter. You’ll get a texture closer to chocolate pudding tart than classic custard pie. Keep it well chilled so it slices cleanly.
FAQ questionHow should I store leftover chocolate pie?
Store it covered in the refrigerator for up to 3 days. The crust will stay firm if it was baked properly and cooled before filling. Do not freeze the fully assembled pie — freezing can cause cracks and graininess in the chocolate filling. If you want to work ahead, you can freeze the baked crust only and fill it later.
A chocolate pie represents the perfect harmony between comfort and sophistication, blending the simplicity of homemade baking with the elegance of a rich, creamy dessert. Each slice offers the contrast of a buttery, flaky crust and a silky chocolate custard that melts effortlessly on the tongue. It’s the kind of dessert that transforms ordinary ingredients — butter, sugar, eggs, and chocolate — into something deeply satisfying and emotionally resonant.
The secret lies in precision: gentle heat, high-quality chocolate, and proper chilling time. These steps ensure a flawless texture that’s firm enough to hold its shape yet soft enough to feel indulgent. The smooth, glossy surface isn’t just visual appeal — it’s proof of perfect emulsification, where the chocolate and cream unite seamlessly.
A well-made chocolate pie fits any occasion. It works beautifully as a centerpiece for celebrations, a comforting treat after dinner, or even a make-ahead dessert for gatherings. Its versatility comes from its timeless flavor — neither too sweet nor too bitter — making it a favorite across generations.
Each bite captures a story of balance: between light and dark, crisp and creamy, tradition and creativity. Whether served plain, with a dusting of cocoa, or topped with whipped cream, this dessert never fails to impress. A single forkful reminds you why classic chocolate desserts will always have a place in modern kitchens — simple ingredients, perfected through patience and care.
Allergens present in the recipe
- Gluten – present in wheat flour.
- Milk – present in butter, cream, and milk.
- Eggs – present in custard filling.
Tips for replacing allergenic ingredients
- Replace wheat flour with a gluten-free blend or almond flour for a nutty note.
- Use plant-based milk and vegan butter for a dairy-free version.
- Substitute cornstarch and aquafaba for egg yolks to create an egg-free filling.
- Vitamin A: 210 µg – supports healthy skin and vision.
- Calcium: 85 mg – contributes to strong bones.
- Iron: 2.2 mg – helps with oxygen transport.
- Magnesium: 48 mg – supports muscle and nerve function.
- Potassium: 190 mg – maintains proper fluid balance.
- Flavonoids: 38 mg – promote heart health and circulation.
- Polyphenols: 72 mg – reduce oxidative stress.
- Theobromine: 18 mg – enhances mood and cognitive function.
Recipes worth trying