A tender spiral of cocoa sponge wrapped around a silky chocolate cream, Creamy Chocolate Swiss Roll Recipe with Soft Texture Step by Step captures the comfort of classic European baking. Whipped eggs, dark chocolate, and fresh cream create a sponge that bends without cracking and a filling that melts softly, turning each slice into a light yet deeply satisfying chocolate moment.
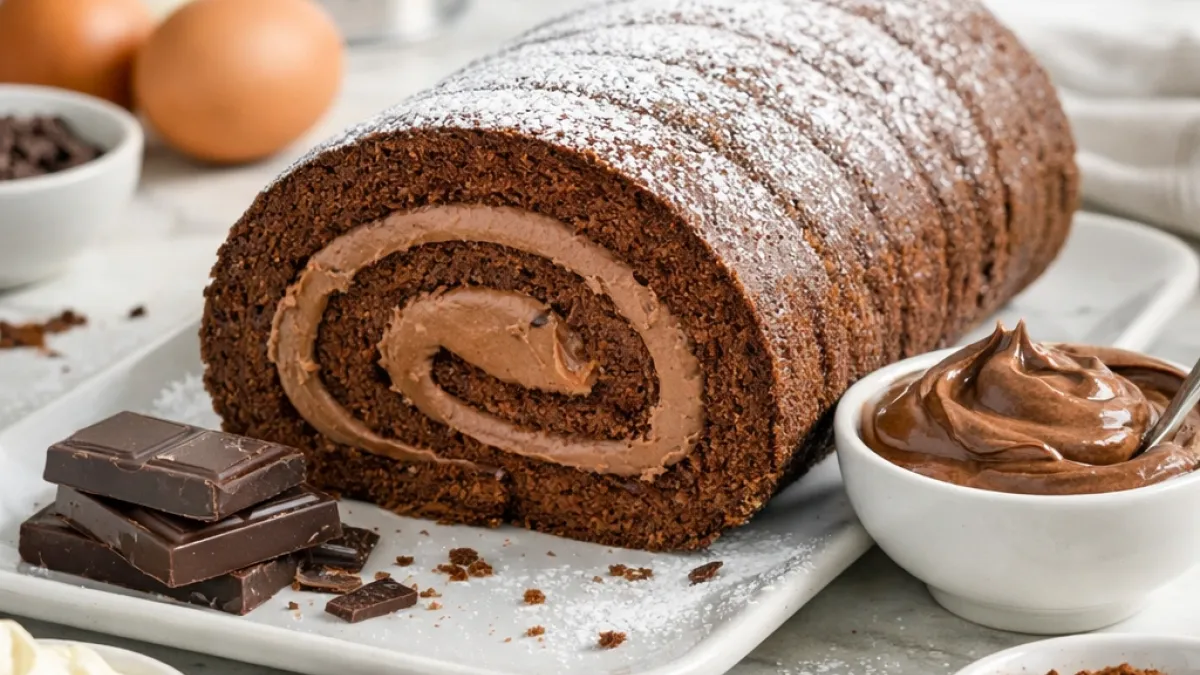
A Silky Chocolate Roll with a Melt-in-the-Mouth Finish
Mastering the art of soft sponge, creamy filling, and flawless rolling
A creamy chocolate Swiss roll arrives at the table with quiet confidence. The sponge bends without cracking, the surface smooth and even, the interior hiding a soft, airy crumb wrapped around a luxuriously creamy chocolate filling. Each slice reveals a perfect spiral—light yet indulgent, structured yet tender. The first bite dissolves gently, where cocoa depth meets a silky, cloud-like texture that feels both nostalgic and refined.
Chocolate rolls like this sit at the intersection of classic European baking and modern technique. Born from rolled sponge cakes popularized across Central Europe, Austria, and France, the Swiss roll evolved as bakers learned to control egg aeration, moisture balance, and temperature to achieve elasticity instead of dryness. What makes this version special is not excess sweetness, but precision—how chocolate enriches without weighing down, how cream supports without overpowering, how every layer stays in balance.
The sponge relies on well-whipped eggs to create lift, fine cocoa powder for depth rather than bitterness, and gentle heat to preserve flexibility. The cream filling plays a crucial role: fat provides smoothness, while careful whipping traps air for lightness. Together, these elements create a roll that feels soft, elegant, and effortless, even though it rewards good technique.
Texture, structure, and why this roll works
- Elastic sponge that rolls warm without cracking
- Creamy chocolate filling that stays stable yet light
- Balanced moisture for clean slices and defined spirals
- Refined cocoa flavor without heaviness
Unlike dense cakes or layered tortes, a chocolate Swiss roll depends on timing and touch. The sponge must be rolled while warm to “learn” its shape, then filled once cooled so the cream holds. This interplay between heat, air, and fat is what separates an average roll from one with a professional finish.
A brief look at its roots
Rolled cakes gained popularity in 19th-century Europe as ovens became more reliable and sponge techniques more precise. Chocolate variations followed naturally as cocoa became widely available. Today, the Swiss roll remains a benchmark dessert—simple in appearance, demanding in execution, and deeply satisfying when done right.
Storage and make-ahead planning
This chocolate roll is well suited for advance preparation. Once filled and rolled, it benefits from resting time, allowing the sponge to relax and the cream to set.
- Store wrapped and chilled to maintain shape
- Slice cleanly once fully cooled
- Ideal for preparing a day ahead without loss of texture
Why you’ll love this chocolate Swiss roll
- Soft, creamy texture that feels light on the palate
- Visually elegant spiral with minimal decoration needed
- Versatile base for seasonal or flavor variations
- Professional result achievable at home
Creative variations to explore
- Dark chocolate sponge with lighter cocoa cream
- Milk chocolate filling for a gentler, dessert-table crowd-pleaser
- Coffee-infused cream for a subtle bitter contrast
- Minimalist finish or paired with glazes for a polished look
For readers drawn to similarly creamy, texture-focused desserts, a refined alternative is the Italian classic Authentic Italian Tiramisù Without Alcohol – Extra Creamy Dessert, where layered softness replaces the spiral form. If baking isn’t the plan, the no-oven structure of Kalter Hund – No-Bake German Chocolate Biscuit Cake for Easy Desserts offers chocolate richness through an entirely different technique. For comfort-driven creaminess, Creamy Coconut Cardamom Rice Pudding – Exotic Comfort Dessert explores softness without sponge at all. And when presentation matters most, a flawless finish becomes possible with Mirror glaze cake recipe that actually works, transforming smooth textures into visual drama.
Every element of this chocolate Swiss roll is about control and contrast—light sponge against creamy depth, structure against tenderness. It’s a dessert that doesn’t shout, yet never goes unnoticed, rewarding careful hands with a result that feels quietly luxurious.
- Preheat the oven to 180 °C (356 °F, Fahrenheit). Line a baking tray measuring approximately 30 × 40 cm (12 × 16 inch) with baking paper.
- Separate the eggs. Beat the egg yolks with half of the granulated sugar until pale, thick, and creamy. Slowly mix in the milk and vegetable oil until fully incorporated.
- In a separate bowl, sift together the flour, cocoa powder, baking powder, and salt. Gently fold this mixture into the yolk batter until smooth and lump-free.
- Whip the egg whites with the remaining sugar to medium-stiff peaks. Carefully fold them into the chocolate batter in three additions, keeping as much air as possible.
- Spread the batter evenly onto the prepared tray, smoothing the surface. Bake for 10–12 minutes, until the sponge springs back lightly when touched.
- Immediately after baking, turn the sponge onto a clean sheet of baking paper, peel off the baking paper, and roll the sponge loosely while still warm. Allow it to cool completely in this rolled shape.
- For the filling, melt the dark chocolate gently and let it cool to lukewarm. Whip the cream with powdered sugar and vanilla extract to soft peaks, then fold in the melted chocolate until smooth and airy.
- Carefully unroll the cooled sponge, spread the chocolate cream evenly over the surface, leaving a small border. Roll the sponge tightly but gently.
- Chill the rolled cake for at least 60 minutes before slicing. Dust with cocoa powder or decorate with chocolate shavings if desired.
A common mistake with a chocolate Swiss roll is overbaking the sponge, which makes it dry and prone to cracking. This method works because the eggs are whipped properly, the sponge is rolled while warm, and the cream is added only after cooling—keeping the texture flexible, light, and smooth. The balance between cocoa sponge and chocolate cream is what makes this roll consistently successful.
This recipe was developed by PEKIS – a professional chef and recipe developer with over 25 years of experience in cooking and baking, focused on European and international cuisine, with a strong passion for precision, structure, and reliable results in both home and professional kitchens.
FAQ questionHow do I prevent a chocolate Swiss roll from cracking?
Cracking almost always comes from a sponge that’s either too dry or rolled at the wrong moment. Bake just until the surface springs back and the cake looks set—overbaking removes moisture fast. As soon as it comes out, turn it out and roll it while still warm so the sponge “learns” the curve. Cooling it in that shape is the key: you’re setting flexibility first, then adding the filling later. Also spread batter evenly so the sponge bakes uniformly—thin, overbaked edges crack first.
FAQ questionWhy is my Swiss roll sponge rubbery instead of soft?
A rubbery sponge usually means the batter was overmixed after adding flour or the egg foam was knocked out. Once dry ingredients go in, fold gently and stop as soon as the flour disappears. Another cause is baking too long or too hot, which tightens the structure. For a soft, bendable crumb, you want stable whipped eggs, minimal folding, and a short bake that sets the sponge without drying it.
FAQ questionCan I make the filling ahead of time?
Yes, but store it in the fridge and rework it carefully. Chocolate cream fillings can firm up when chilled, so let it sit briefly at room temperature, then whip or stir gently just until it becomes spreadable and smooth. Overwhipping can turn it grainy or heavy. If you plan to prep ahead, aim for a filling that holds shape yet stays light—stable, airy cream gives cleaner spirals when slicing.
FAQ questionWhat’s the best way to get a clean spiral when slicing?
Chill the finished roll long enough for the cream to set—this prevents smearing. Use a long, sharp knife and wipe the blade between cuts. For extra precision, warm the knife briefly (hot water, then dry), then slice with a single confident motion rather than sawing. The goal is firm cream + relaxed sponge, which keeps the spiral defined.
FAQ questionHow do I keep the sponge moist without making it soggy?
Moisture is controlled by fat and timing, not by soaking. A little oil in the batter helps tenderness, while proper bake time prevents dryness. Rolling warm traps steam slightly, which keeps the crumb supple. Avoid covering the hot sponge tightly (that can create condensation and sogginess). Once filled, chilling helps the cream stabilize while the sponge stays tender, not wet.
FAQ questionCan I freeze a chocolate Swiss roll?
Yes, freezing works well if you wrap it properly. Chill first so the roll is firm, then wrap tightly in plastic wrap and a second layer (foil or a freezer bag) to prevent freezer odors. Thaw overnight in the fridge. Expect the sponge to stay soft, while the cream texture depends on the fat content—higher-fat cream fillings typically thaw more smoothly.
FAQ questionWhat chocolate gives the best flavor in the filling?
Choose a chocolate you enjoy eating on its own. Dark chocolate delivers a deeper cocoa profile and balances sweetness, while semi-sweet is milder and more crowd-friendly. Avoid very low-quality chocolate that melts poorly—it can make the filling dull or greasy. The best result comes from clean-melting chocolate paired with properly whipped cream for a silky, stable filling.
Soft cocoa sponge, gently rolled while warm, creates the foundation for a dessert defined by flexibility, balance, and clean structure. When air is preserved in the eggs and baking time stays precise, the sponge bends without resistance and keeps its delicate crumb intact.
Silky chocolate cream brings contrast and depth, delivering smoothness without heaviness. Proper chilling allows the filling to set just enough for clear slices, while the sponge remains tender and responsive. Each cut reveals a consistent spiral that holds its shape from first slice to last.
Control over temperature and timing transforms simple components into a dessert with professional polish. Rolling warm, filling cool, and slicing cold form a reliable sequence that supports both texture and appearance.
This approach highlights how technique shapes outcome, turning chocolate, cream, and sponge into a cohesive whole where softness, clarity, and chocolate intensity work together naturally.
Allergens present in the recipe
- Eggs: naturally present in the sponge, essential for structure and volume.
- Milk: present in cream and chocolate, contributes to creaminess.
- Gluten: present due to all-purpose flour in the sponge.
Allergen and gluten substitution tips
- Egg-free option: use an aquafaba-based sponge substitute, though texture will differ.
- Dairy-free option: replace cream with coconut whipping cream and use dairy-free chocolate.
- Gluten-free option: substitute all-purpose flour with a certified gluten-free flour blend designed for sponge cakes.
- Vitamin A (µg): 180 – supports vision and immune function.
- Vitamin B12 (µg): 0.6 – essential for nervous system health and energy metabolism.
- Calcium (mg): 85 – contributes to bone strength and muscle function.
- Iron (mg): 2.1 – supports oxygen transport in the blood.
- Magnesium (mg): 45 – important for muscle relaxation and metabolic balance.
- Flavonoids (mg): 120 – derived from cocoa, help protect cells from oxidative stress.
- Polyphenols (mg): 150 – contribute to overall antioxidant capacity and cardiovascular support.
Calculators



Recipes worth trying