A warm blend of honey, walnuts and chocolate shapes the beehive cake into a tender bite with a smooth centre and a crisp shell. Its swirl pattern echoes old European festive sweets, while the creamy filling contrasts the thin coating for a balanced texture that feels nostalgic and indulgent.
Starting with a small tip: the most common mistake with beehive cakes is pressing the dough too firmly into the mould, which makes the shell dense instead of tender. A lighter touch keeps the texture smooth and the filling cavity clean. This method works because the mould’s shape guides the structure while the wooden press creates consistent space for cream.
For more insights and techniques from PEKIS – professional chef and recipe developer with over 25 years of experience in cooking and baking, specializing in European and international cuisine.
Beehive delights inspired by classic European mini-cakes
A sensory introduction to the beehive cake tradition
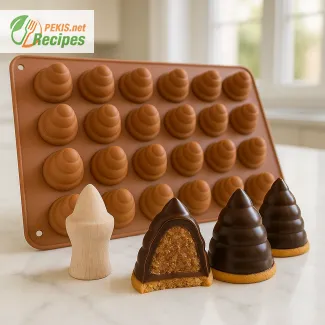
A gentle aroma of honey, walnuts and dark chocolate rises the moment the mould is set on the counter, hinting at the soft, layered tenderness inside each miniature beehive cake. The first bite meets a thin, glossy shell that gives way to a creamy, velvety centre, balanced by a light biscuit base that keeps every piece structured yet delicately soft. There is an unmistakable charm in these small conical cakes: a nostalgic treat rooted in Central European pastry traditions, reshaped here with a modern silicone mould featuring 28 perfectly even cavities and a wooden core press that helps form a tidy hollow for fillings. Each cavity creates a uniform swirl pattern, echoing the silhouette of a traditional beehive and giving the finished cakes their signature look.
The story of the beehive cake reaches back to old honey-based festive sweets, often shaped into natural forms linked to spring, harvest or symbolic prosperity. Over time, walnut-based creams and chocolate coatings became defining elements, turning this once-rustic idea into a polished confection served at celebrations. The combination of honey sweetness, nut richness and chocolate depth continues to distinguish the dessert today, and a high-quality silicone mould expands the possibilities—precise shape retention, smooth release and effortless repetition.
Working with ingredients like finely ground nuts, honey, biscuit crumbs, butter and chocolate allows for flexible textures. Nut mixtures bring structure and earthy aroma, while butter softens and binds. Honey contributes natural moisture and a warm, fragrant sweetness. A thin chocolate shell adds a crisp moment before the creamy interior melts, creating contrast in each bite. The dedicated wooden press is essential, as it forms consistent hollows for fillings such as walnut cream, chocolate mousse or even chestnut purée—another European classic also available as a standalone dessert: Chestnut purée – silky no bake dessert ready in 20 minutes.
Storing the prepared cakes is simple. Their chocolate coating protects the filling, allowing them to keep well in the refrigerator for several days. The mould can also be used for advance prep: shaped uncoated cores can be frozen, then coated and filled later to save time before events. This makes the beehive cake an excellent choice for gatherings where flawless presentation matters.
Ingredient characteristics and culinary balance
Walnuts lend natural oils and delicate sweetness that pair with honey and chocolate. Biscuit crumbs add stability and ensure the mixture presses cleanly into the mould. Butter shapes mouthfeel, making the mixture smooth and cohesive. Honey—not just a sweetener—enhances moisture and gives the cakes their distinctive aroma. Chocolate creates a protective shell and brings refined bitterness to counterbalance the sweet filling. Each component contributes to achieving the signature multi-layered bite.
Many variations of nut-based miniature cakes exist across Europe, including crisp walnut-shell cookies with chocolate fillings such as the English version featured here:
Crispy walnut shell cookies with creamy chocolate filling recipe.
For more seasonal inspiration built on similar flavour notes, a festive option is the honey-nut Christmas cake:
Christmas cake with nut and honey flavor.
Why you’ll love this preparation method
- Consistent shape using a 28-cavity silicone mould.
- Clean, defined hollows using a wooden core press.
- Smooth release thanks to flexible, non-stick material.
- Versatile fillings from nut creams to light mousses.
- Beautiful presentation with naturally glossy chocolate shells.
Creative variations
- Replace the classic walnut cream with a hazelnut-chocolate mousse.
- Add citrus zest to the honey mixture for brightness.
- Use white chocolate for a softer contrast and gentler sweetness.
- Create layered fillings by combining nut cream with a thin caramel stripe.
- Add fine biscuit crumbs to adjust firmness for warmer serving conditions.
How ingredients influence structure and flavour
Butter determines the smoothness of the mixture and shapes the texture when chilled. Nuts provide the base character and hold shape when pressed into the mould. Honey adds moisture and contributes to the warm aromatic profile. Biscuit crumbs regulate density, preventing the cakes from becoming overly soft. Chocolate offers a crisp exterior and locks in freshness. Each decision—from nut grind size to chocolate choice—affects the final texture, aroma and visual appeal.
Storage and make-ahead guidance
Prepared cakes stay fresh in the refrigerator for several days due to their sealed structure. Freeze uncoated cores for efficient batch prep. Coated cakes should be stored in airtight containers to protect the glossy finish and prevent moisture condensation.
Culinary context and inspiration
Beehive cakes belong to a lineage of miniature European sweets where nuts, honey and chocolate form the backbone of regional desserts. Their shape reflects centuries of tradition in which symbolism and flavour intertwine. With a modern mould and consistent technique, the dessert aligns beautifully with contemporary preferences for polished, bite-sized treats.
Extended ingredient insight
Walnuts deliver earthy aroma and richness. Honey enhances natural sweetness. Chocolate introduces depth and a smooth finish. Biscuit crumbs offer structure and pressability. Butter ensures melt-in-the-mouth softness. These elements combine harmoniously, creating a dessert that is both visually striking and flavourfully layered.
- Place the finely ground walnuts into a mixing bowl and combine them with the softened butter until smooth.
- Add honey, biscuit crumbs, cocoa powder and vanilla extract. Mix until a cohesive dough forms. Adjust texture with extra crumbs if needed.
- Melt the dark chocolate gently and brush a thin layer inside each cavity of the 28-cavity silicone mould. Allow to set slightly.
- Press walnut dough into each cavity, ensuring the sides are even.
- Use the wooden core press to create a clean hollow in the centre of each portion.
- Fill each hollow with nut cream, smoothing the surface.
- Cover each piece with a biscuit base to seal the filling.
- Chill the mould for 30 minutes to firm the shapes.
- Unmould each beehive piece carefully.
- Dip the top in melted chocolate (decoration) for a glossy finish and let set.
- Arrange the beehive cakes on a tray and refrigerate until serving.
FAQ questionHow do I keep the beehive cake shells from cracking when unmoulding?
Cracking usually means the shell is either too thin or not fully set. Aim for a thin but even chocolate layer, making sure the sides and tip are fully coated with no see-through spots. Let the mould chill until the chocolate feels firm and dry to the touch, not tacky. When releasing, gently flex the silicone instead of pulling on the cakes, and push from the base so the shell slides out without stress points.
FAQ questionWhy is my beehive filling leaking or soaking into the biscuit base?
Leaking happens when the filling is too fluid or the shell is not sealed. Use a filling with a stable, creamy consistency—it should hold soft peaks, not run. After pressing the cavity, spread a thin layer of chocolate or nut mixture at the bottom before adding the filling to create a barrier. Finally, press the biscuit base on while the barrier is still slightly soft so it bonds and prevents seepage.
FAQ questionCan I use other nuts instead of walnuts in beehive cakes?
Yes, but each nut behaves differently. Hazelnuts give a sweeter, more dessert-like flavour, while almonds make the filling lighter and milder. Keep the texture similar to the original recipe by grinding the nuts finely but not oily, and adjust biscuit crumbs if the mixture feels too moist. Always taste and balance with honey and cocoa so the iconic beehive profile remains.
FAQ questionHow full should I pack the dough into a 28-cavity silicone mould?
The cavities should be completely lined but not overfilled. Press the nut mixture up the sides to form a uniform wall, then level the rim so it sits flush with the mould. This leaves enough space for the core press to create a neat cavity and still maintain a stable shell. Overpacking leads to heavy, dense cakes; underpacking causes thin, fragile walls.
FAQ questionWhat is the best way to temper or melt chocolate for a glossy beehive shell?
For the best shine, use tempered chocolate. Melt two-thirds of the chocolate slowly over gentle heat, then remove from heat and stir in the remaining one-third until smooth. This brings the chocolate to a stable working temperature and encourages a glossy finish with a clean snap. If you prefer a simpler method, melt chocolate in short bursts and add a little neutral oil for easier coating, though the finish will be slightly softer.
FAQ questionCan beehive cakes be made in advance and frozen?
They freeze well if protected from moisture. Place the finished cakes on a tray to freeze individually, then store them in an airtight container with baking paper between layers. Thaw in the refrigerator so condensation forms on the container, not on the chocolate. This keeps the shell smooth and the filling creamy, making them ideal for parties where you need a reliable make-ahead dessert.
The beehive cake stands out because every element works together: a smooth nut mixture, a crisp chocolate shell, and a creamy centre that adds contrast in both flavour and texture. The combination feels classic yet playful, shaped with precision thanks to the silicone mould and core press.
Working with ingredients like walnuts, honey and cocoa creates a naturally rich profile that remains balanced rather than heavy. Each component contributes something unique, from the warm sweetness of honey to the gentle bitterness of chocolate, making the final bite layered and satisfying.
The method adapts easily for different fillings or coatings, allowing the dessert to suit both festive occasions and everyday treats. By mastering the structure—shell, cavity, filling—you gain full control over texture, shape and flavour harmony.
The result is a dessert that looks polished, feels nostalgic and delivers consistent quality. With its defined shape, creamy interior and delicate shell, the beehive cake becomes a reliable favourite for anyone who enjoys elegant small desserts with a handmade touch.
Allergens present in the recipe
- Walnuts – tree-nut allergen
- Butter – milk allergen
- Biscuit crumbs – contains gluten
- Chocolate – may contain traces of milk and soy
How to replace allergens and gluten
- Replace walnuts with ground sunflower seeds for a nut-free option.
- Replace butter with plant-based margarine for a dairy-free version.
- Replace biscuit crumbs with certified gluten-free biscuit crumbs.
- Choose dairy-free chocolate if required.
- Vitamin E (mg): 3 – supports cell protection
- Magnesium (mg): 45 – contributes to muscle function
- Potassium (mg): 160 – important for fluid balance
- Iron (mg): 1.2 – contributes to normal oxygen transport
- Calcium (mg): 30 – supports bone structure
- Polyphenols (mg): 85 – contribute to cellular protection
- Flavonoids (mg): 40 – support antioxidant activity
- Proanthocyanidins (mg): 25 – associated with heart health
Recipes worth trying