The Ultimate Guide to Crafting a Perfect Minecraft Cake
A Delightful Cake for Every Minecraft Fan
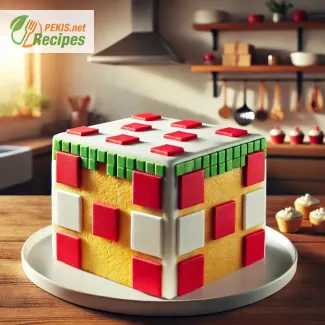
If you or your loved ones are passionate about Minecraft, there’s no better way to celebrate than with a homemade Minecraft cake. This pixel-perfect dessert is not only visually striking but also incredibly delicious, making it the perfect centerpiece for a birthday party, a game night, or simply a fun baking project. With its signature square shape, white frosting, and red pixel-like decorations, this cake brings the beloved video game into real life, delighting fans of all ages.
Why a Minecraft Cake?
Whether you’re a seasoned baker or a complete beginner, this Minecraft-themed cake is surprisingly simple to make. With just a few basic ingredients and some easy decorating techniques, you can recreate the iconic in-game cake that every Minecraft player recognizes. The beauty of this cake lies in its customizability—you can tweak the flavors, colors, and decorations to match your personal preference while still maintaining its authentic game-inspired look.
This cake isn’t just for decoration—it’s a delicious treat that brings together a moist, fluffy sponge, a rich and creamy frosting, and sweet, vibrant toppings. Whether you opt for a classic vanilla sponge, a rich chocolate base, or a combination of flavors, this cake is bound to impress.
The Key to a Perfect Minecraft Cake
Selecting the Right Base
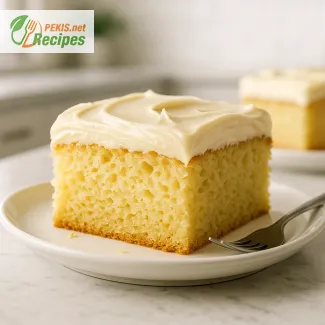
The foundation of a great Minecraft cake is its sponge. While vanilla cake is the most traditional choice, many bakers prefer chocolate or red velvet for a richer taste and a visually striking effect when cut. The key is to achieve a cake that is sturdy yet soft, making it easy to cut into sharp, clean squares—just like in the game.
Achieving the Classic Look
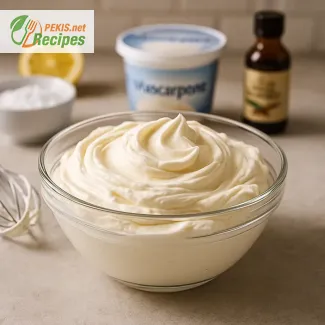
To stay true to the original Minecraft cake, you’ll need smooth white frosting and red pixel-like toppings. While fondant gives a flawless blocky look, buttercream frosting provides a more wholesome homemade feel with an equally delicious taste. The red pixel details can be made using red fondant, strawberries, or red sprinkles, adding a vibrant contrast to the white top.
For an authentic block-like effect, it’s crucial to get the edges sharp and clean. Using a square baking pan, trimming the edges, and chilling the cake before frosting ensures that your Minecraft cake maintains its signature cubed shape.
A Fun Project for Gamers and Bakers Alike
One of the best things about making a Minecraft cake is that it’s as fun to create as it is to eat. It’s a perfect baking activity to do with kids, allowing them to decorate and bring their favorite game to life. The process of assembling and decorating the cake is almost like crafting within Minecraft itself—layer by layer, piece by piece, you’re creating something spectacular.
If you’re hosting a Minecraft-themed party, this cake will be the showstopper of the dessert table. Pair it with Minecraft cupcakes, pixel cookies, or themed drinks, and you’ve got an immersive experience that will delight any fan.
Personalizing Your Minecraft Cake
Although the classic white and red design is iconic, there are plenty of ways to add a personal touch:
- Color Variations: Swap the red toppings for different colors to match your event’s theme.
- Flavor Twists: Experiment with different cake flavors, such as red velvet for a bold effect or lemon for a refreshing twist.
- Custom Decorations: Add Minecraft figurines, fondant pickaxes, or edible game elements to enhance the theme.
Bringing the Minecraft Universe to Life
Making a Minecraft cake is more than just baking—it’s about bringing the game’s creativity into reality. The best part? You don’t need any fancy equipment or professional baking skills. With a little patience, some careful decorating, and a passion for gaming, you can create a showstopping dessert that looks straight out of the game.
So, whether you’re making it for a birthday celebration, a Minecraft-themed party, or simply to surprise a fellow gamer, this cake is a must-try. Gather your ingredients, channel your inner builder, and get ready to craft the ultimate real-life Minecraft cake!
Preparation Steps:
- Prepare the cake batter: Preheat the oven to 175°C (350°F). Grease a square baking pan and line it with parchment paper.
- In a bowl, beat the butter and sugar until light and fluffy. Add eggs one at a time, mixing well after each addition.
- Sift the flour, baking powder, and salt together. Gradually add these dry ingredients to the butter mixture, alternating with milk and vanilla extract. Mix until smooth.
- Pour the batter into the prepared pan and bake for 30-35 minutes, or until a toothpick inserted in the center comes out clean.
- Let the cake cool in the pan for 10 minutes, then transfer it to a wire rack to cool completely.
Frosting and Assembly:
- In a bowl, beat the butter until creamy. Gradually add powdered sugar and continue beating. Add vanilla extract and heavy cream, mixing until smooth.
- Trim the edges of the cake to create a sharp square shape. Spread a thin layer of frosting over the entire cake to create a crumb coat. Refrigerate for 15 minutes.
- Apply the remaining frosting smoothly over the cake.
- Roll out the white fondant and place it gently over the top of the cake. Smooth it out and trim the edges.
- Cut small squares from the red fondant or use strawberries to create the pixelated red spots on top of the cake.
- Let the cake set in the fridge for at least 30 minutes before serving.
Elevating the Classic Minecraft Cake Recipe
Enhancing the Flavor Profile
A Minecraft cake may look simple, but there are many ways to elevate its taste and texture. While the traditional recipe uses a vanilla sponge base, adding a few enhancements can bring out richer flavors and better consistency.
- Use brown sugar instead of white sugar – This gives the cake a deeper, caramel-like sweetness, making it more flavorful.
- Add a hint of almond extract or citrus zest – A few drops of almond extract or a bit of orange zest can subtly enhance the vanilla base.
- Incorporate buttermilk instead of regular milk – Buttermilk adds tanginess and makes the sponge softer and more tender.
A simple vanilla sponge is always a crowd-pleaser, but by making small tweaks, you can create a richer, more complex cake that stands out.
The Importance of High-Quality Ingredients
Using high-quality ingredients is crucial when making a homemade cake. It may be tempting to use cheaper alternatives, but the difference in taste is noticeable.
- Butter over margarine – Always opt for real butter instead of margarine, as it provides a creamier, richer flavor.
- Pure vanilla extract instead of artificial vanilla – Artificial vanilla has a synthetic taste, whereas real vanilla extract or vanilla bean paste brings a naturally sweet, aromatic depth.
- Organic eggs and fresh dairy – Using fresh, organic ingredients enhances the texture and structure of the cake.
Avoiding Common Baking Mistakes
Many home bakers make small errors that can affect the texture and appearance of the cake. Here are some common mistakes and how to avoid them:
- Overmixing the batter – Overmixing results in a dense, rubbery cake instead of a light and airy texture. Always mix just until the ingredients are combined.
- Using cold ingredients – Ingredients should be at room temperature, especially eggs and butter, to ensure they blend evenly.
- Skipping the crumb coat – A crumb coat (thin first layer of frosting) helps create a smooth and polished final look.
Avoiding these small mistakes ensures your cake turns out light, moist, and visually appealing every time.
Making the Cake Healthier Without Sacrificing Taste
While the traditional Minecraft cake is a delicious treat, it can be modified to be healthier while still maintaining its indulgence.
- Replace white flour with whole wheat or almond flour – This adds fiber and nutrients, making the cake more filling.
- Reduce sugar or use natural sweeteners – Coconut sugar, honey, or maple syrup can provide sweetness without causing a sharp sugar spike.
- Use Greek yogurt instead of butter – Replacing some butter with Greek yogurt adds moisture and protein, making the cake slightly healthier.
These simple swaps can create a healthier version without compromising on flavor or texture.
Improving the Texture and Moisture
One of the most critical factors in a great cake is its moisture level. A dry cake is disappointing, but a few techniques can prevent that from happening.
- Add a bit of oil to the batter – While butter provides richness, adding a little vegetable or coconut oil enhances moisture retention.
- Brush the cake with a simple syrup – A light sugar syrup glaze (made with sugar and water) can prevent the cake from drying out.
- Do not overbake – Baking the cake just until a toothpick comes out with a few crumbs ensures a perfectly moist texture.
A cake that is light, soft, and evenly baked is far more enjoyable, making these adjustments worth implementing.
Customizing the Decorations for a Unique Look
While the classic white and red pixelated design is a must for authenticity, there are many ways to personalize your cake.
- Use colored fondant to create different Minecraft elements – Instead of just red and white, try adding green fondant for grass, brown for dirt blocks, or even a mini Minecraft character.
- Experiment with different shapes – While a square cake stays true to the game, layering two cakes can create a 3D Minecraft block effect.
- Add texture with different frosting techniques – Using a piping bag can create cool effects like pixelated textures or a whipped look.
By customizing the decorations, your cake becomes more visually engaging and unique.
Why a Homemade Minecraft Cake is the Best Choice
A store-bought cake may seem like an easy option, but making it at home has many advantages:
- Control over ingredients – You can use higher-quality, fresher ingredients rather than preservative-packed bakery cakes.
- Custom flavors and fillings – Store cakes are often basic, while homemade cakes can have unique flavor additions like layers of jam, Nutella, or fruit.
- A personal touch – Making a cake from scratch adds a homemade warmth and love that a store-bought cake lacks.
By baking the Minecraft cake yourself, you create a more special, personalized dessert that fits your preferences.
With the right techniques, quality ingredients, and creative touches, a Minecraft cake can go from being a simple themed dessert to an outstanding homemade masterpiece. Small changes like enhancing the flavor, improving the texture, and experimenting with decorations make a huge difference. Whether you're making this for a birthday party, gaming event, or just for fun, these tips will help you create a cake that is not only visually stunning but also deliciously unforgettable.
Contains gluten, dairy, eggs. Not suitable for those with wheat, dairy, or egg allergies.
Ingredient Substitutions for Allergies:
- Use gluten-free flour blend to replace regular flour.
- Substitute vegan butter and coconut milk for dairy-free options.
- Replace eggs with flaxseed meal (1 tbsp + 3 tbsp water per egg) for an egg-free alternative.
- Calcium: Supports bone health and muscle function.
- Iron: Helps in oxygen transport and energy production.
- Vitamin A: Beneficial for vision and immune function.
- Vitamin D: Aids in calcium absorption and bone strength.
- Strawberries: Rich in vitamin C and anthocyanins, which help reduce inflammation.
- Vanilla extract: Contains small amounts of polyphenols, which have antioxidant properties.
- Butter: Contains trace amounts of vitamin E, which contributes to skin health.
Recipes worth trying