Silky and glossy, this Perfect Chocolate Glaze delivers a flawless finish for 12 portions in just 20 minutes of prep and 5 minutes of cooking. Made with rich dark chocolate, cream, butter, and corn syrup, it sets into a smooth layer that never cracks or dulls. Ideal for cakes, pastries, and desserts, the glaze stays shiny even after chilling and can be stored for up to 5 days. Its flexible texture and deep chocolate flavor make it the ultimate finishing touch for elegant homemade creations.
I’ve spent years perfecting the balance between chocolate, cream, and butter to create a glaze that looks as good as it tastes. Through countless tests in my kitchen, I discovered how to keep it smooth, shiny, and crack-free, even after cooling. It’s one of those techniques that feels simple once you understand the texture and timing—but it makes all the difference when finishing a dessert.
PEKIS – professional chef and recipe developer with over 25 years of experience in cooking and baking, specialized in European and international cuisine.
Silky Chocolate Coating for Cakes and Pastries
How to achieve a glossy, smooth finish that never cracks
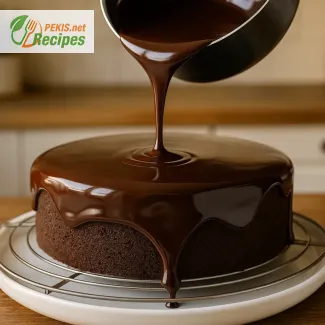
Few things elevate a dessert quite like a perfect chocolate glaze—a luscious, mirror-like coating that clings to every curve of a cake or éclair, setting into a smooth, unblemished surface. When done right, this glaze enhances both the appearance and flavor of any sweet creation, adding a delicate snap when sliced yet remaining pliant enough to melt effortlessly on the tongue. The secret lies in the precise balance between chocolate, fat, and liquid, which together form a glossy emulsion capable of staying smooth even as it cools.
Unlike simple melted chocolate, a true chocolate glaze involves a gentle combination of cocoa solids, cream, butter, and syrup, allowing the mixture to flow elegantly over the surface without seizing or cracking. Each ingredient plays a vital role: butter or oil lends elasticity and shine, cream contributes richness and softness, and chocolate with the right cocoa butter ratio ensures stability as the glaze sets. The result is a flawless finish—silky, reflective, and durable enough to stay beautiful for hours at room temperature.
The science behind a smooth chocolate glaze
A well-balanced glaze depends on temperature control and emulsification. If the mixture is too hot, it will run off the dessert and lose its sheen. Too cool, and it becomes dull or streaky. The key is to let the glaze reach that ideal, pourable consistency—warm but not hot—so it spreads evenly and sets into a thin, flexible shell.
The emulsification process unites water and fat, creating that iconic glossy texture. Stirring slowly and continuously while combining warm cream with chopped chocolate helps stabilize the mixture, preventing separation or crystallization. Some bakers also incorporate a touch of corn syrup or glucose for extra elasticity and long-lasting shine.
A brief history of chocolate glazing traditions
The concept of coating desserts with chocolate dates back to European pâtisseries of the 19th century, where master chocolatiers refined the art of couverture and ganache. French and Austrian pastry chefs used it to decorate Opera cakes, Sachertorte, and petits gâteaux, establishing the glaze as a hallmark of professional confectionery. Over time, the method spread to home kitchens worldwide, becoming a trusted finishing touch for everything from layer cakes to profiteroles.
Modern pastry chefs continue to experiment—introducing mirror glazes, vegan versions, and white chocolate adaptations, each variation reflecting contemporary tastes while preserving the timeless appeal of a perfectly smooth chocolate coating.
Why you’ll love this recipe
- No cracks or dull spots – the glaze stays supple and glossy, even after chilling.
- Professional finish at home – looks like it came from a high-end pâtisserie.
- Simple ingredients, refined technique – nothing complicated, just precision.
- Versatile use – perfect for cakes, cupcakes, éclairs, tarts, or even frozen desserts.
- Rich chocolate flavor – deep, smooth, and perfectly balanced in sweetness.
Storing and making ahead
A chocolate glaze can be prepared in advance and stored for later use. Once cooled, keep it in an airtight container in the refrigerator for up to five days. Before applying, warm it gently over a double boiler or in short microwave bursts, stirring frequently until it regains its smooth consistency. If it thickens too much, add a small spoon of warm cream or milk to restore its flow.
Avoid freezing, as it can cause the emulsion to break and lead to an uneven texture. Always cover the surface directly with plastic wrap before refrigeration to prevent a skin from forming.
Creative variations for every occasion
A classic chocolate glaze can serve as a canvas for countless culinary variations:
- Espresso-infused glaze – add a shot of strong espresso or instant coffee granules for depth.
- Dark rum or cognac twist – a few drops of liqueur enhance both aroma and smoothness.
- Salted caramel chocolate glaze – swirl in a spoon of caramel sauce and a pinch of sea salt.
- White or ruby chocolate glaze – experiment with cocoa butter–rich chocolates for unique tones.
- Vegan alternative – replace cream with coconut milk and butter with plant-based margarine for a silky, dairy-free version.
Each adaptation introduces a subtle flavor shift while maintaining the same glossy, flexible texture that defines a professional-quality glaze.
Expert insight: mastering texture and shine
For an ultra-smooth surface, strain the glaze through a fine sieve before pouring to remove air bubbles or unmelted bits. When glazing, position your cake on a wire rack above a tray to catch excess and achieve even coverage. Use a steady, continuous pour starting from the center outward—this minimizes streaks and ensures a seamless coat.
Temperature is everything: pour the glaze at around 32–34°C, allowing it to flow evenly without melting the dessert beneath. Let it rest undisturbed until set; avoid refrigeration during the first hour to maintain its flawless shine.
Perfecting this balance of technique and patience transforms a simple dessert into an elegant showpiece. Whether you’re finishing a birthday cake or a delicate mousse dome, this smooth, unbreakable chocolate glaze guarantees a professional touch that delights both the eyes and the palate.
- Chop the chocolate finely and place it in a heatproof bowl. This ensures even melting and prevents lumps in the final glaze.
- Heat the cream in a small saucepan over medium heat until it just begins to simmer. Do not boil. Remove from the heat immediately.
- Pour the hot cream over the chocolate, letting it sit for about 1 minute to soften the chocolate.
- Stir gently with a silicone spatula from the center outward until a smooth, glossy mixture forms. Avoid whisking too fast to prevent air bubbles.
- Add butter and corn syrup, stirring slowly until completely incorporated. The glaze will become shiny and slightly thickened.
- Add vanilla extract and a pinch of salt, mixing until smooth.
- Let the glaze cool for 5–10 minutes until it reaches pouring consistency (around 32–34°C / 90–93°F).
- Pour over your cake or pastries, starting from the center and working outward for even coverage. Let excess glaze drip off on a rack.
- Allow to set at room temperature for 30–45 minutes. Do not refrigerate immediately to maintain the glossy finish.
- Decorate if desired with chocolate shavings or cocoa nibs (for decoration) once the glaze is slightly firm.
FAQ questionWhy does chocolate glaze crack and how do I prevent it?
Cracking happens when temperature contrast is too high (hot glaze on very cold cake) or when the formulation lacks flexibility. Keep the glaze at 32–34°C and the cake slightly chilled, not frozen. Include a small amount of fat (butter) and invert sugar/corn syrup to add elasticity. Pour in a steady, continuous stream and avoid moving the cake while it sets to prevent stress lines.
FAQ questionWhat chocolate should I use for the smoothest, shiniest finish?
Choose dark couverture (≈70% cocoa) with a high cocoa-butter content; it melts evenly and emulsifies beautifully. Finely chop it for uniform melting and combine with warm cream to form a stable emulsion. Avoid compound chocolate with vegetable fats—it sets dull and can seize more easily.
FAQ questionHow do I fix a dull or streaky glaze?
Dullness usually means the glaze was too cool or over-agitated. Gently rewarm to pourable viscosity, then strain through a fine sieve to eliminate bubbles and unmelted bits. If it’s still thick, blend in 1–2 tsp warm cream to restore gloss and flow. Always stir slowly from center outward to protect the emulsion.
FAQ questionCan I replace corn syrup, and will it still not crack?
Yes—use glucose syrup or invert sugar for similar shine and flexibility. Honey works in a pinch but adds flavor and can slightly soften the set. Avoid granulated sugar; it can crystallize and reduce gloss. Whatever the substitute, keep the liquid sugar ratio modest to avoid a runny finish.
FAQ questionHow much glaze do I need for different cakes?
Plan on about 250–300 ml for an 8-inch (20 cm) round cake, 350–400 ml for a 9-inch (23 cm), and 120–150 ml for a loaf, tart, or 12 eclairs. It’s better to have 10–15% extra to ensure a single, uninterrupted pour, which is key for a seamless surface.
FAQ questionCan I glaze frozen cakes or mousse cakes?
You can, but excess frost causes condensation and matte spots. For mirror-smooth results, let the frozen item temper a few minutes so the surface isn’t icy, then pour at 32–34°C. If beads of moisture appear, dab gently before glazing; water interferes with emulsification and shine.
FAQ questionHow do I store and reuse leftover glaze without losing the sheen?
Refrigerate in an airtight container with plastic wrap touching the surface for up to 5 days. Rewarm slowly (double boiler or short microwave bursts), stirring until silky and homogeneous. If it thickens or splits, emulsify with a splash of warm cream or use an immersion blender in short pulses to restore gloss and fluidity.
A perfect chocolate glaze is more than a finishing touch—it’s a statement of precision, patience, and understanding how ingredients behave together. Every element, from the quality of chocolate to the temperature of the cream, plays a vital role in achieving that glossy, unbroken surface. The moment the warm glaze flows evenly over a cake and sets without a single crack is pure satisfaction for anyone who loves the craft of baking.
Creating that smooth, reflective coating is about more than just appearance. It enhances the texture and flavor balance, turning an ordinary dessert into something remarkable. The glaze’s thin, elastic layer melts softly on the palate, amplifying the deep notes of cocoa while adding a luxurious visual shine. Whether you’re preparing a birthday cake, éclairs, or elegant petits gâteaux, this glaze guarantees a professional finish that catches both light and attention.
What makes this method special is how easily it can be adapted. The same base technique supports endless creative variations—a touch of espresso, a swirl of caramel, or a hint of sea salt. Each twist reveals a new dimension while preserving that unmistakable silky consistency. Once you master the texture, it becomes a versatile essential in your baking routine.
Every pour tells its own story. The steady flow of melted chocolate, the glossy ripple spreading over a perfectly leveled cake, the quiet patience as it sets—these moments define the artistry of baking. With a balanced emulsion, steady hand, and the right timing, your chocolate glaze will stay smooth, stable, and picture-perfect every time.
Allergens present in the recipe:
- Milk (from cream and butter)
- Possible traces of soy (depending on chocolate brand)
- Gluten-free if pure chocolate and corn syrup are used
Substitution tips for allergens and gluten:
- Replace heavy cream with coconut cream for a dairy-free option.
- Use vegan butter or margarine instead of dairy butter.
- Choose certified gluten-free chocolate if necessary.
- Iron 2.5 mg – supports oxygen transport in the blood.
- Magnesium 35 mg – helps regulate muscle and nerve function.
- Calcium 25 mg – contributes to strong bones and teeth.
- Potassium 180 mg – supports heart health and proper fluid balance.
- Phosphorus 60 mg – essential for cell energy and bone maintenance.
- Flavonoids 180 mg – improve blood flow and reduce inflammation.
- Polyphenols 250 mg – protect cells from oxidative stress and aging.
- Catechins 40 mg – strengthen immune response and cardiovascular health.
Recipes worth trying