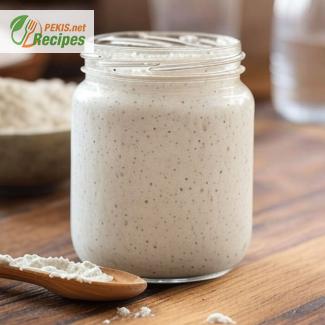
Creating a sourdough starter from scratch is a culinary adventure that combines tradition, patience, and the magic of fermentation. This process, which has been cherished by bakers for centuries, transforms simple ingredients—flour and water—into a living, bubbling culture that will elevate your baking. Whether you’re an experienced baker or a beginner, making your own sourdough starter is a rewarding journey that brings a sense of accomplishment and a deeper connection to the food you create.
Why Make a Sourdough Starter?
A homemade sourdough starter is the heart of artisanal bread baking. Unlike commercial yeast, a sourdough starter relies on naturally occurring wild yeast and lactic acid bacteria. These microorganisms develop a unique flavor profile, giving sourdough its signature tangy taste and complex aroma. Moreover, sourdough bread is often easier to digest and has a lower glycemic index, making it a healthier alternative to conventional bread.
Crafting your starter from scratch ensures you have a reliable, additive-free base for your bread. It’s an ongoing relationship—you’ll nurture your starter, feed it regularly, and watch it grow into a robust culture that can last for years with proper care.
The Process: Simple Ingredients, Extraordinary Results
Creating a sourdough starter requires just two ingredients: flour and water. But the magic lies in the details. The right type of flour, water quality, and room temperature play critical roles in the success of your starter. Whole-grain flours like rye or whole wheat are particularly effective for starting the fermentation process because they contain more nutrients and natural yeast than refined flours.
Over 5 to 7 days, you’ll combine these ingredients in specific proportions, allowing natural fermentation to occur. Each day, you’ll discard a portion of the mixture and "feed" it with fresh flour and water. As the days progress, you’ll notice your starter developing a pleasant, slightly tangy aroma and a bubbly texture, indicating that it’s alive and thriving.
What Makes a Good Sourdough Starter?
A healthy sourdough starter should be bubbly, active, and slightly tangy in smell. It should double in size within 4-6 hours of feeding and show visible air pockets, which indicate fermentation. The texture will be thick and stretchy, with a consistency similar to pancake batter. When ready, your starter will have the strength to leaven dough, producing bread with a chewy crumb and a beautifully crusty exterior.
The Rewards of Patience and Persistence
The process of cultivating a sourdough starter requires patience, but the rewards are well worth the effort. Not only will you gain a versatile baking tool, but you’ll also join a rich tradition of bakers who have embraced the natural rhythms of fermentation. A well-maintained starter can be used for much more than bread—it can inspire recipes for pancakes, waffles, crackers, and even cakes.
Troubleshooting and Tips for Success
While the process is straightforward, there are challenges you may encounter along the way. A sluggish starter may need a change in feeding schedule, warmer temperatures, or a switch to a different type of flour. Unpleasant odors or mold can indicate contamination, but these issues are easy to avoid with proper care and hygiene.
To increase your chances of success:
- Use filtered or non-chlorinated water to avoid killing the yeast.
- Maintain a consistent feeding schedule, ideally every 12 hours during the early stages.
- Keep the starter in a warm spot, around 22-26°C (72-78°F), to encourage fermentation.
A Lifelong Baking Companion
Once established, your sourdough starter becomes a part of your culinary repertoire, evolving with time and care. It’s a testament to the beauty of slow food—nurturing an ingredient that grows and improves with age. Whether you use it weekly or store it in the refrigerator for occasional use, your starter will remain a reliable companion in your kitchen.
Embark on this journey of crafting a sourdough starter from scratch, and discover the joy of baking bread that is as flavorful as it is nourishing. Each loaf you create will carry the unique character of your starter, connecting you to a timeless tradition of artisanal baking.
- Day 1:
Combine 100 g (3.5 oz) whole-grain flour and 100 ml (3.4 fl oz) filtered water in a clean glass jar or bowl. Mix thoroughly until smooth. Cover loosely with a cloth or lid. Let it rest at room temperature (22-26°C or 72-78°F) for 24 hours. - Day 2:
Check for signs of bubbles or activity. If present, discard half of the mixture and add 100 g (3.5 oz) all-purpose flour and 100 ml (3.4 fl oz) filtered water. Stir well. If no activity is visible, repeat the process and wait another 24 hours. - Days 3-6:
Continue discarding half of the mixture daily and feeding it with equal parts (100 g / 3.5 oz flour and 100 ml / 3.4 fl oz water). By day 4 or 5, you should notice increased bubbling, a tangy smell, and doubling in volume within 4-6 hours of feeding. - Day 7:
Your starter should now be active and ready for baking. Test its readiness by dropping a spoonful into water—it should float. If not, continue feeding for another day or two. - Maintenance:
Once active, store the starter in the refrigerator and feed it weekly or keep it at room temperature with daily feedings for frequent use.
Enhancing Your Sourdough Starter Recipe: Tips and Ingredient Adjustments
Crafting a sourdough starter from scratch is a blend of science and art, offering room for experimentation and personalization. While the core ingredients remain simple—flour and water—making thoughtful adjustments can significantly impact the flavor, activity, and texture of your starter. Below are expert tips and suggestions for modifying ingredients and techniques to create a starter that suits your baking goals and flavor preferences.
Flour Choices: The Foundation of Flavor and Activity
Whole-grain flours
Using whole-grain flours like rye or whole wheat is an excellent choice for starting the fermentation process. These flours are rich in natural yeast and nutrients, which encourage a faster and more vigorous starter. Rye flour, in particular, creates a highly active starter with a slightly nutty and tangy flavor, making it perfect for those who enjoy a more robust sourdough profile.
Refined flours
Switching to all-purpose or bread flour after the initial stages of your starter creates a milder flavor and a smoother texture. These flours are lower in bran and germ, resulting in a more neutral-tasting bread that allows other ingredients, such as herbs or seeds, to shine.
Alternative flours
Experimenting with alternative flours, such as spelt, einkorn, or even gluten-free options, introduces unique flavors and textures. Spelt adds a slightly sweet and nutty taste, while einkorn enhances the starter’s natural creaminess. Gluten-free flours like rice or sorghum can be used to create a gluten-free starter, though they may require more frequent feeding due to their lower protein content.
Water Adjustments: The Often Overlooked Ingredient
Filtered or spring water
Using filtered or spring water is essential for a healthy sourdough starter. Tap water often contains chlorine or chloramine, which can inhibit fermentation. If these are your only options, let the water sit uncovered for 24 hours to allow the chemicals to evaporate.
Hydration levels
Adjusting the water-to-flour ratio can alter the starter’s texture and activity. A higher hydration starter (e.g., 120 ml (4 fl oz) water to 100 g (3.5 oz) flour) ferments more quickly and produces a tangier flavor. In contrast, a lower hydration starter (e.g., 80 ml (2.7 fl oz) water to 100 g (3.5 oz) flour) yields a thicker consistency and slower fermentation, often resulting in a milder taste.
Temperature Control: Fine-Tuning Fermentation
Temperature plays a significant role in the fermentation process. Warmer temperatures (24-26°C or 75-79°F) speed up activity, leading to a faster rise and a more pronounced sourness. Cooler temperatures (18-21°C or 64-70°F) slow down fermentation, developing more complex and subtle flavors. Adjust your starter’s environment to achieve the taste and activity level you prefer.
Pro Tip: If you live in a colder climate, place your starter near a warm spot, such as on top of the refrigerator or in an oven with the light on, to maintain consistent warmth.
Feeding Schedule: Balancing Activity and Flavor
Frequent feedings
Feeding your starter every 8-12 hours during the initial stages ensures a strong and active culture. This is particularly important if you’re aiming for a tangy, complex sourdough flavor.
Extended feeding intervals
Reducing the feeding frequency to once every 24 hours (or less when refrigerated) can mellow the starter’s flavor. This approach is ideal for bakers who prefer a lighter, less tangy bread.
Adjusting Flavor with Add-ins
While the traditional sourdough starter consists of just flour and water, adding certain ingredients can subtly influence the flavor:
- Honey or sugar: A small amount of honey or sugar can accelerate fermentation and add a hint of sweetness to your bread.
- Salt: A tiny pinch of salt slows down fermentation and enhances flavor complexity, though it’s typically not added until the baking stage.
Creating a Gluten-Free Starter
For those with gluten sensitivities, a gluten-free sourdough starter can be made using rice, sorghum, or millet flour. Keep in mind that gluten-free starters may ferment faster due to the absence of gluten structure. Feeding intervals should be adjusted accordingly, and gluten-free flours may need additional water to achieve the desired consistency.
How Changes Affect the Final Bread
Adjustments made to your starter directly influence the bread you bake:
- Tanginess: More frequent feedings, higher hydration, and warmer temperatures enhance sourness.
- Texture: Whole-grain flours produce denser, more flavorful bread, while refined flours yield a lighter crumb.
- Complexity: Allowing your starter to ferment at cooler temperatures over longer periods enhances the depth of flavor.
Troubleshooting Common Issues
- Weak activity: Try switching to whole-grain flour or increasing feeding frequency to boost fermentation.
- Overly sour starter: Reduce fermentation time or adjust hydration to moderate acidity.
- Unpleasant smells: Discard a portion of the starter, refresh with clean flour and water, and ensure your jar is clean.
Experimentation Leads to Mastery
Every sourdough starter develops its own unique characteristics based on the choices you make—flour type, water quality, feeding schedule, and environmental factors. By experimenting with these variables, you can create a starter that reflects your personal taste preferences and baking style.
Whether you aim for a tangy, robust sourdough or a mild, versatile base for your breads, these tips and techniques will help you unlock the full potential of your sourdough starter. With a bit of patience and creativity, the possibilities are endless.
This recipe contains gluten. To make it gluten-free, substitute with gluten-free flour (e.g., rice, sorghum, or buckwheat flour) and ensure all equipment is free from gluten contamination.
- B Vitamins: Present in whole-grain flour, supporting energy metabolism and brain health.
- Iron: Found in small amounts, essential for oxygen transport in the blood.
- Manganese: Promotes bone health and antioxidant function.
- Magnesium: Important for muscle function and nerve signaling.
- Phenolic Compounds: Found in whole-grain flour, beneficial for reducing oxidative stress.
- Ferulic Acid: Present in whole grains, supports skin health and reduces inflammation.
Embark on this delightful journey of creating your sourdough starter, and enjoy the rewards of baking naturally leavened bread with a flavor that’s uniquely your own.
