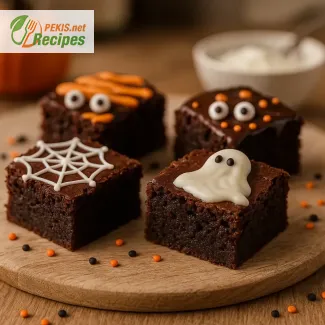
Serves 12 pieces, ready in 20 minutes prep, 25 minutes bake, 45 minutes total. These spooky Halloween brownie bites combine rich dark chocolate, cocoa powder, and a chewy texture, topped with eerie decorations like icing and candy eyes. Perfect for parties, they stay fresh at room temperature for 2 days or can be frozen up to 2 months. Easy to reheat at 150 °C (300 °F) for 8–10 minutes, making them a fun and festive treat that’s both indulgent and practical.
PEKIS – professional chef and recipe developer with more than 25 years of experience, specializing in European and international cuisine. For these Halloween brownie bites, I’ve drawn on years of baking seasonal desserts where presentation matters just as much as flavor. I’ve worked countless times with chocolate-based treats for festive occasions, experimenting with textures and decorations that hold up well on party tables. My approach here is to keep the brownie base fudgy, while letting the decorations bring out the playful, spooky side of the holiday.
Frightfully Delicious Brownie Bites for Halloween Parties
Chocolate-dipped treats with spooky seasonal flair
Bite-sized brownies dressed up for Halloween instantly set the mood for any gathering. The rich chocolate base pairs with playful, eerie decorations that capture the spirit of the holiday. Whether topped with spider webs, ghostly swirls, or candy eyes, these Halloween brownie bites strike the perfect balance between indulgence and festive fun. Their small size makes them easy to grab from a dessert table, while the deep cocoa flavor ensures each mouthful feels satisfyingly decadent.
Origins and tradition of brownies with a spooky twist
The brownie has its roots in American baking at the end of the 19th century, evolving as a dessert that merged the intensity of chocolate cake with the chewy density of a cookie. Over time, brownies became a canvas for seasonal creativity. For Halloween, bakers began to experiment with adding thematic toppings and colors, transforming a simple square into a miniature edible artwork. These playful adaptations are now a tradition in many households, linking nostalgia with modern creativity.
Why you will love these Halloween brownie bites
- Portable and shareable – perfect for parties, buffets, or trick-or-treat gatherings.
- Rich chocolate flavor that stands out, even under layers of decoration.
- Kid-friendly size and design make them appealing to both children and adults.
- Versatile decorations allow personalization with icing, candy, or themed sprinkles.
- Make-ahead friendly, so you can prepare without stress on the day of your event.
Key elements that define spooky brownie bites
When crafting these treats, the texture of the brownie base matters most. A chewy and slightly fudgy center holds toppings securely, while a crisp edge gives structural support. Adding melted chocolate or a ganache coating creates a glossy finish that acts as an edible adhesive for decorations. Seasonal accents such as orange-tinted icing, black sprinkles, or candy corn add a pop of color and tie the dessert visually to Halloween. Miniature edible decorations like sugar eyes, bats, or pumpkin candies add the final touch of frightful charm.
Creative variations for Halloween brownie bites
- Mummy brownies: drizzle white icing in thin strands, then add candy eyes.
- Spider web brownies: pipe concentric circles of white chocolate and drag a toothpick outward for a web effect.
- Pumpkin patch brownies: top with green icing vines and small pumpkin candies.
- Graveyard brownies: insert half a cookie to resemble a tombstone and scatter crushed chocolate cookies for “soil.”
- Witch hat brownies: finish with a chocolate cone hat and a colored icing band.
Storing and making ahead
Brownie bites can be stored at room temperature for 2 days in an airtight container to maintain moisture and freshness. For longer storage, they freeze well for up to 2 months without losing flavor or texture. Simply thaw at room temperature before serving. If you prefer to serve them warm, reheat in the oven at 150 °C (300 °F) for 8–10 minutes, which revives the soft chewiness and enhances the chocolate aroma.
How decorations and ingredients influence results
The type of chocolate used determines the depth of flavor – darker cocoa brings intensity, while milk chocolate adds sweetness. Butter enriches the batter and ensures a tender crumb. A small amount of flour balances the fudgy density without turning the brownies cakey. Sweet decorations like icing, sprinkles, or candy provide visual appeal, while also layering additional textures. For adults, touches of sea salt or chili flakes can be added for sophistication, contrasting with the sweetness and aligning with the dramatic Halloween theme.
Enticing presentation ideas for gatherings
- Serve on a dark platter with cobweb decorations for a theatrical effect.
- Place each bite in a colorful cupcake liner for easier handling.
- Mix variations on a single tray – mummies, spiders, pumpkins – for a diverse visual spread.
- Add themed toppers such as mini flags, toothpick bats, or paper pumpkins for added flair.
Festive entities in focus: brownies, chocolate, and Halloween desserts
Brownies have become more than just a baked good; they are a symbol of comfort, indulgence, and creativity. Combined with Halloween desserts, they highlight the playful intersection of food and celebration. The small, bite-sized form creates an ideal match for party settings, while the chocolate base provides a timeless flavor that bridges tradition and modern festivity. These elements together embody why spooky brownie bites remain a favorite during the Halloween season.
- Preheat the oven to 175 °C (350 °F). Line a square baking pan with parchment paper.
- Melt dark chocolate and butter together over a water bath until smooth, then let cool slightly.
- Whisk granulated sugar, brown sugar, and eggs until fluffy. Add vanilla extract.
- Stir the melted chocolate mixture into the egg mixture until combined.
- Sift flour, cocoa powder, baking powder, and salt together. Gently fold into the batter.
- Add chocolate chips and mix briefly.
- Pour the batter into the prepared baking pan and spread evenly.
- Bake for 25 minutes, until the top is set but the center remains slightly fudgy.
- Allow to cool completely, then cut into small bite-sized squares.
- Decorate with icing, candy eyes, or themed sprinkles to create spooky Halloween effects.
FAQ questionHow do I keep the brownie bites fudgy, not cakey?
Aim for a higher fat-to-flour ratio, mix just until combined, and avoid overbaking. Pull them when the top looks set with a thin, shiny crust and a toothpick shows moist crumbs (not wet batter). Use a metal 20 × 20 cm (8-inch) pan for even heat; glass bakes slower and can dry the edges. Let the slab cool completely before cutting—carryover heat finishes the center without drying it out.
FAQ questionWhat chocolate and cocoa work best for deep flavor?
Choose 60–70% dark chocolate for a balanced, intense base and pair it with unsweetened cocoa powder for depth. Natural cocoa gives brighter chocolate notes, while Dutch-processed adds smoother, darker flavor and a richer color. Folding in a handful of chocolate chips at the end boosts pockets of melted chocolate in each bite.
FAQ questionCan I make them ahead and how should I store them?
Yes—cool completely, then store airtight at room temperature for 2 days to keep the crumb moist and chewy. For longer storage, freeze (preferably undecorated) for up to 2 months; thaw covered at room temp to prevent condensation. To refresh before serving, warm at 150 °C (300 °F) for 8–10 minutes—the fudgy center springs back without turning cakey.
FAQ questionHow do I get decorations to stick and look sharp?
Start with a fully cooled surface. Spread a thin layer of melted chocolate or ganache as a “glue,” then add candy eyes, sprinkles, or piped spider webs/mummy lines. For quick-setting details, use royal icing or a chocolate drizzle; a brief chill (5–10 minutes) helps decorations set cleanly and resist smearing on the platter.
FAQ questionWhat’s the cleanest way to cut bite-size squares?
Chill the baked slab for 30–45 minutes, then mark a grid with a ruler for even pieces. Use a long, sharp knife, wiping the blade between cuts for crisp edges. For party trays, aim for 3–4 cm squares. Prefer a no-cut method? Portion the batter into a mini muffin tin for uniformly round brownie bites with neat edges.
FAQ questionHow can I adapt for gluten-free, dairy-free, or egg-free diets?
Swap wheat flour for a 1:1 gluten-free blend (with xanthan gum) to keep the structure; avoid overbaking, as GF crumbs dry faster. Use plant-based butter and dairy-free dark chocolate for a lactose-free version. Replace each egg with a flax “egg” (1 tbsp ground flax + 3 tbsp water) to maintain moisture and binding—expect a slightly denser, fudgier crumb.
FAQ questionIs a boxed mix okay if I’m short on time?
Absolutely. Enhance a good brownie mix by swapping oil for melted butter for richer flavor, whisk in 20–30 g cocoa for extra depth, and fold in chocolate chips for melty pockets. Bake a touch short of the package time for moist, fudgy centers, then finish with Halloween decorations once fully cooled.
Small squares of fudgy brownie topped with playful decorations bring instant charm to any Halloween celebration. The contrast between the rich chocolate base and the colorful toppings makes them stand out on a party table, while the bite-sized format ensures they are easy to enjoy without fuss. Each piece delivers the familiar comfort of a classic brownie with just enough spooky flair to delight both children and adults.
Serving these Halloween brownie bites at gatherings creates a centerpiece that combines taste and atmosphere. Their moist texture and deep cocoa flavor anchor the recipe, while the decorations—whether spider webs, candy eyes, or icing swirls—add variety and excitement. Guests appreciate the combination of indulgence and seasonal creativity, making them a reliable hit year after year.
The recipe also adapts well to different needs. With simple swaps, the brownies can become gluten-free, dairy-free, or even egg-free, keeping them accessible without losing flavor. Decorations can be tailored to suit your theme, from lighthearted designs to darker gothic styles, giving endless room for personalization.
Stored correctly, these treats maintain their freshness and texture for days or months, making them practical for busy hosts. Whether served straight from the oven or decorated in advance, they offer convenience alongside indulgence. Their balance of chocolate richness, festive visuals, and flexible preparation ensures these spooky brownie bites remain a Halloween favorite worth returning to every year.
Allergens present in the recipe:
- Gluten (from wheat flour)
- Eggs
- Dairy (butter, chocolate)
- Possible traces of soy (in chocolate)
Suggestions for substitutions:
- Replace wheat flour with oat flour or almond flour for a gluten-free version.
- Use dairy-free margarine and vegan chocolate to avoid milk allergens.
- Replace eggs with flaxseed meal mixed with water (1 tbsp flaxseed + 3 tbsp water per egg).
- Vitamin A 90 µg – supports vision and immune function.
- Vitamin D 0.4 µg – contributes to bone health.
- Calcium 28 mg – important for strong bones and teeth.
- Iron 2.1 mg – supports red blood cell production.
- Magnesium 34 mg – aids muscle and nerve function.
- Potassium 180 mg – contributes to normal blood pressure.
- Zinc 0.8 mg – supports immune system function.
- Flavonoids 180 mg – reduce oxidative stress and support heart health.
- Polyphenols 220 mg – linked to improved circulation and anti-inflammatory benefits.
- Catechins 40 mg – promote cellular protection.
Recipes worth trying