The Pinocchio Cake serves 12 portions and comes together in just 45 minutes of prep and 35 minutes of baking for a total of 80 minutes. This whimsical layered cake combines soft vanilla sponge, creamy buttercream, and a playful fondant figure inspired by the classic wooden puppet. Its charm lies in the simple yet artistic fondant decoration, ideal for birthdays or themed celebrations. The sponge stays moist for days when brushed with syrup, and the cake can be prepared in advance—fondant decorations can be made up to two days before serving.
PEKIS – a professional chef and recipe developer with over 25 years of experience in cooking and baking, specialized in European and international cuisine. I’ve always loved turning simple ideas into playful desserts, and this Pinocchio Cake is one of those creations that blend storytelling with sweetness. Working with fondant and modeling paste has taught me how much joy small edible details can bring, especially when they remind us of childhood tales. This cake captures that feeling perfectly – a mix of creativity, nostalgia, and craftsmanship in every layer.
Enchanting Celebration Cake Inspired by Pinocchio’s Timeless Story
A creative fondant design that brings fairy-tale magic to your dessert table
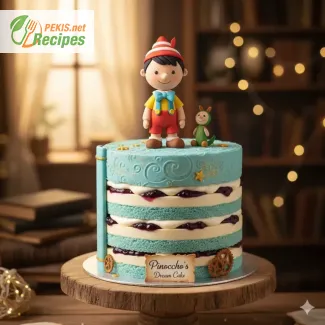
A Pinocchio Cake transforms a classic layered dessert into a whimsical centerpiece, where each tier tells part of the story of the beloved wooden puppet who dreamed of becoming a real boy. The smooth buttercream layers form the perfect canvas for a fondant figure of Pinocchio, delicately modeled by hand to capture his playful character and iconic hat. Soft vanilla sponge, silky cream, and subtle notes of chocolate or fruit form a perfect balance of flavors, while the decoration adds that magical fairy-tale touch ideal for birthdays, children’s parties, or nostalgic celebrations.
The design of this cake highlights the beauty of creative fondant work, combining simplicity and charm. The main figure—crafted from pliable modeling paste—is intentionally kept easy to make, allowing even beginners to achieve impressive results. The cake can be adapted with various fillings, from light whipped cream to rich chocolate ganache, or even fruit-based layers that enhance both taste and color contrast. Every slice not only delights the taste buds but also captures the imagination of guests, making it a dessert that celebrates both artistry and sweetness.
The fairy-tale origin and inspiration behind the Pinocchio cake
The Pinocchio theme draws inspiration from the timeless tale written by Carlo Collodi, where the puppet’s journey toward honesty and humanity has charmed generations around the world. In Italy, the story of Le avventure di Pinocchio symbolizes childhood wonder and moral lessons, often reflected in themed desserts served during family celebrations. Over time, the Pinocchio cake has evolved from simple sponge layers to elaborate creations decorated with sugar figures and edible illustrations. The idea of shaping Pinocchio from fondant or sugar paste adds a storytelling dimension—every feature from his pointed nose to his red suspenders becomes an edible artwork, merging narrative and confectionery craft into one creation.
Why you’ll love this Pinocchio cake
- Perfect for children’s birthdays – it brings a storybook hero to life in edible form.
- Beginner-friendly decoration – the fondant figure is simple to sculpt with basic tools.
- Versatile flavor combinations – pairs well with chocolate, vanilla, or fruit fillings.
- Show-stopping centerpiece – instantly becomes the highlight of any dessert table.
- Customizable design – adapt colors, layers, and figure expressions for any occasion.
Creative variations for your Pinocchio-themed cake
- Chocolate forest Pinocchio: Replace the base sponge with chocolate layers and decorate with green fondant trees for a scene from the enchanted woods.
- Caramel puppet show version: Add a thin layer of caramel glaze on top for a golden stage-like finish, symbolizing Pinocchio’s performance moments.
- Fruit fantasy: Fill each layer with strawberry or raspberry puree to give a vibrant, fairy-tale red interior.
- Whipped cloud edition: Use a lighter whipped cream frosting and pale colors to evoke the dreamy innocence of childhood stories.
How fondant and sponge textures create balance
The fondant layer gives the cake its signature smoothness and durability, making it easy to shape and color. Beneath it, the sponge layers provide softness and moisture, while fillings add richness and depth. Vanilla or lemon sponges keep the structure light, whereas chocolate or nut-based versions deliver a more decadent experience. The combination of creamy butter layers, sugar paste decoration, and handcrafted modeling elements ensures both visual and textural harmony—each bite feels balanced and luxurious.
Decorative elements that capture Pinocchio’s personality
The fondant figure at the center of this creation represents the essence of playfulness and storytelling. Small details like edible buttons, painted facial features, and a tiny fondant hat breathe life into the character. The use of primary colors—yellow, red, and blue—reflects the traditional imagery of Pinocchio’s outfit. For added charm, tiny sugar stars, ribbons, or wood-grain textures can be incorporated to evoke the puppet’s origins. The artistry lies in keeping the details simple yet expressive, ensuring the final cake remains both elegant and joyful.
Preparation and make-ahead storage
This layer cake can be prepared in stages to save time. The sponge layers can be baked up to two days in advance and stored airtight at room temperature. Buttercream or mousse fillings can be kept refrigerated for 24 hours before assembly. Once decorated with fondant, the cake should be stored in a cool, dry place away from moisture and direct sunlight to preserve the modeling paste figure. Avoid refrigeration after fondant application, as condensation may soften the surface.
For large events or themed parties, the fondant figure can even be sculpted several days ahead, allowing it to firm up and maintain its shape perfectly on the day of presentation.
Artistic fondant cake design for themed celebrations
The Pinocchio Cake belongs to a broader tradition of story-inspired cakes, where edible art meets classic storytelling. It combines cake decorating techniques, sugar modeling, and creative design, bridging the gap between pastry craftsmanship and childhood nostalgia. Ideal for professional bakers, hobby decorators, or parents planning a special occasion, this cake embodies both creativity and tradition—proof that the simplest ideas, when combined with imagination, can produce unforgettable desserts.
- Prepare the sponge:
Preheat the oven to 180°C (350°F). Grease and line two 20 cm (8-inch) round cake tins. In a large bowl, beat butter and sugar until light and creamy. Add eggs, one at a time, mixing well after each addition. Stir in vanilla extract.
In a separate bowl, sift together flour, baking powder, and salt. Gradually add to the butter mixture, alternating with milk, until a smooth batter forms. Divide evenly between pans and smooth the tops. - Bake:
Bake for 30–35 minutes, or until a skewer inserted into the center comes out clean. Let the cakes cool in the pans for 10 minutes, then transfer to a wire rack to cool completely. - Prepare the syrup (optional):
Combine water and sugar in a small saucepan. Heat until the sugar dissolves, then add vanilla and cool completely. Brush each cake layer lightly with syrup to keep them moist. - Make the buttercream filling:
Beat softened butter until pale and fluffy. Gradually add powdered sugar, beating continuously. Add cream and vanilla extract; whip until the mixture is smooth and creamy. - Assemble the cake:
Place one sponge layer on a serving board. Spread an even layer of buttercream, then add the second layer on top. Cover the entire cake with a thin crumb coat of buttercream. Chill for 15 minutes, then apply a smooth final layer. - Cover with fondant:
Roll out the white fondant on a cornstarch-dusted surface to about 3 mm thickness. Carefully cover the cake, smoothing with your hands or a fondant smoother. Trim the edges neatly at the base. - Create the Pinocchio figure:
Use modeling paste to shape Pinocchio’s head, body, hat, and limbs. Use colored fondant for clothing details. Attach parts using edible glue or a small brush dipped in water. Allow the figure to dry for at least 12 hours before placing it on the cake. - Final decoration:
Add extra fondant details like stars, books, or wood textures to enhance the fairy-tale theme. Arrange the Pinocchio figure gently on top as the central element. Optionally, dust with edible shimmer for a magical finish.
FAQ questionHow do I keep the fondant figure simple but expressive?
Start with modeling paste for stability; it dries firmer than standard fondant. Build basic shapes first (ball head, cone hat, cylinder limbs), then add minimal, high-impact details: a small nose, painted eyes, and colored “clothing” panels. Keep edges smooth with a little edible glue or water and let pieces dry separately before assembly so the figure stands without slumping.
FAQ questionWhat cake base works best under fondant for this design?
Choose a tight-crumb vanilla sponge or butter cake; it supports carving and stays moist. Apply a thin crumb coat of buttercream, chill until firm, then a smooth final coat—this creates the flat, stable surface fondant needs. Avoid high-moisture fillings that leak; keep juicy layers contained (buttercream dam or set ganache) to protect the fondant.
FAQ questionCan I make parts ahead without losing freshness?
Yes. Bake sponges 1–2 days in advance and wrap airtight at room temperature. Sculpt the fondant/modeling paste figure 24–48 hours ahead so it firms up. Once covered in fondant, store the cake cool and dry (not refrigerated) to prevent condensation. If your kitchen is humid, place the cake in a cardboard box to buffer moisture.
FAQ questionHow do I prevent fondant from cracking or elephant skin?
Knead fondant until pliable and warm; dry fondant cracks. Lightly coat hands with vegetable shortening if it resists. Roll to ~3 mm thickness on a cornstarch-dusted surface, then smooth quickly to avoid drying. If small cracks appear, rub with a tiny amount of shortening or use a fondant smoother in circular motions to blend.
FAQ questionWhat’s the best way to keep the sponge moist without making it soggy?
Brush layers with a light vanilla syrup (cool syrup, thin coat only). Focus on exposed cut surfaces, not the outer crust. Let syrup absorb fully before filling. This maintains a soft, even crumb for several days, especially useful when decorating over multiple sessions.
FAQ questionHow do I transport the cake without damaging the figure?
Dry the figure fully before placement. Insert toothpicks or food-safe skewers into legs/torso (if sized appropriately) for anchoring. Chill the buttercream-coated, fondant-covered cake briefly to set (avoid long refrigeration). Use a non-slip mat, a fitted box, and keep the cake level during transit; add the figure on-site if travel is long or bumpy.
The Pinocchio Cake celebrates both creativity and tradition, merging the sweetness of a homemade dessert with the storytelling magic of childhood. Its layered sponge, smooth buttercream, and charming fondant design create more than just a cake—it becomes a centerpiece of imagination, perfect for moments shared with family and friends. Every element, from the handcrafted figure to the delicate flavors, reflects the joy of turning simple ingredients into something extraordinary.
Behind the playful fondant details lies a balance of skill and simplicity. Even without advanced decorating experience, anyone can shape a small figure or smooth a fondant layer with patience and care. The reward is a dessert that feels personal and handcrafted—an edible piece of art that connects emotion, craft, and flavor in every slice.
What makes this cake stand out is its versatility. It adapts easily to different occasions—children’s birthdays, themed parties, or nostalgic gatherings—and allows countless variations in colors, fillings, and decorative accents. The base remains the same: soft sponge, creamy filling, and a story-inspired touch that never fails to impress.
As it rests on the table, the Pinocchio Cake invites both wonder and conversation. It’s a reminder that baking can be both a creative outlet and a celebration of memories. Whether you bake it for a child’s smile or your own love of storytelling, each layer tells a tale—sweet, colorful, and unforgettable.
Allergens present in the recipe:
- Gluten (flour)
- Eggs
- Milk and dairy (butter, cream)
Substitution tips for allergens and gluten:
- Replace all-purpose flour with gluten-free baking flour mix (same amount).
- Use plant-based margarine and non-dairy cream instead of butter and cream.
- Replace eggs with unsweetened applesauce (60 g / ¼ cup per egg) or chia seed gel (1 tbsp chia + 3 tbsp water).
- Calcium: 65 mg – supports strong bones and teeth.
- Iron: 0.9 mg – contributes to normal oxygen transport in the blood.
- Vitamin A: 180 µg – important for vision and immune function.
- Vitamin B2 (Riboflavin): 0.25 mg – aids in energy metabolism.
- Vitamin D: 0.8 µg – helps with calcium absorption.
- Potassium: 120 mg – supports normal muscle and nerve function.
- Magnesium: 12 mg – important for muscle performance and energy production.
- Vitamin E: 0.7 mg – protects cells from oxidative stress.
- Beta-carotene: 150 µg – promotes healthy skin and vision.
- Polyphenols: 20 mg – naturally found in vanilla and cocoa (support heart health and reduce inflammation).
