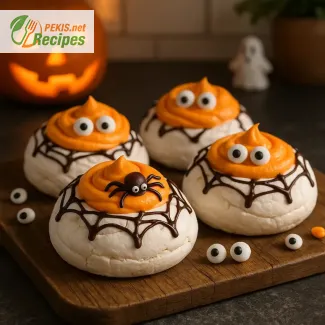
Serves 8 portions with a 25-minute prep, 90-minute bake, and a total of 115 minutes, these Spooky Halloween Pavlova Nests deliver crisp meringue shells with a soft marshmallow center. Made from egg whites, sugar, cornstarch, vinegar, and cream, they are decorated with dark chocolate cobwebs and candy eyes for a festive touch. Naturally gluten-free, they can be stored in an airtight container for 2 days or frozen for up to 2 months, making them perfect for Halloween parties and kid-friendly gatherings.
PEKIS – professional chef and recipe developer with more than 25 years of experience, specialized in European and international cuisine. For these Spooky Halloween Pavlova Nests, I’ve drawn on my long practice in working with meringues and festive desserts, refining textures and decorations to make them both fun for kids and elegant enough for themed parties.
Enchanting Pavlova Nests Perfect for a Spooky Halloween Celebration
Delicate meringue creations with eerie decorations for festive gatherings
Light, crisp on the outside and chewy at the center, Pavlova nests are transformed into an unforgettable centerpiece when paired with Halloween-inspired decorations. Their fragile structure becomes the perfect canvas for cobweb effects, drizzles of dark chocolate, swirls of orange-tinted cream, and even candy spiders that bring a spooky yet playful charm. Ideal for children’s parties, autumn celebrations, or themed gatherings, these bite-sized treats combine visual creativity with a delightful contrast of textures that always surprise guests.
The origin of Pavlova dates back to the 1920s, created in honor of Russian ballerina Anna Pavlova during her tours of Australia and New Zealand. Traditionally topped with cream and fruit, this dessert evolved into smaller individual nests, making them versatile for seasonal adaptations. For Halloween, they capture the essence of both elegance and eeriness, showing how a classic dessert can embrace playful transformations.
Why these Pavlova nests stand out
- Spooky design with cobweb-style decorations and edible creatures
- Kid-friendly dessert that balances fun and flavor
- Light texture from airy meringue combined with creamy toppings
- Customizable colors with food gels, sprinkles, or themed candies
- Impressive centerpiece for Halloween dessert tables and buffets
Creative twists for spooky variations
Halloween desserts thrive on imagination, and Pavlova nests provide the perfect foundation. They can be tinted with a touch of natural food coloring to achieve shades like midnight black or pumpkin orange, then filled with whipped cream swirls or tangy curd to balance sweetness. For an even more haunting effect, drizzle melted chocolate in web patterns or dust with edible glitter for a moonlit glow. Mini marshmallows shaped into ghosts or gummy worms crawling over the surface give children a thrill, while adults can appreciate the refined crunch paired with a smooth filling.
Ingredients that shape the final result
The success of these spooky Pavlova nests lies in the precise balance of simple elements. Egg whites create the stable base, sugar adds both sweetness and structure, and a touch of vinegar or cornstarch ensures the soft, marshmallow-like center. The topping, whether whipped cream, mascarpone, or a fruity curd, adds richness, while decorations like chocolate, candy, or seasonal fruits elevate both visual and flavor complexity. Every component contributes to the playful yet indulgent character of this dessert.
Storing and preparing in advance
These Pavlova nests are best enjoyed fresh, but they can be made ahead with careful storage:
- At room temperature: keep in an airtight container for up to 2 days.
- Freezing: store undecorated nests for up to 2 months, thawing gently before use.
- Reheating: if they lose crispness, warm in the oven at 150 °C (300 °F) for 8–10 minutes.
Occasions and serving ideas
Halloween celebrations are just one way to highlight these desserts. Their individual serving size makes them perfect for birthday parties, school events, or themed dinner gatherings. Presented on a tiered stand or arranged as a centerpiece, they capture attention instantly. Guests are encouraged to interact with the decorations, making them as much a conversation piece as a sweet indulgence.
The entity-driven artistry of Halloween Pavlova nests
Pavlova nests embody more than a simple dessert: they merge culinary tradition, seasonal creativity, and visual storytelling. Each bite links the airy lightness of a ballet-inspired classic with the dark, whimsical imagery of Halloween. The result is a festive treat that delights across generations, equally loved by children for its fun shapes and by adults for its elegance. With just a few adjustments, this timeless meringue transforms into the ultimate Halloween dessert experience.
- Preheat the oven to 120 °C (250 °F) and line a baking tray with parchment paper.
- Whip the egg whites in a clean, grease-free bowl until soft peaks form.
- Gradually add the caster sugar, one spoon at a time, whisking until glossy stiff peaks form.
- Gently fold in the cornstarch, vinegar, and vanilla extract to stabilize the meringue.
- Spoon the mixture onto the prepared tray, shaping into 8 small nests with a hollow center.
- Bake for 90 minutes, then switch off the oven and leave the meringues to cool inside with the door slightly open.
- Whip the heavy cream with powdered sugar until soft peaks form. Add a few drops of food coloring for a Halloween effect.
- Fill the cooled meringue nests with whipped cream.
- Drizzle with melted dark chocolate in a cobweb pattern.
- Decorate with candy eyes or spooky-themed sweets before serving.
FAQ questionHow do I keep Pavlova nests crisp and not chewy?
Aim for stiff, glossy peaks before baking and use a low-and-slow bake (about 120 °C / 250 °F). Spread sugar in gradually so it fully dissolves—undissolved crystals draw moisture and cause weeping. Dry the nests in the switched-off oven with the door slightly ajar, then cool completely and store in an airtight container with a paper towel. Avoid humid days or decorate just before serving to prevent softening.
FAQ questionWhy do my meringues crack or collapse?
Cracks come from rapid temperature changes or over-beating. Stop mixing as soon as the meringue is thick, shiny, and holds peaks; over-whipping weakens structure. Bake on the middle rack, resist opening the door, and let the nests cool slowly in the oven. A small amount of cornstarch and vinegar helps stabilize the marshmallowy center while reducing collapse.
FAQ questionCan I make them ahead and how should I store them?
Yes—bake the nests up to 2 days ahead and keep them undecorated in an airtight container at room temperature. For longer storage, freeze the plain nests for up to 2 months, layered with parchment. Thaw at room temp in the closed container to avoid condensation. If they lose crispness, refresh at 150 °C (300 °F) for 8–10 minutes, then cool before filling.
FAQ questionHow do I get vivid Halloween colors without ruining the texture?
Use gel or powder coloring (not liquid), adding the tiniest amount to the whipped cream or to a portion of the meringue if you’re swirling colors. Liquid dyes add water and can deflate the foam. For dramatic effects, finish with dark-chocolate cobwebs, candy eyes, or a cocoa dusting—all add contrast without excess moisture.
FAQ questionWhat’s the best way to pipe and shape neat nests?
Trace guides on parchment, flip it over, then pipe spirals with a raised rim or spoon and hollow the centers. Keep thickness even so the nests bake uniformly. If peaks form, smooth gently with a damp spatula. Leave space between nests for airflow; consistent sizing ensures even drying and clean presentation.
FAQ questionCan I make them dairy-free or egg-free?
For dairy-free, use whipped coconut cream and dairy-free chocolate. For egg-free, whip aquafaba (chickpea water) with sugar to stiff peaks; add a pinch of cream of tartar or a splash of vinegar for stability. Note that aquafaba meringues often need a longer drying time and benefit from a slightly lower temperature to avoid browning.
FAQ questionWhen should I add toppings to avoid sogginess?
Decorate just before serving. Add whipped cream and fruit or curd last, then finish with chocolate drizzles and candy. Moist toppings (curds, fresh fruit) migrate into the meringue, so assemble close to serving time. If you need to pre-assemble, brush the inside lightly with melted chocolate first; it sets a moisture barrier and keeps the nests crisp longer.
Spooky Halloween Pavlova Nests combine crisp meringue shells with a soft, marshmallow-like center and festive decorations that delight both children and adults. The balance of sweetness, lightness, and creativity makes them a centerpiece for any autumn celebration. Their delicate structure contrasts beautifully with whipped cream, chocolate drizzles, and playful candy, turning a simple dessert into something visually striking.
The recipe builds on the tradition of Pavlova, originally inspired by a ballerina’s elegance, and adapts it for a Halloween theme with cobwebs, eerie colors, and spooky garnishes. Each nest is a miniature showcase of seasonal fun that can be prepared in advance and finished quickly before serving. By combining basic pantry ingredients with imaginative toppings, these nests remain both accessible and impressive.
Their versatility allows for countless variations—dairy-free or egg-free versions, colorful swirls for party tables, or elegant minimalist designs with dark chocolate accents. Because they are naturally gluten-free, they fit easily into diverse menus. From children’s parties to sophisticated gatherings, Pavlova nests adapt to the occasion while maintaining their crisp texture and light flavor.
For hosts, the convenience of making them ahead of time and storing them properly adds to their appeal. For guests, the surprise of textures and decorations ensures they remain memorable long after the party. These Halloween Pavlova nests showcase how timeless desserts can evolve into playful seasonal treats while keeping their classic charm intact.
Allergens present in the recipe
- Eggs
- Dairy (cream, chocolate)
Tips for replacing allergens and gluten
- Replace eggs with aquafaba (chickpea water) in the meringue base.
- Replace dairy cream with whipped coconut cream.
- Use dairy-free chocolate alternatives.
- The recipe is naturally gluten-free.
- Calcium: 40 mg – supports bone health
- Potassium: 120 mg – contributes to muscle function
- Magnesium: 8 mg – supports energy production
- Phosphorus: 45 mg – important for teeth and bones
- Vitamin A: 150 IU – supports vision and skin health
- Vitamin B2 (Riboflavin): 0.1 mg – aids in energy metabolism
- Flavonoids from dark chocolate: 40 mg – support heart health and reduce inflammation
- Vitamin E from cream: 0.2 mg – protects cells from oxidative stress
- Polyphenols from cocoa: 35 mg – contribute to improved circulation and reduced oxidative damage
Recipes worth trying